
![]()
![]()
![]() Buy. Download. Create. Get Photoshop now at the Adobe Store.
Buy. Download. Create. Get Photoshop now at the Adobe Store.
![]() Photoshop for Students. Get super savings at the Adobe Education Store.
Photoshop for Students. Get super savings at the Adobe Education Store.
![]()
![]()
Create An Online Portfolio Gallery With Photoshop
Times really have changed! Only a few years ago it was par for the course to travel across town (or the country) lugging a heavy portfolio case full of treasured works, or mailing them to a faceless stranger. There was the fear of damage, or worse still, hearing the words, "Can you just leave it here with us for a few days," not knowing what will happen to them as soon as we turn our backs.
I have a hunch that the printed portfolio will be with us well into the future. However there is a growing trend to put a portfolio on the web. This has obvious advantages; Your site is up 24/7, it's cheap, can be viewed by anyone around the world and the potential audience is huge. Since launching PhotoshopCAFE.com almost 5 years ago, over 3 million people from around the world have viewed my portfolio, this would be impossible without the web.
Photoshop makes it very easy to build an online portfolio. I will show you how in just a few steps and we can do it all from the File Browser in Photoshop CS or Bridge in CS2.
STEP 1 - Working With The Metadata Tab
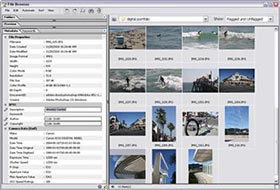 Launch the File Browser (Bridge in CS2) and navigate to the folder of images that you desire to include in your online Portfolio. (Tip: To hide all the palettes press the tab key.)
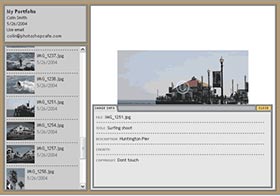
Click on an image and view the metadata tab. A lot of information can be stored here such as Image information, camera settings at time of capture and even your location if your camera is equipped with GPS. Under "IPTC" You will notice some fields that have a pencil in the left Column. This means that these fields are editable. Enter in a description (this will become our caption on the Web Page). Also enter in the credits for the image. Note: For more fields, right click a thumbnail and choose "File Info."
Click the checkmark at the bottom of the window to apply the custom fields to the image. This information will now be attached to the image and travel wherever the image goes.
STEP 2 - Working With The Gallery
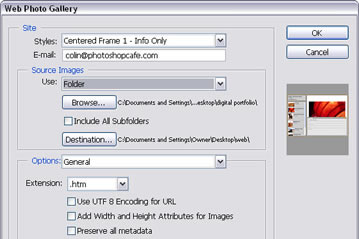 Lets move on to the gallery, choose Automate> Web Photo Gallery from the file browser's menu (Tools> Photoshop> Web Photo Gallery in Bridge CS2). Select a style for the gallery.
You can see a preview to the right (note that some options will not be available with certain styles). Enter your email address so that visitors can contact you. Cast your attention to the Source Images section. This is where we will choose the images and decide where we will save the gallery.
Use either Folder: Select an entire folder of images to be processed Selected Images From File Browser (Or Bridge): Use this option to use only selected images. You will have to select the images before opening the Web Photo Gallery dialog box. Hold down Ctrl (Cmd on Mac) and click on each desired thumbnail to select it. Click on Destination and either create or select a folder to save the gallery into.
STEP 3 - Name The Gallery
Under options, you will see a drop down menu. Space is limited to run through each of the options, so we will look at the important ones and the others can be left as defaults.
Choose Banner. This is where you will enter the title of the gallery and personal information.
STEP 4 - Choose Compression Settings
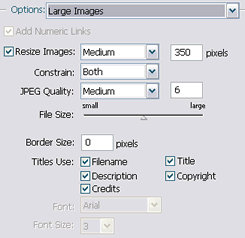 Choose large images: This is the actual size that your images will be displayed. You can choose the default or increase the size if you wish. Notice there is a slider that says "File size."
This will set the jpg compression. The further left the slider, the faster the images will load — but they will be lower quality and suffer from jpeg artifacts (little blocks and smudged details).
Move the slider to the right and the quality will be much better, but it will take longer for the image to download.
The setting you use depends on your intended audience. If your audience are using fast connections such as cable or DSL, then use a higher setting. If they are using Dial-up modems or overseas, then use lower settings. If you are unsure, a setting of 5 will produce a healthy compromise.
STEP 5 - The Security Setting
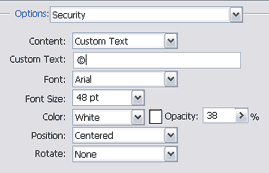 Perhaps the most important setting is the security setting. This will allow you to watermark your images. This will make it difficult for people to steal them and use them without paying you the proper fee or credit (one of the biggest fears of Photographers desiring to post images online).
Under custom text you can type in any message you like for a watermark. In this case I have used the copyright symbol. Tip: A great idea is to take your logo and have it converted to a font, and then select it as the watermark.
Choose the size and placement of the watermark.
Finally select a color and opacity, this will determine the strength of the watermark. I prefer to use White and lower the opacity to 38%. This allows the watermark to protect the image without distracting too much.
STEP 6 - Let Photoshop Do All The Work
 When you are happy with all the settings, hit OK. Photoshop will now do all the work for you. Sit back and relax while you are being saved hours of work. You don't even have to resize any of your images first, Photoshop does it all for you. All the thumbnails, HTML and Javascript will be built for you.
When Photoshop have finished, it will launch your new gallery in your web browser.
You can scroll through the thumbnails and click on any of them to display the full size image. This is a quick way for viewers to locate the desired images quickly. Notice that the watermark can be clearly seen.
Portfolio.6.tifClick in the Image Info tab to display the File information.
STEP 7 - Upload To The Web
 The final step is to upload the images to the web. You will need to locate a web hosting company if you don't already have an account. A hosting account can be obtained for a very reasonable price. You will then upload all the files in your chosen folder (the one we exported to) to the internet via FTP.
There are easy-to-use ftp programs available such as cuteFTP for windows or Fetch for Mac. This really is easy and any good hosting company will provide full instructions and assistance.
Good luck with your portfolio, your images are waiting to be displayed in the World's largest gallery for everyone to see.
For more cool techniques like this on an easy to follow video format check out Photoshop Secrets For Digital Photographers.
![]()
Photoshop CS5 & Photoshop CS5 Extended - Best Deals From Adobe
 Adobe Photoshop CS5 delivers breakthrough capabilities to help you create images with impact. Refine your
images with reengineered photography tools for removing noise, adding grain, and creating high dynamic
range (HDR) images. Get precise results when making complex selections. Remove any image element and
see the space fill in almost magically. Paint with naturally textured brushstrokes and realistic color blends. Learn more about Photoshop CS5.
Adobe Photoshop CS5 delivers breakthrough capabilities to help you create images with impact. Refine your
images with reengineered photography tools for removing noise, adding grain, and creating high dynamic
range (HDR) images. Get precise results when making complex selections. Remove any image element and
see the space fill in almost magically. Paint with naturally textured brushstrokes and realistic color blends. Learn more about Photoshop CS5.
Adobe Photoshop CS5 Extended software helps you create the ultimate images
for print, the web, and video. Enjoy all the state-of-the-art editing, compositing,
and painting capabilities in industry-standard Photoshop CS5, and experience
fast performance thanks to cross-platform 64-bit support. Also create 3D extrusions
for logos, artwork, and motion graphics; edit 3D objects with advanced tools; and create and enhance motion-based content. Learn more about Photoshop CS5 Extended.
Find CS5 upgrade options and Creative Suite 5 deals at the Adobe Store. See CS5 pricing in UK currency at the Adobe UK Store. Visit the Adobe Special Offers page to find the latest deals. Save 80% on Adobe Student Editions. Try before you buy — download a free Photoshop CS5 trial.
 Adobe Creative Suite 5 Design Premium
Adobe Creative Suite 5 Design Premium software gives you fresh new creative tools, along
with the ability to deliver ideas faster in print and create interactive content without writing
code. Plus Design Premium integrates with Adobe CS Live online services to maximize
your design time by streamlining critical nondesign tasks.
Adobe Creative Suite 5 Design Premium combines Adobe InDesign CS5, Photoshop CS5 Extended, Illustrator CS5, Flash CS5 Professional, Dreamweaver CS5, Fireworks CS5, and Acrobat Pro with additional tools and services. Download a free CS5 Design Premium 30 day trial.
Photoshop CS5 Tutorials & CS5 Resources
See our Photoshop CS5 Resource Center for Free Photoshop CS5 Tutorials, and the Free Photoshop CS5 Trial Download. See our Photoshop CS4 Resource Center for Free Photoshop CS4 Tutorials.
![]()
Exclusive 15% Discount On All Topaz Plugins - Use Coupon Code PHOTOSHOPSUPPORT - Includes Bundles And Upgrades
 Enter our exclusive discount coupon code PHOTOSHOPSUPPORT during the checkout process at Topaz Labs for an instant 15% discount on any Topaz product, including bundles and upgrades.
Topaz Labs Photoshop plug-ins are specifically designed to expand a photographer's creative toolbox by harnessing powerful image technology developments. Photographers everywhere are now taking advantage of the creative exposure effects, artistic simplification, unique edge manipulation, and top-of-the-line noise reduction offered in Topaz products. The Topaz Photoshop Plugins Bundle is a super powerful Photoshop plugins package that includes the following Topaz products:
Topaz Adjust
Deliver stunning and dynamic images with this uniquely powerful plug-in that features HDR-like abilities and enhances exposure, color and detail.
 Topaz Detail
A three-level detail adjustment plug-in that specializes in micro-contrast enhancements and sharpening with no artifacts.
Topaz ReMask
The fastest and most effective masking and extraction program with one-click mask refining.
Topaz DeNoise
Highest-quality noise reduction plug-in that removes the most noise and color noise while preserving the most image detail.
Topaz Simplify
Provides creative simplification, art effects, and line accentuation for easy one-of-a-kind art.
Topaz Clean
Take control of the detail depth of your images with extensive smoothing, texture control and edge enhancement tools.
Topaz DeJPEG
Drastically improves the quality of web images and other compressed photos.
Learn more about the Topaz Photoshop Plugins Bundle. Download a free trial version.
![]()
Exclusive onOne Software 15% Instant Discount Coupon
 Enter our exclusive discount coupon code - PSSPPT06 - during the checkout process at onOne Software for an instant 15% discount on any onOne product. This includes Genuine Fractals and their amazing Photoshop Plug-In Suite.
OnOne’s new Plug-In Suite solves six of the most frequent problems photographers will encounter in Photoshop. This suite has been granted American Photos Magazine’s Editor’s Choice award for Top Image Editing Software. The Plugin Suite includes:
Genuine Fractals Pro is renowned by both photographers and printers for its finesse at increasing images to more than ten times their original size while maintaining the sharpness and detail you started with. Think of this as the industry standard for image resizing.
Mask Pro is used to remove the tough stuff — such as hair, smoke and glass — while retaining the fine detail. You choose what colors to keep, then paint away what you don’t need.
 PhotoTools Pro packs hundreds of high-calibre photographic effects into one user-friendly plug-in. It’s fast and easy to use. Gives your photos that pro quality look.
PhotoFrame Pro lets you enhance your pictures with hundreds of such design effects, or simply drop your image into a pre-fab layout in Photoshop, Lightroom or Aperture.
FocalPoint helps to control focus and minimize visual noise. Draw the eye to specific points in your images by using selective focus, depth-of-field and vignette effects.
PhotoTune lets you can compare images side-by-side and easily color correct and enhance them. PhotoTune optimizes the dynamic range, color and sharpness of your image without the need to know all the complicated controls in Photoshop like levels and curves.
Simply enter our exclusive discount coupon code - PSSPPT06 - during the checkout process at onOne Software for an instant 15% discount on any onOne product.
![]()
Nik Software 15% Instant Discount - Exclusive 15% Coupon
Enter our exclusive discount coupon code - NIKPSS - during the checkout process at Nik Software for an instant 15% discount on any Nik Software product. This exclusive discount coupon code can be applied to all the latest Nik Software Photoshop plugins, including Silver Efex Pro, Color Efex Pro, Viveza, Sharpener Pro, and Dfine.
Color Efex Pro
 52 photographic filters with over 250 effects for professional quality images.
Completely Original. Completely Indispensable.
52 photographic filters with over 250 effects for professional quality images.
Completely Original. Completely Indispensable.
Nik Software Color Efex Pro filters are the leading photographic filters for digital photography. The award-winning Color Efex Pro filters are widely used by many of today's professional photographers around the world to save time and get professional level results. Whether you choose the Complete Edition, Select Edition, or Standard Edition, you’ll get traditional and stylizing filters that offer virtually endless possibilities to enhance and transform images quickly and easily.
Patented U Point technology provides the ultimate control to selectively apply enhancements without the need for any complicated masks, layers or selections. Control color, light and tonality in your images and create unique enhancements with professional results. With 52 filters and over 250 effects found in Color Efex Pro, you can perform high quality retouching, color correction, and endless creative enhancements to your photographs. Download a free Trial version.
Viveza
 The most powerful tool to selectively control color and light in photographic images without the need for complicated selections or layer masks.
Two of the most important factors in creating great photography are color and light. Mastering the art of selectively correcting or enhancing each of these is now possible for every photographer without the need for complicated masks or selections, or expert-level knowledge of Photoshop. Integrating award-winning U Point technology, Viveza is the most powerful and precise tool available to control light and color in photographic images.
U Point powered Color Control Points, placed directly on colors or objects in an image (such as sky, skin, grass, etc.), reveal easy-to-use controls that photographers can use to quickly adjust brightness, contrast or color in a fraction of the time needed by other tools. With Viveza you’ll spend more time shooting photographs and save hours of image editing. Download a free Trial version.
Silver Efex Pro
 Complete power and control to create professional quality black and white images in one convenient tool.
Silver Efex Pro from Nik Software is the most powerful tool for creating professional quality black and white images from your photographs. For the first time, all the advanced power and control required for professional results have been brought together in one convenient tool.
Featuring Nik Software’s patented U Point technology to selectively control the tonality and contrast of the image, Silver Efex Pro includes advanced imaging algorithms to protect against unwanted artifacts, a comprehensive collection of emulated black and white film types, a variable toning selector for adding traditional toning techniques, over 20 one-click preset styles, and a state-of-the-art grain reproduction engine that help produce the highest quality black and white images possible from your color images while providing more freedom to experiment. Download a free Trial version to use Silver Efex Pro.
Enter our exclusive discount coupon code - NIKPSS - during the checkout process at Nik Software for an instant 15% discount. This exclusive discount coupon code can be applied to all the latest Nik Software Photoshop plugins, including Silver Efex Pro, Color Efex Pro, Viveza, Sharpener Pro, and Dfine.
![]()
Photoshop Masking Plugin Fluid Mask - Exclusive Instant Discount
 The 4 1/2 out of 5 star review of Fluid Mask at MacWorld begins by saying that this "Photoshop plug-in takes the pain out of extracting backgrounds," and goes on to recommend the latest version, stating that "Fluid Mask is a very effective tool for separating objects from their backgrounds. It offers a variety of useful features for tackling almost any difficult image, from wispy hair to complex foliage. Online video tutorials and live training sessions help ease the learning curve."
Our friends at Vertus, the makers of Fluid Mask Photoshop Plugin, have set up a special exclusive discount for PhotoshopSupport.com. Go to our Fluid Mask page for a special, exclusive discount link.
Fluid Mask is designed for photographers, image editors, graphic designers and all those who take digital image editing seriously. In a streamlined interface and workflow, Fluid Mask instantly shows key edges in the image and provides comprehensive easy to use tools that work with difficult-to-see edges and tricky areas like trees & lattices. Fluid Mask will also preserve all-important edge information for a professional quality cut out. Go to our Fluid Mask page for more info.
![]()
lynda.com Online Training Library - View Free Video Clips
 Subscriptions to the lynda.com Online Training Library provide anytime access to tens of thousands of video tutorials covering Photoshop, Illustrator, Dreamweaver, web design, digital imaging, 3D, digital video, animation, and many other topics. View free video clips.
For less than a dollar a day, members have the opportunity to stay current and keep skills sharp, learn innovative and productive techniques, and gain confidence and marketability - all at their own pace. Premium subscriptions include instructors’ exercise files so that members can follow along with the exact examples onscreen. Customers learn at their own pace and may stop, rewind, and replay segments as often as necessary. View some free video clips (high resolution).
![]()
Did You Know You Could Create An Entire Website In Photoshop?
SiteGrinder Photoshop Plugin - Create Websites Instantly
 There often seems to be a strict division of labor within the world of web design and development. Creative professionals tend to stick to the Photoshop domain, while those well-versed in scripting are left to the task of implementing their work. Indeed, the two realms are quite different from each other, to which any of us even vaguely familiar with either can easily attest.
Essentially, Photoshop is a no-holds-barred design studio, offering the artist a seemingly endless array of creative options. On the other hand, HTML, CSS, Java and the like follow strict rules of engagement, requiring the developer to take any number of esoteric concerns into consideration in order to ensure that designs are properly displayed on the web.
Turn Photoshop Into A Complete Web Design Tool
SiteGrinder seeks to bridge this gap between design and development. Basically, SiteGrinder turns Photoshop into an easy-to-use and fully functional web design tool. With SiteGrinder, designers will now have the freedom to totally let their creativity loose and then, without skipping a beat, transfer their designs to the web. Bringing esthetic concerns together with more practical considerations, SiteGrinder is an amazingly powerful tool that would make a fantastic addition to any web designer's bag of tricks. Mac OS X and Windows versions of the SiteGrinder unlockable demo are available now via download.
![]()
Photoshop CS4 Essential Skills - By Mark Galer And Philip Andrews
 Brimming with beautiful pictures, Photoshop CS4 Essential Skills guides you through a project-based, progressive curriculum so that you can build all the essential skills to enhance photographs creatively and professionally with Photoshop CS4. If you are an aspiring professional or a student learning photography, digital imaging, or design graphics, you'll be amazed at the stunning results you can achieve. A DVD is included free.
The Essential Skills Photography Series from Focal Press uniquely offers a structured learning experience for photographers of all ages, with both the underlying theory and loads of invaluable 'how to' and real-life practice projects - all from the most talented photography practitioners/educators in the world.
Read 2 free sample chapters:
Skin Retouching Tips In Photoshop CS4
Transforming Smart Objects In Photoshop CS4
Find more Photoshop CS4 tutorials on our Photoshop CS4 Tutorials Page.
Read 2 free sample chapters from the Adobe Photoshop CS3 version:
Adjusting Exposure in Adobe Camera Raw CS3
Photoshop CS3 Tutorial High Dynamic Range
Find More Adobe Photoshop Books at Amazon.com
Find all the latest bestselling Photoshop books at discount prices at Amazon.com.
![]()
![]()
![]()
![]()