![]()
![]() Try before you buy. Download any Adobe product for a free 30 day trial.
Try before you buy. Download any Adobe product for a free 30 day trial.
![]()
Welcome To The December 2012 Photoshop Newsletter
![]()
10 Quick And Simple Retouching Tips For Photoshop
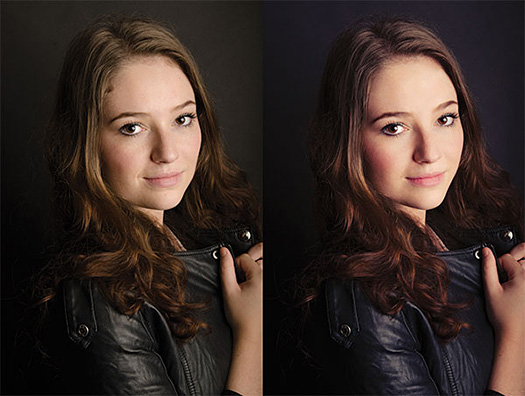
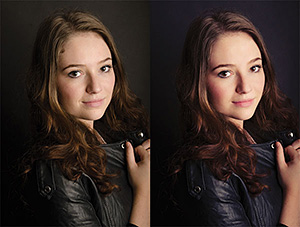 Edit your photos fast with the easy to apply techniques you'll find in this Photoshop retouching tutorial from Adam Smith at Photoshop Daily:
Smooth skin on the fly
Duplicate your model layer, applying Filter>Noise>Median at a Radius of 3 pixels. Apply a 5-pixel Gaussian Blur, then a layer mask. Invert this and paint to it, with the brush opacity determining the effect strength.
Believable eye edits
For a natural look, duplicate your model and then apply the Patch tool under your eye, selecting the deepest line. Simply decrease the duplicate layer’s opacity to determine detail.
Soften shadows
Facial contours create shadow. Softening this will clear complexion. Apply a Curves layer, highlighting the skin. Choose Blending Options, hold Opt/Alt and drag your underlying slider all the way. Invert your mask and paint to this to reveal effects.
Hair grafting
You can easily fill gaps in hair lines, eyebrows and eyelashes by simply copy and pasting in surrounding areas, then applying a Darken blending mode to integrate. Mask treatment cleans up obvious edges.
The Healing Brush
This is your weapon of choice when replacing blemished and completely treating under eye areas. Work with the directions your skin textures to create natural yet clean looks, maintaining pore structure.
Winning smile
A straightforward effect for getting those pearly whites. Simple apply a Hue/Saturation adjustment layer set to Yellow. Set Saturation at -100, Lightness at 100. Invert your layer mask and paint to your teeth.
Boost colour
Selective Color is a great way to target specific image tones and enhance their richness. You can apply these on a layer-by-layer basis, targeting image areas with layer masks.
Warp tool
Used attentively, this Photoshop tool can amend shape and alignment of facial features such as eyebrows, nose, lips, the jaw line and contours of the face.
High impact skin gloss
Duplicate your retouched model, setting an Overlay blending mode. Apply an 8 pixels Radius High Pass. Press Cmd/Ctrl+Opt/Alt+Shift+E, applying Shadows/Highlights>Highlights Amount and Tonal Width, at 25%. Holding Opt/Alt, split your Blending Options>Blend If white slider to create effects.
Trust in Curves
To enhance localised contrast I use a combination of Curves adjustment layers and layer masks, from the traditional S-curve to Curves optimised for highlights, midtones or shadows.
![]()
Perfect Effects 4 Pugins Free Edition And Premium Edition Released - Get 15% Off Premium With Coupon
DECEMBER 03, 2012
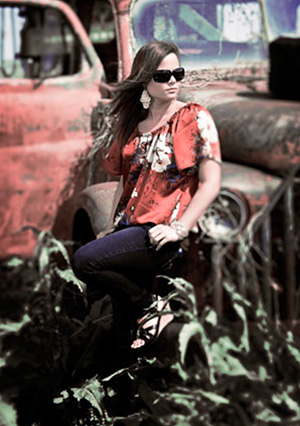 onOne has announced the availability of Perfect Effects 4 Premium Edition and Perfect Effects 4 Free Edition. Both software programs offer a library of photographic effects and powerful tools for image enhancement and creative stylization.
Each may be used as a standalone application, as an external editor for Apple Aperture, Adobe Lightroom, or as a Photoshop plug-in. Use our discount code PSSPPT06 to get 15% off any onOne product.
Perfect Effects 4 Premium Edition provides photographers with a robust library of more than 400 photographic effects that instantly add professional looks to photos. Effects are sorted into more than 40 categories, such as HDR, Movie Looks, and Vintage.
Also included are effects that recreate the look of film and darkroom techniques, add glows, vignettes, and borders, and correct common photography problems. Effects may be added with a single click or combined to create unique looks.
Perfect Effects 4 Free Edition includes 70 photographic effects found in the Premium Edition, while maintaining core functionality and usage without restrictions of a traditional 30-day timed trial, or the addition of watermarks to images.
A flexible new browser with keyword search functionality and the ability to mark effects and presets as Favorites are new to both editions of Perfect Effects 4. They both also include new blending modes, paint-in brush effects, and a powerful, edge-detecting Perfect Brush that smoothly applies or removes adjustments to specific areas without going “outside the lines.”
Both Perfect Effects 4 Premium and Free Editions are now available from onOne Software. New users may purchase Perfect Effects 4 Premium Edition for $99.95. Use discount code PSSPPT06 to get 15% off any onOne product.
Owners of Perfect Effects 3 or PhotoTools 2.6 and earlier may upgrade for $69.95.
![]()
Creating Masks To Move Over Time In Photoshop CS6
In this Quick Tip for Photoshop CS6 (free trial), Julieanne Kost reveals a technique to create a mask using the reflected gradient which can quickly be repositioned over time without retouching.
![]()
Nik HDR Efex Pro 2.0 Workshop 3 Free Video Clips - 15% Off Nik Plugins
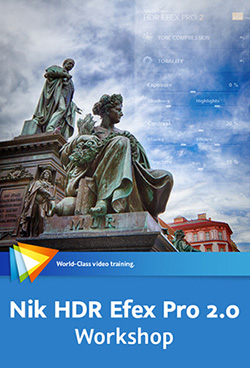 Here are 3 free video clips from Nik HDR Efex Pro 2.0 Workshop. In this workshop Tim Grey teaches you how to use Nik Software’s HDR Efex Pro 2.0 to create great high-dynamic-range images. After showing you the basics of HDR Efex Pro – including configuring the interface and settings, using presets, and evaluating your image – Tim introduces you to the various adjustment options.
Follow our links and a 15% discount will be AUTOMATICALLY APPLIED to any purchase you make on NIK plugins, or use our exclusive discount coupon code - NIKPSS - during the checkout process at Nik Software for the instant 15% discount. This exclusive discount coupon code can be applied to all the latest Nik Software Photoshop plugins, including Silver Efex Pro, Color Efex Pro, Viveza, HDR Efex Pro, and The Complete Collection (big savings).
Evaluating "Before" and "After"
As you fine-tune the settings for your HDR image it is often helpful to get a "before" and "after" view of the image. This lesson will show you the various options for doing this in HDR Efex Pro.
Tone Compression Settings
The tone compression settings determine how the high dynamic range image data is mapped in the final result. In this lesson you'll see how to refine the tone compression settings for an image in HDR Efex Pro.
Applying Targeted Adjustments with Control Points
Control points are the foundation of targeted adjustments in HDR Efex Pro, and this lesson will show you how to put control points to use.
![]()
Exporting Images from Lightroom 4 - Video Tutorial
In this episode of The Complete Picture, Julieanne Kost demonstrates the advantage of setting up presets in Lightroom to simultaneously export images to multiple file types, sizes, compression settings etc. You might find even find this method more powerful than Photoshop’s Image Processor (30-day free trial of Lightroom 4).
![]()
Perfect B&W - onOne Plugin Creates Stunning Black & White Photos
 onOne Perfect B&W provides photographers with the easiest way to develop stunning black and white images, and is now included in the new Perfect Photo Suite 7 plugin bundle. If you want to buy this product alone, you have to wait until end of November. (Use our exclusive discount code PSSPPT06 to get 15% off any onOne product, including bundles and upgrades.)
Perfect B&W is a brand new product that includes powerful and intuitive tools that give photographers instant results and complete creative control to replicate time-honored black and white processing techniques. With Perfect B&W, photographers can add dramatic, elegant and classic monochromatic looks to their images, and create the many moods black and white photography can evoke — resulting in beautiful and provocative imagery. Here are some of the key benefits of Perfect B&W:
Includes Search-Friendly Library of Expertly-Crafted Presets: Dramatic, romantic, elegant, vintage and classic looks may all be achieved in a single click with the more than 100 black and white presets included in Perfect B&W. Find the preset you want to use quickly with visual thumbnails in the browser or with the built-in keyword search. Tag your favorites for easy future access.
Real-Time Previews: Explore the look of different presets on your image in a browser that can be expanded to show more detail or click a preset to see it on your image on a full-screen before you apply it.
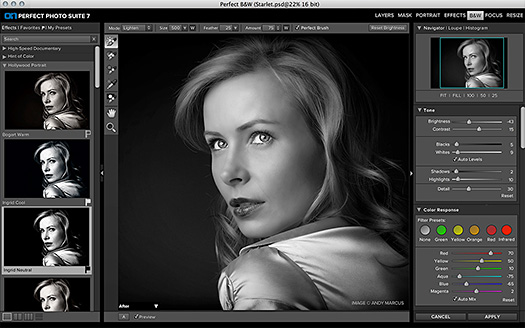
Essential Adjustment Brushes: Precisely dodge and burn, add contrast and detail, and apply selective color with a set of powerful brushes designed specifically for black and white image processing. Control how much and where you want to apply your effect with simple brush strokes. Wacom® tablet users can control brush size and strength using built-in pen pressure and sensitivity support.
Perfect Brush: Paint inside the lines with precision using the NEW edge-detecting Perfect Brush! Whether you’re painting in effects, detail, contrast, highlights or selective color, the Perfect Brush will apply adjustments smoothly to the specific area you’re working on while automatically recognizing the edges around it.
Blending Modes: Use Blending Modes to blend your black & white image with your original to achieve a unique hand-painted or grungy contrast look. Choose from a selection of 30 modes to change the brightness, contrast, and color of your image and dramatically alter its appearance.
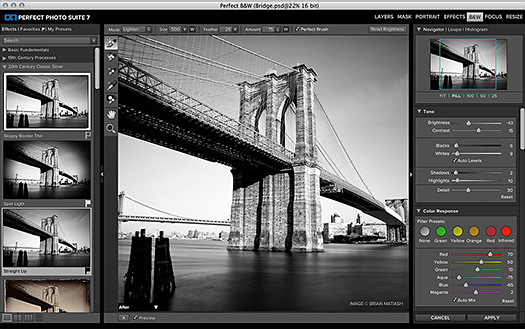
Toner Presets: Imply mood, add depth and create striking contrast within your images using the Toner Presets in Perfect B&W. Select from a collection of toners including the popular copper, cyanotype, selenium, sepia and more—or build your own.
Filter Presets: Get the effect of photographic filters after the shot. Use built-in color filter presets to enhance contrast in your images and adjust the relative brightness of the details you care about, whether it’s the sky, foliage, or people.
Tone Curve: Optimize the balance of tone and contrast in your image with the Tone Curve. Adjust your shadows, mid-tones and highlights to create the exact look you want.
Film Grain: Add the timeless look and feel of vintage film stock using our library of authentic film grain. Choose from a selection of carefully crafted film types that integrate realistic grain onto your images.
Borders, Edges and Vignettes: Accentuate your images with flexible vignettes and authentic film & darkroom edge effects of sloppy borders and print edges.
Supports Any Workflow: Integrate Perfect B&W seamlessly into your workflow no matter what tools and software you use. It works as a plug-in to Adobe® Photoshop®, Photoshop Elements, Lightroom® or Apple® Aperture® where you can send your images directly into Perfect B&W, make your adjustments, then get them right back to your photo editing workflow. You can also use Perfect B&W as a standalone application all by itself.
![]()
Photoshop FAQ (Frequently Asked Questions) 2012 Edition
 Below are the questions from Jeff Tranberry's Photoshop FAQ. Go to his site to read the answers.
Photoshop FAQ (Frequently Asked Questions)
Why doesn’t my version of Photoshop support my camera?
I’m having a problem while using Photoshop. How can I fix it?
I’m having a problem while downloading, installing or activating my copy of Photoshop. How can I fix it?
How do I make Photoshop run faster? How do I tune Photoshop for peak performance? What computer hardware is best for running Photoshop?
The Crop tool only crops to 1px by 1px (or a tool is misbehaving). How do I fix it?
How do I remove a background from an image?
Where did the Extract Filter go in Photoshop CS5/CS6?
Where do I get the TWAIN plug-in for scanning in Photoshop? How do I use/troubleshoot the TWAIN plug-in?
How do I combine two images?
I don’t like the grey application background. How do I see the desktop on Mac in Photoshop CS6?
I can’t see more than one image at a time. How do I disable tabbed documents?
How do I drag a layer from one document to another?
Can I exchange my Windows PC license for a Mac License (or vice versa)?
Where did the Lighting Effects filter go in Photoshop CS5?
Why does the delete key bring up the Fill dialog in Photoshop CS5/CS6?
How do I change the zoom tool back to the way it worked in previous versions?
What are the differences between Photoshop CS6 & Photoshop CS6 Extended?
How do I uninstall the Photoshop CS6 beta?
Why change the crop tool in Photoshop CS6? How can I get the old behavior back?
How do reposition the crop area after selecting the Crop tool in Photoshop CS6?
What are the JDI (Just Do It) features in Photoshop CS6?
How do I migrate my saved presets from an earlier version of Photoshop or import/export them?
Where did the “No Color Management” option go for printing in Photoshop CS5/CS6?
What happened to the automate commands Contact Sheet II, PDF Presentation and Web Photo Gallery in Photoshop?
Why doesn’t Command/Control + z undo each history step?
When I drag a layer, the whole group moves. How do I just move a layer inside a group?
Why are there white grid lines around the pixels when I zoom in really far? How do I make it go away?
Why does changing the light direction of layer styles on one layer affects EVERY LAYER with the same effect?
Why does my brush cursor looks broken at certain zoom levels in Photoshop on Windows (XP, Vista, Windows 7)?
Why should I submit a Crash Report? Does anyone read them?
Why does my image get rotated and show a compass when using the trackpad on my MacBook or while using my Magic Trackpad?
Is it safe to buy software from eBay, Amazon Marketplace, or Craigslist? How do I protect myself from hacked and counterfeit software?
Why should I create an Adobe ID to register or activate my product?
![]()
How To Reset The Photoshop Preference File In CS6 Video Tutorial
In this episode of The Complete Picture, Julieanne demonstrates two methods for one of the most common trouble shooting techniques: resetting the Photoshop Preferences in Photoshop CS6 (free trial).
![]()
InDesign CS6: New Features Workshop - Learn What's New and How It Affects You - 3 Free Videos
 In this course, InDesign CS6: New Features Workshop, Adobe Certified Expert Kelly McCathran looks at the new and enhanced features available in Adobe InDesign CS6 (free trial) and shows you how to incorporate them into your workflow. You’ll learn how to work with linked content, Liquid Layout, Alternate Layouts, PDF forms, and more. You’ll also see how the increasing use of HTML5 and CSS3 affects your design and layout work. Use discount Code “PSV2B20” for 20% off, good through Dec 12, 2012. Here are 3 free videos from the course:
The Content Collector Tool and New Linked Content: Stories
New features in InDesign CS6 make it easy to create multiple, linked versions of the same story for use in different layouts. You'll see how it's done in this video.
Guide-based Liquid Layout Rules
Guide-based rules for Liquid Layout allow you to create guides that will preserve the relative position of page items when creating alternate layouts. When using guide-based rules it is important to create guides that cross over all important objects in the layout. In this example, there is also a black background fill on A-Master, so we need to mix the guide-based rules on the pages with object-based rules on the master.
Adding a Submit Button
In order for a filled-out PDF form to be sent back to the author (or the person who needs this information), it needs a Submit button. In this lesson we will create a button that sends the information from the form to an email address.
![]()
Create The Lomo Effect In Photoshop - Using Curves To Simulate The Cross-processing Effect
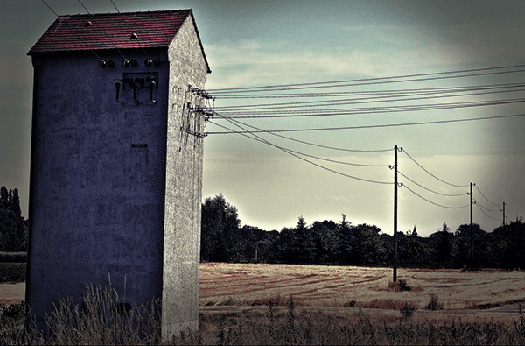
Here's a tutorial by Adam Smith from Photoshop Daily that shows you how to create the Lumo effect in Photoshop by using curves.
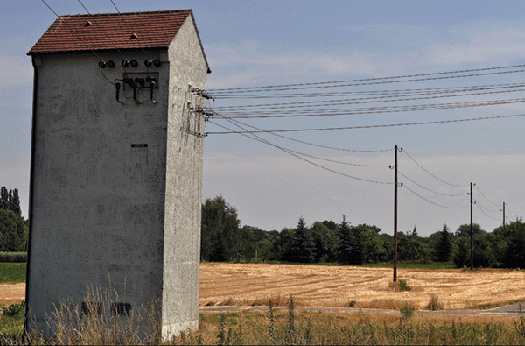
Step 01: Creative curves
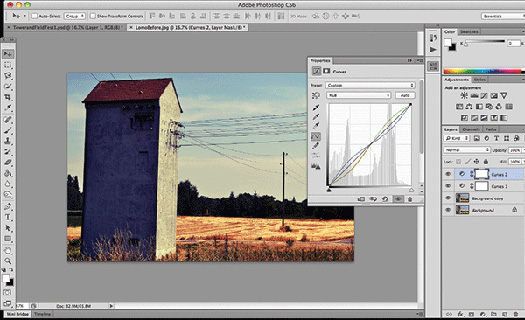
Add a Curves layer and create a S-shaped curve to increase saturation and contrast. Add another S-shaped curve with the red and green channel and an inverted S-shape for the blue.
Step 02: Add a Blending mode
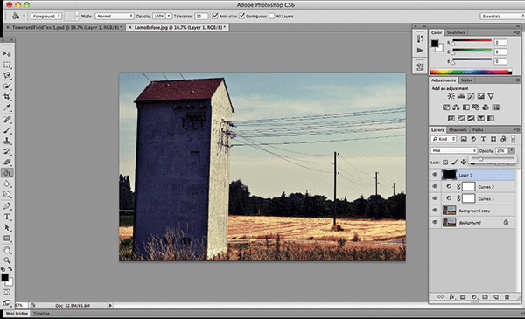
Add a new layer, paint it black and set the Blend Mode to Hue. Decrease the Opacity to 30%. This will add a subdued look without dampening the original colours too much.
Step 03: Use unsharp Mask
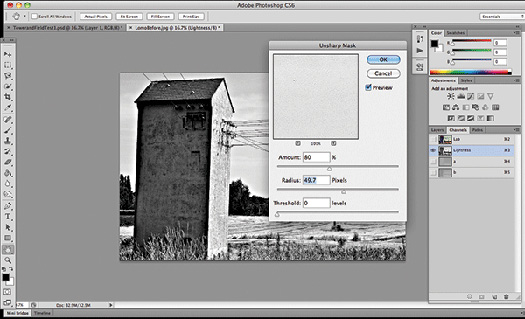
Change the Image Mode from RGB to Lab Colour. In Channels select Lightness. Add an Unsharp Mask filter, set the Amount to 80% and the Radius to about 50. Change the mode back to RGB.
Step 04: Place Dark Edges
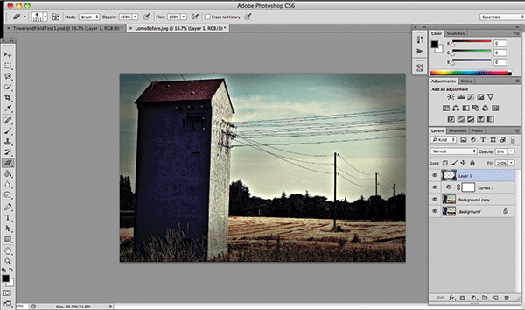
Create a new layer and use the Paint Bucket to colour it black. Set the Opacity to 50% and use a large soft eraser to remove the centre and leave the darkened edges.
Final image:
![]()
Adobe InDesign CS6: Learn by Video -
Master the Fundamentals - 5 Free Video Clips
Here are 5 free clips from Adobe InDesign CS6: Learn by Video. Use discount Code “PSV2B20” for 20% off, good through Dec 12, 2012
 InDesign CS6 (30-day free trial) is desktop publishing software for the age of mobile, offering state-of-the-art features like Adaptive Design Tools, which let you repurpose layouts to look great on a variety of page sizes, orientations, and devices. And of course it does everything you expect InDesign to do, giving you precise control over text, images, and colors so you can create amazing designs.
In this Learn by Video course (created in partnership with our friends at Peachpit Press), Adobe Certified Expert Kelly McCathran takes an in-depth look at InDesign CS6, from the very basics to advanced features like book-building and dynamic content.
Creating and Formatting Text
In this lesson you'll learn all about creating and formatting text for maximum impact as you build a postcard layout project.
Working with Graphics
In this video you'll learn how to place (or import) an image on your InDesign page and how to scale, center, and crop an image. We'll also go over the most popular image formats: PSD, AI, TIFF, and JPEG.
Working with Frames
This lesson looks at frames. Everything that is placed into InDesign ends up in a frame - you can create frames from scratch, or you can import text and images into a document and InDesign will automatically create the frame for you.
Creating Letterhead
Letterhead is fundamental for branding, and in this video we will build one from scratch, complete with guides, logo, and contact text. When we're finished, we'll save the letterhead as an InDesign template for reuse.
Building a Newsletter
A newsletter is an easy, low-cost way to reach customers and colleagues or connect with family. In this lesson we will start a newsletter with a template, auto-flow some text, semi auto-flow more text, and place images to create a clean, elegant newsletter.
![]()
Using Photographic Toning Gradients In Photoshop CS6
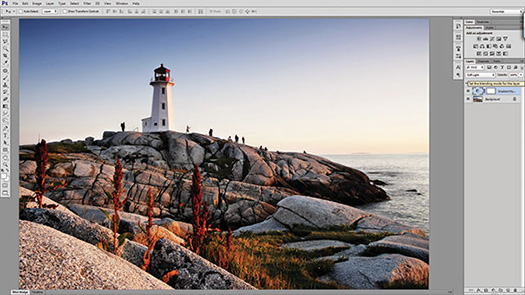
 This tutorial is from Adam Smith at Photoshop Daily. Photoshop CS6 has a whole host of improvements and new features, which have been celebrated and covered extensively through different media outlets. But there is also a long list of discrete yet productive features that haven’t been over sold. Photographic Toning gradients are a notable example. You can apply this new hidden feature in Photoshop CS6 (free trial) to replicate print styles.
Essentially Photographic Toning gradients provide a library of gradient styles, which mimic the behaviour of specific chemical treatments from the era when photos were developed in a dark room. You might be wondering what is so special about another set of gradients. If you only use them with the gradient tool, you would be rather bewildered. But these were developed with the Gradient Map adjustment layer in mind.
A Gradient Map adjustment is a clever way of re-colouring a photograph, based on the image’s luminance values. The colours at the left end of the gradient are mapped to the dark and shadow areas of the image. The hues at the right are assigned to the bright and highlight pixels in the image. This allows a high degree of control for converting to black and white, or creating duotones. Follow along and see just how useful these can be.
Find your gradients
Begin by adding a Gradient Map adjustment layer. In the Properties panel, click on the small arrow to the right of the gradient thumbnail to open up the Gradient Selection and then click on icon in the top right corner. Select Photographic Toning from the fly out list. When Photoshop prompts you to replace the current presets, choose Append.
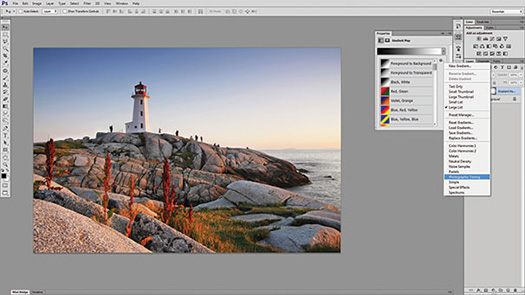
The new library
Open up the Gradient pull-down menu again to find 38 new gradients added to the list of presets. These are based on actual photographic chemical treatments. Choose the Sepia Highlights 1 preset to turn the image to black and white with only the bright areas tinted a sepia hue.
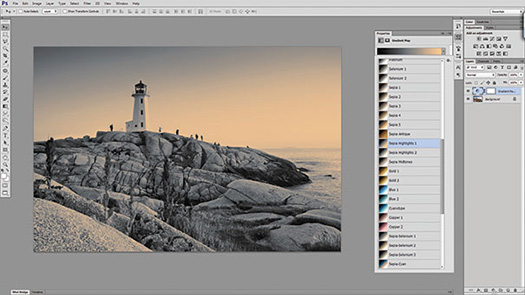
Going further
Simply mapping the new gradients creates an assortment of new, useful and interesting effects, opening up a whole library of potential. Yet that potential is multiplied by adjusting the blending mode of the Adjustment Layer. In this case, turning the blending mode to Soft Light create a warmer, high contrast appearance.
![]()
Masking Video for Special Effects in Photoshop CS6 - Tutorial
In this episode of The Complete Picture (Masking Video for Special Effects in Photoshop CS6), Julieanne Kost demonstrates how to mask a video clip in Photoshop CS6 (free trial) to reveal motion in a selective region of the clip over time.
![]()
Creating 3D Punched Letters In Illustrator - Video Tutorial And Step-by-Step
In this video Deke McClelland shows you how to transform plain text into punched-out 3D letters in Adobe Illustrator (free trial).
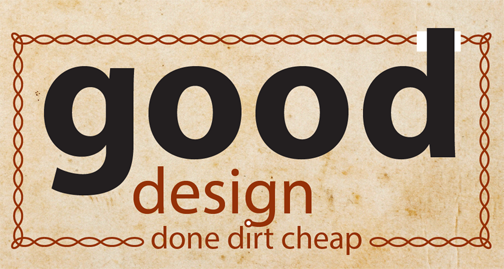
In order to keep the original type intact, Deke begins by making a copy of the type layer to work on. After converting that copy to outlines, he also makes a copy of the outlines layer to work on. This way, the original type isn’t destroyed in the design process. Safety observed, Deke then removes the black fill and adds a 4-point white stroke, setting the stroke to align to the outside of the letters.
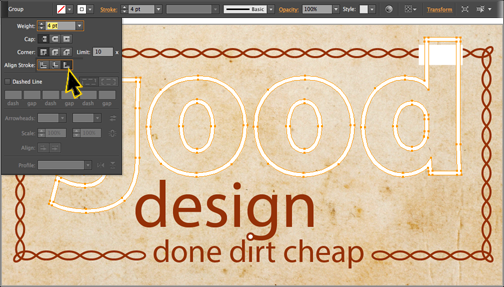
After converting the stroke to outlined fills, the type is ready for 3D extrusion. From the Effects menu, choose 3D > Extrude & Bevel, and set the Z value to 0 degrees, and the X and Y values to 4 degrees.
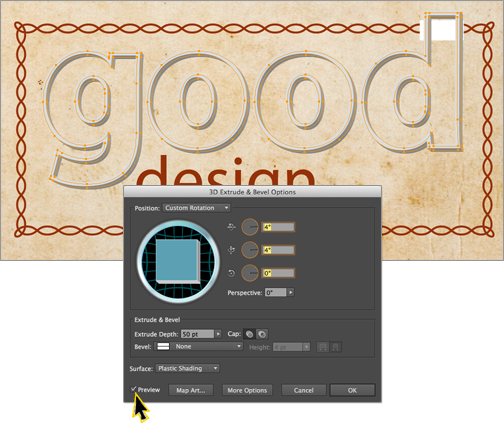
The next step involves some careful expansion, selection, grouping, and the creation of a compound path to prepare the edges of the letters for a white fill and the extruded edges for a red fill. And by careful, I mean follow Deke’s instructions carefully here and you won’t go wrong. Cavalierly ignore certain aspects of the instruction in this section, as I may have done, and you may go astray—as I may have done.
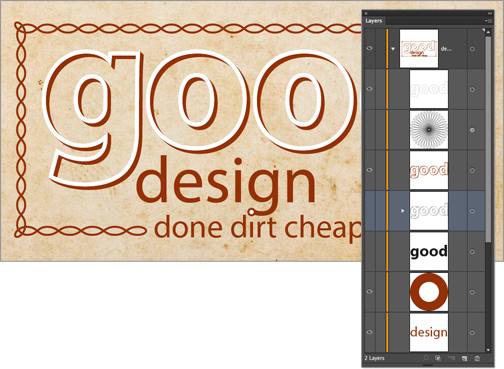
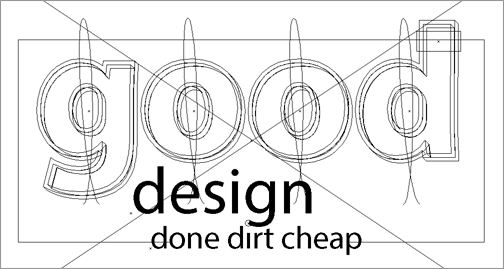
After some housekeeping in the Layers panel (using the Reverse Order command to put the letters g-o-o-d in the right order), it’s time to do a little straightening of the letters themselves. The application of the 3D effect tends to misalign the letters and their edges a bit, so switching to the Outline mode (Command/Ctrl+Y) allows you to drag the paths back into alignment.
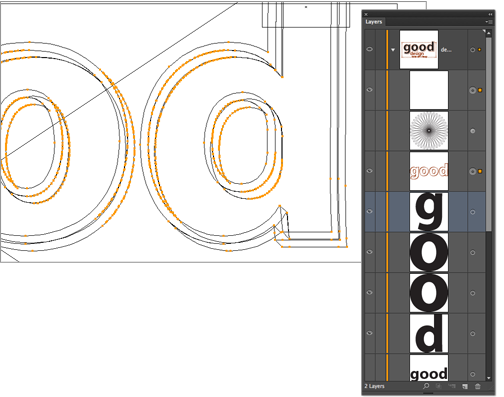
The next step is to take a hypotrochoid pattern and duplicate it over each letter. (Check out this episode of Deke’s Techniques for more on how to create the hypotrochoid pattern.)
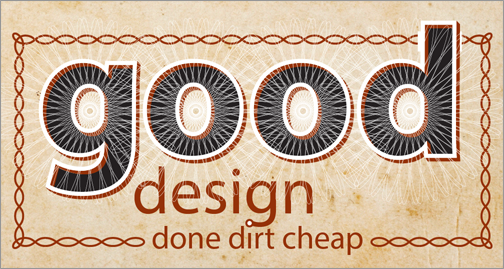
After pasting the pattern in back of the letters, Deke creates a clipping mask for each letter/pattern combination, eventually filling the inside of each letter with the pattern.
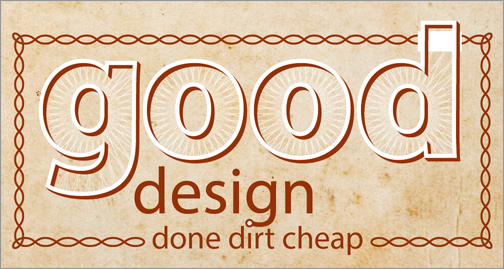
After refilling the letters with red and adding a narrow stroke, it’s time for another round of alignment, which again is best done in Outline mode.
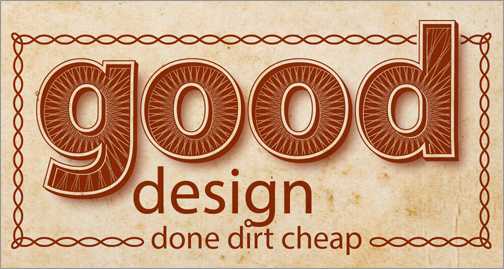
Lastly, a drop shadow, another stroke around the letter edges, and the application of the Multiply blend mode provide the final touches to this sculptural letter effect:

Of course, this rich graphical 3D effect would not be the same without its fancy intertwined border, so next week, Deke will show you how to create that design using a pattern brush in Illustrator.
You can get a free 7-day trial to the lynda.com Online Training Library. The trial membership entitles you to 7 days of access to all 986 courses in the lynda.com Online Training Library for free. Click sign up on the subscription plan of your choice to get started.
![]()
How To Mimic Stormy Weather In Your Photos - Photoshop Tutorial
In this Photoshop tutorial by Adam Smith from Photoshop Daily, you will learn how to enhance the drama with a stormy sky in just a few simple steps. (Try a 30-day free trial of Photoshop.)
Desaturate the image
Hue/Saturation can be used to reduce the blue tones in the image and leave the sky effectively desaturated. When using Hue/ Saturation to reduce a particular colour, remember to check similar tones and reduce them. Here we desaturated the blues and the cyans.

Use curves
A Curves adjustment can help to adjust the contrast in the image. Making a slight S curve deepens the blacks and brightens the whites to make the overall image punchier, which boosts the sky. While you can increase the contrast as much as you wish, don’t introduce too much clipping.

Gradient and noise
Use the Gradient tool set to Linear and the Foreground to Transparent preset set to black as the Foreground tone. This darkens corners of the image, particularly around the sky. Go to Filter>Noise>Add Noise, check Gaussian and Monochromatic and add some noise to the image.

![]()
Some Good Useful Photoshop Tips From Photoshop Secrets
I like these Super Useful Photoshop Tips from Abduzeed. From the intro: For the next few weeks we'll be posting some of the best Photoshop tips from Photoshop Secrets. Some of these tips can greatly optimize your workflow helping you work faster and more precisely. Here's one from the collection:
Open a duplicate window of your document so you can work on a detailed version
When creating icons or small assets you may want to see both the 100% view and a zoomed in view so you can edit details and see the original at the same time. You can do so by clicking Window > Arrange > New Window for [doc_name]. The shortcut you see on the image I created myself by going to Edit > Keyboard Shortcuts.

![]()
Special Deals On Nik Software Photoshop Plugins - Viveza, Complete Collection - 15% DISCOUNT COUPONS
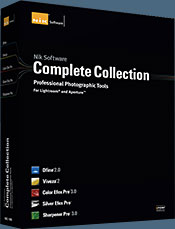 Follow the links below and a 15% discount will be AUTOMATICALLY APPLIED to any purchase you make, or use our exclusive discount coupon code - NIKPSS - during the checkout process at Nik Software for the instant 15% discount. This exclusive discount coupon code can be applied to all the latest Nik Software Photoshop plugins, including Silver Efex Pro, Color Efex Pro, Viveza, HDR Efex Pro, and The Complete Collection (big savings).
The Complete Collection features products with Nik Software's patented U Point® technology, giving photographers the most powerful tools for precise and natural photographic enhancements and corrections without the need for complicated selections or layer masks.
The Complete Collection is offered in two editions: (1) the Complete Collection Ultimate Edition includes support for every plug-in to work in Photoshop, Lightroom, and Aperture, and offers Color Efex Pro 3.0 to work in Capture NX 2 as well. (2) the Complete Collection for Lightroom and Aperture includes support for each plug-in to only work in Lightroom and Aperture. Click here to compare both editions
Color Efex Pro
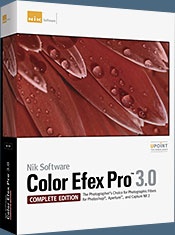 52 photographic filters with over 250 effects for professional quality images.
Completely Original. Completely Indispensable.
Nik Software Color Efex Pro 3.0 filters are the leading photographic filters for digital photography. The award-winning Color Efex Pro 3.0 filters are widely used by many of today's professional photographers around the world to save time and get professional level results. Whether you choose the Complete Edition, Select Edition, or Standard Edition, you’ll get traditional and stylizing filters that offer virtually endless possibilities to enhance and transform images quickly and easily.
Patented U Point technology provides the ultimate control to selectively apply enhancements without the need for any complicated masks, layers or selections. Control color, light and tonality in your images and create unique enhancements with professional results. With 52 filters and over 250 effects found in Color Efex Pro 3.0, you can perform high quality retouching, color correction, and endless creative enhancements to your photographs. Download a free Trial version.
Viveza
 The most powerful tool to selectively control color and light in photographic images without the need for complicated selections or layer masks.
Two of the most important factors in creating great photography are color and light. Mastering the art of selectively correcting or enhancing each of these is now possible for every photographer without the need for complicated masks or selections, or expert-level knowledge of Photoshop. Integrating award-winning U Point technology, Viveza is the most powerful and precise tool available to control light and color in photographic images.
U Point powered Color Control Points, placed directly on colors or objects in an image (such as sky, skin, grass, etc.), reveal easy-to-use controls that photographers can use to quickly adjust brightness, contrast or color in a fraction of the time needed by other tools. With Viveza you’ll spend more time shooting photographs and save hours of image editing. Download a free Trial version.
Silver Efex Pro
 Complete power and control to create professional quality black and white images in one convenient tool.
Silver Efex Pro from Nik Software is the most powerful tool for creating professional quality black and white images from your photographs. For the first time, all the advanced power and control required for professional results have been brought together in one convenient tool.
Featuring Nik Software’s patented U Point technology to selectively control the tonality and contrast of the image, Silver Efex Pro includes advanced imaging algorithms to protect against unwanted artifacts, a comprehensive collection of emulated black and white film types, a variable toning selector for adding traditional toning techniques, over 20 one-click preset styles, and a state-of-the-art grain reproduction engine that help produce the highest quality black and white images possible from your color images while providing more freedom to experiment. Download a free Trial version to use Silver Efex Pro.
HDR Efex Pro
 Experience the power, control, and creative expression of HDR. This all in one toolkit lets you achieve your best HDR images ever, ranging from the realistic to artistic.
HDR Efex Pro is the essential new standard for creating amazingly high quality realistic to artistic HDR images with a revolutionary new all-in-one workflow. HDR Efex Pro includes a vast selection of one-click visual presets for incredibly fast results, advanced tone mapping algorithms, powerful and detailed HDR controls, and patented U Point® technology
Follow our discount coupon links, or enter our exclusive discount coupon code - NIKPSS - during the checkout process at Nik Software for the instant 15% discount. This exclusive discount coupon code can be applied to all the latest Nik Software Photoshop plugins, including Silver Efex Pro, Color Efex Pro, Viveza, HDR Efex Pro, and The Complete Collection (big savings).
![]()
onOne Ships Perfect Photo Suite 7 - 15% Exclusive Discount Code
 onOne today announced the availability of Perfect Photo Suite 7. Improved to give photographers even more ways to maximize their creativity and solve common problems in digital photography.
Exclusive Discount Code - 15% Off
Use our exclusive discount code PSSPPT06 to get 15% off any onOne product, including the new Perfect Photo Suite 7.
Perfect Photo Suite 7 provides easy-to-use and powerful tools to develop stunning black and white photographs, enhance the look and feel of images with professionally-designed effects, beautifully retouch portraits, replace unwanted backgrounds, control depth-of-field after the shot has been taken, as well as resize and prepare images for print, in robust layered file workflow—in one affordable package.
For those who have purchased Perfect Photo Suite 6 on or after August 1, 2012, onOne Software will issue a complimentary upgrade to Perfect Photo Suite 7 via download
Perfect Photo Suite 7 introduces five new products—Perfect B&W, Perfect Portrait 2, Perfect Layers 3, Perfect Effects 4 and Perfect Resize 7.5 Pro, integrated with existing favorites Perfect Mask 5.2 and FocalPoint 2.
Photographers can effortlessly move between all of the modules while editing their photos using Perfect Photo Suite 7 as a standalone application. Photographers can also use Perfect Photo Suite to extend the image editing power of Adobe Photoshop Lightroom and Apple Aperture, and as a plug-in to Adobe Photoshop and Adobe Photoshop Elements.
Perfect Photo Suite 7 features a redesigned user interface with a new browser, search functionality, and the ability to flag and access favorite effects and presets. It also includes the powerful new edge-detecting Perfect Brush, presets that give users instant results alongside manual controls that offer photographers the option to fine-tune adjustments and create the images they envision.
![]()
Exclusive 15% Discount On Topaz Plugins, Bundles And Upgrades
 Enter our exclusive discount coupon code PHOTOSHOPSUPPORT during the checkout process at Topaz Labs for an instant 15% discount on any Topaz product, including bundles and upgrades.
Topaz Labs Photoshop plug-ins are specifically designed to expand a photographer's creative toolbox by harnessing powerful image technology developments. Photographers everywhere are now taking advantage of the creative exposure effects, artistic simplification, unique edge manipulation, and top-of-the-line noise reduction offered in Topaz products. The Topaz Photoshop Plugins Bundle is a super powerful Photoshop plugins package that includes the following Topaz products:
Topaz Adjust
Deliver stunning and dynamic images with this uniquely powerful plug-in that features HDR-like abilities and enhances exposure, color and detail.
Topaz InFocus
 Topaz InFocus uses the latest advancements in image deconvolution technology to restore, refine and sharpen image detail.
Topaz Detail
A three-level detail adjustment plug-in that specializes in micro-contrast enhancements and sharpening with no artifacts.
Topaz ReMask
The fastest and most effective masking and extraction program with one-click mask refining.
Topaz DeNoise
Highest-quality noise reduction plug-in that removes the most noise and color noise while preserving the most image detail.
Topaz Simplify
Provides creative simplification, art effects, and line accentuation for easy one-of-a-kind art.
Topaz Clean
Take control of the detail depth of your images with extensive smoothing, texture control and edge enhancement tools.
Topaz DeJPEG
Drastically improves the quality of web images and other compressed photos.
Learn more about the Topaz Photoshop Plugins Bundle. Download a free trial version.
![]()
Site Grinder Web Design Tool
 There often seems to be a strict division of labor within the world of web design and development. Creative professionals tend to stick to the Photoshop domain, while those well-versed in scripting are left to the task of implementing their work. Indeed, the two realms are quite different from each other, to which any of us even vaguely familiar with either can easily attest.
Essentially, Photoshop is a no-holds-barred design studio, offering the artist a seemingly endless array of creative options. On the other hand, HTML, CSS, Java and the like follow strict rules of engagement, requiring the developer to take any number of esoteric concerns into consideration in order to ensure that designs are properly displayed on the web.
Turn Photoshop Into A Complete Web Design Tool
SiteGrinder seeks to bridge this gap between design and development. Basically, SiteGrinder turns Photoshop into an easy-to-use and fully functional web design tool. With SiteGrinder, designers will now have the freedom to totally let their creativity loose and then, without skipping a beat, transfer their designs to the web. Bringing esthetic concerns together with more practical considerations, SiteGrinder is an amazingly powerful tool that would make a fantastic addition to any web designer's bag of tricks. Mac OS X and Windows versions of the SiteGrinder unlockable demo are available now via download.
 WordPress Photoshop Plug-in Creates Wordpress Blogs & Sites
Designers can now create PSD to WordPress Themes in Photoshop with Media Lab's NEW SG3xpress for Wordpress Photoshop plug-in. In addition, Media Lab has released the SG3xpress Add-on for its SiteGrinder 3 for users who wish to add advanced blog and WordPress Theme-building to the already powerful SiteGrinder 3 website creation software.
If you know Photoshop then you already know enough to start creating WordPress themes and blogs for yourself and your clients. Creating a blog or a WordPress site in Photoshop is easy with SG3xpress. Now you can go directly to WordPress with your design saving even more time and money for yourself and your clients.
![]()
Photoshop Masking Plugin Fluid Mask - Exclusive Instant Discount
 The 4 1/2 out of 5 star review of Fluid Mask at MacWorld begins by saying that this "Photoshop plug-in takes the pain out of extracting backgrounds," and goes on to recommend the latest version, stating that "Fluid Mask is a very effective tool for separating objects from their backgrounds. It offers a variety of useful features for tackling almost any difficult image, from wispy hair to complex foliage. Online video tutorials and live training sessions help ease the learning curve."
Our friends at Vertus, the makers of Fluid Mask Photoshop Plugin, have set up a special exclusive discount for PhotoshopSupport.com. Go to our Fluid Mask page for a special, exclusive discount link.
Fluid Mask is designed for photographers, image editors, graphic designers and all those who take digital image editing seriously. In a streamlined interface and workflow, Fluid Mask instantly shows key edges in the image and provides comprehensive easy to use tools that work with difficult-to-see edges and tricky areas like trees & lattices. Fluid Mask will also preserve all-important edge information for a professional quality cut out. Go to our Fluid Mask page for more info.![]()
lynda.com Online Training Library - View Free Video Clips
 Subscriptions to the lynda.com Online Training Library provide anytime access to tens of thousands of video tutorials covering Photoshop, Illustrator, Dreamweaver, web design, digital imaging, 3D, digital video, animation, and many other topics. View free video clips.
For less than a dollar a day, members have the opportunity to stay current and keep skills sharp, learn innovative and productive techniques, and gain confidence and marketability - all at their own pace. Premium subscriptions include instructors’ exercise files so that members can follow along with the exact examples onscreen. Customers learn at their own pace and may stop, rewind, and replay segments as often as necessary. View some free video clips (high resolution).
![]()
A Thank You To Our Friends, Partners & Sponsors!
![]() We'd like to thank our friends, partners and sponsors: Adobe, Google, Hostway, Apple, O'Reilly Media, Brusheezy, Janita, Heathrowe, The Photoshop Roadmap, Power Retouche Plugins, Wacom, onOne Software, Obsidian Dawn, BittBox.
We'd like to thank our friends, partners and sponsors: Adobe, Google, Hostway, Apple, O'Reilly Media, Brusheezy, Janita, Heathrowe, The Photoshop Roadmap, Power Retouche Plugins, Wacom, onOne Software, Obsidian Dawn, BittBox.
![]()
![]()
