
![]()
![]() Try before you buy. Download any Adobe product for a free 30 day trial.
Try before you buy. Download any Adobe product for a free 30 day trial.
![]()
Welcome To The March 2013 Photoshop Newsletter
![]()
Creative Cloud Discount - Adobe Creative Cloud 40% Off Discount
 Current Creative Suite users - Save 40% off the first year on Adobe Creative Cloud.
Offer available to all registered users of individual products and suites, CS3 or later. Not available for education or volume licensing customers.
Current Creative Suite users - Save 40% off the first year on Adobe Creative Cloud.
Offer available to all registered users of individual products and suites, CS3 or later. Not available for education or volume licensing customers.
With Adobe Creative Cloud, a simple monthly membership gives you the entire collection of CS6 tools and more. Love print? Interested in websites and iPad apps? Ready to edit video? You can do it all. Plus, Creative Cloud members automatically get access to new products and exclusive updates as soon as they’re released. And, with cloud storage and the ability to sync to any device, your files are always right where you need them. Creative Cloud is available for individuals or teams.
![]()
Download Free Edge Reflow, Responsive-Web Design Tool
Here is Edge Reflow. From John Nack: "Photoshop speaks a fundamentally different language from the web,” writes PM Jacob Surber. That’s great for many things, but Adobe’s new Edge Reflow—available to download now, for free—takes a different approach, creating designs that present themselves differently depending on device (phone, tablet, desktop).
Honesty in design: Edge Reflow itself is built using HTML, CSS and JavaScript, with the goal of helping web designers design for HTML, CSS and JavaScript. Our intention is to remove layers of abstractions, so designers can create for the web using the web.
Focus on standards: Edge Reflow will ONLY enable designers to create experiences that are compatible with the web. In some situations this can be limiting, but as the capabilities of the web changes, Reflow will evolve as well. Adobe has committed to contributing and advancing web standards. Our goal is to integrate that work, as experimental features, in our web tools such as Reflow.
![]()
Adobe Brings Photoshop Touch to Mobile Phones
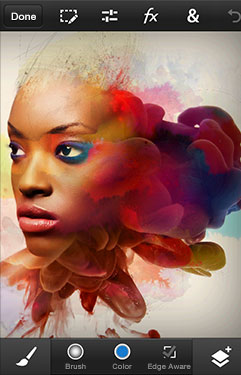 Adobe today announced the immediate availability of a new version of Adobe Photoshop Touch, optimized for iPhone, iPod touch, and Android smart phones.
Inspired by the highly successful Photoshop Touch for tablets, the phone app brings core features of Photoshop desktop software to mobile devices and offers similar intuitive, touch-based gestures and features. Photoshop Touch for phone offers powerful new capabilities for smartphone users:
—
Enhance images using popular Photoshop features such as layers, selection tools, filters, tonal and color adjustments
— Apply effects and add graphical text for endless creative possibilities
— Edit images as large as 12 megapixels with layers
— Combine images together quickly using the Scribble Selection feature, and easily refine your selection with the Refine Edge tool
— Automatically sync images to Adobe Creative Cloud with free 2GB of storage
Photoshop Touch for phone is integrated with Adobe Creative Cloud and includes access to 2GB of Creative Cloud storage with a free account. Users can sync photos and projects to Creative Cloud, and then continue working with the files from a tablet or Photoshop desktop software. Creative Cloud is a radical rethinking of the entire creative process and an industry-defining shift in creative expression and inspiration, where members can explore, create, publish and share their work across devices, the desktop and the Web. Visit Adobe Creative Cloud for more information.
Photoshop Touch for phone is immediately available in the Apple App Store and Google Play for US$4.99. For iOS devices, the app requires iOS 5, iPhone 4S and iPod touch 5th generation; Android phones must run Android 4.0 (Ice Cream Sandwich) or later.
![]()
25 Photoshop Secrets To Improve Your Skills - 25 Tips and Tricks
Here's a good bunch of helpful tips from Creative Bloq: 25 Photoshop secrets to improve your skills. Photoshop is an amazing bit of software that many designers use on a daily basis. It's such a flexible bit of kit that you could spend a week learning new features, and still have only scratched the surface of what's possible.
Once you've overcome the beginners' learning curve, however, there are some real gems hidden inside Photoshop that can help you speed up your work and get more out for less effort. Here we've rounded up 25 of the best Photoshop secrets to help sharpen your skills and improve your productivity.
![]()
Free Creative Suite 6 Superguide From PhotoshopCafe
Following the huge success of the free CS4 and CS5 Superguide, PhotoshopCafe have just released the free 77-page CS6 Superguide eZine. All you need to do is sign up for their newsletter. The new features of most of the CS6 Products are covered in depth, with articles from industry leaders such as Jack Davis, Colin Smith, David Blatner, Janine Warner, Stephen Burns, Chana Messer, Weston Maggio and more. Everything is available in a single PDF that you can take with you. View on your laptop, iPad or iPhone, print it or store it online.

![]()
Creative Compositing in Photoshop - Sample Chapter
 This free chapter addresses working freely and creatively with Photoshop, including discovering inspiration with the simplest subjects, learning how to treat Photoshop (CS6 free trial) as a digital sandbox, experimenting with blending modes, textures, and effects, and understanding the essentials of image composition.
The creative process is simultaneously fulfilling, intimidating, and—in a way—addictive. It involves honing your craft, nurturing your muse, and creating images that express your values, perceptions, and sensibilities. In the process, especially during those times when you run up against a creative block, you may doubt yourself, your ideas, and your abilities, but don’t.
Often, we seek the recognition and approval of people we respect, and we know from experience that worrying about what others will think can have a paralyzing effect on working freely. In Chapter 2, “The Creative Process,” we discussed finding your inspiration and turning off that nagging and doubting voice. This chapter continues that discussion and addresses working freely and creatively with Photoshop. In this chapter, you’ll:
— Discover inspiration with the simplest subjects
— Learn how to treat Photoshop as a digital sandbox
— Experiment with blending modes, textures, and effects
— Understand the essentials of image composition
The Photoshop techniques used in creative compositing are the same as those that have been presented throughout this book—from making selections, to masking, to experimenting with blending modes, to adding shadow and texture. In this chapter we review some key concepts and techniques, and feature several examples to illustrate how they can be used on actual compositing projects. Because this chapter concentrates more on the artistic process and on ways to foster and encourage your creative discoveries, it includes fewer step-by-step examples to work along with than previous chapters. But there’s still plenty of inspiration to give you ideas for your own collages!
Read full sample chapter.
![]()
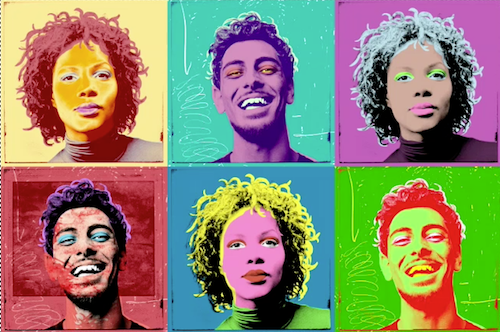
Assembling Multiple Variations Into A Single Comp - Photoshop Video And Step-by-Step Tutorial
This week, Deke shows you how to assemble a single Adobe Photoshop composition, or comp, from the six Warhol–like image treatments we created with the last two techniques. Learn how to precisely align each image so that not a single pixel is clipped or singed. To get started, follow along with Deke in this week’s free video and use the companion text below to help with each step. Use the portraits you’ve assembled over the last two tutorials, use your own images, or work with the exercise files included with the course.
1. Start in Adobe Bridge by Shift-click-selecting all of your images. Choose Tools > Photoshop > Load Files into Photoshop Layers.
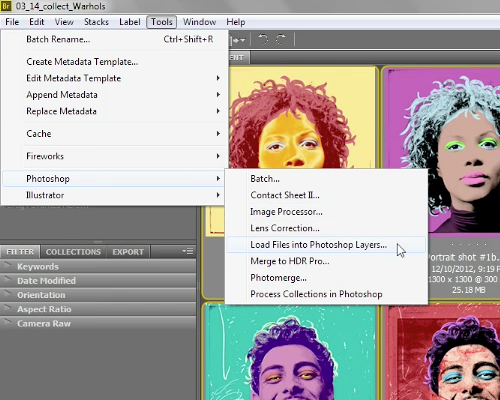
This method flattens each of the files and assigns it to an independent layer in Photoshop.
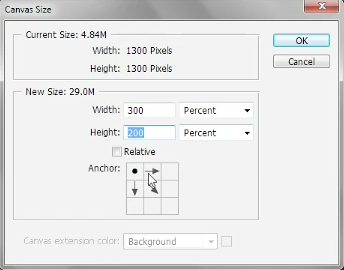
2. To give yourself more room to work, choose Image > Canvas Size. Deselect the Relative check box. Since there are six images and the plan is to place three of them in each row, you need to enlarge the image by 300 percent horizontally and 200 percent vertically. If you’re using a different number of images, you’ll need to adjust accordingly. Also make sure to click in the upper-left corner of the Anchor Matrix to expand the canvas in the correct direction.
3. Select the second image layer and choose the Move tool (V). This enables the Align menu in the panel options bar.
4. Click Align Bottom and then Align Horizontal.
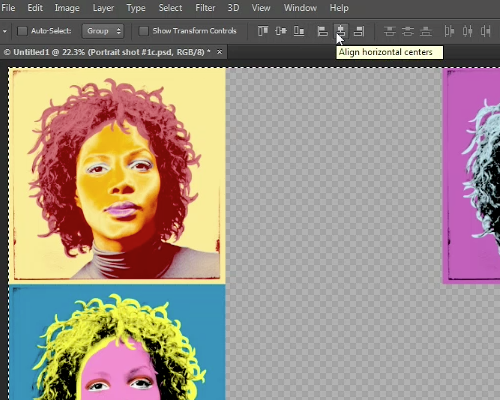
5. Select the next image layer. Alternatively, press the Alt+ (Windows) or Option+ (Mac) shortcut to move down the layer stack. Use the Align horizontal centers for this layer.
6. Select both of the last two images and choose Align Right Edges from the options bar.
7. Press Ctrl+D (Windows) or Cmd+D (Mac) to deselect all layers and save your work.
This technique is good for combining any number of images, as long as they are the exact same size. Just remember to scale your canvas size by the number of photos you want to place vertically and horizontally.
You can get a free 7-day trial to the lynda.com Online Training Library. The trial membership entitles you to 7 days of access to all 986 courses in the lynda.com Online Training Library for free. Click sign up on the subscription plan of your choice to get started.
![]()
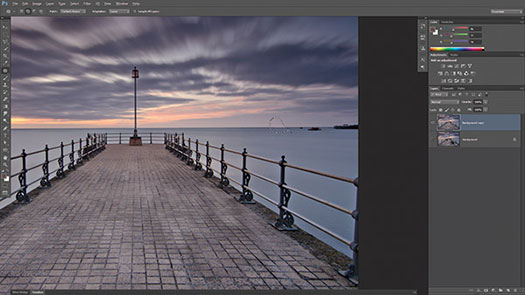
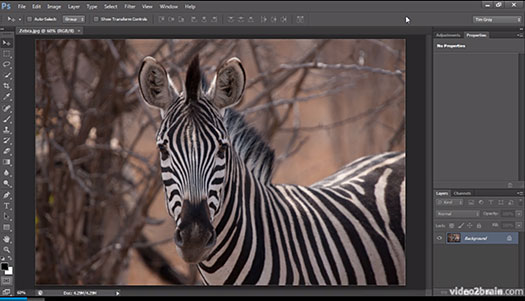
Using The Content-Aware Tools In Photoshop - Step-by-Step Tutorial
From Photoshop Daily: Leverage the power of Content-Aware technology to speed up your photo retouching. ( Download the image used in this tutorial to experiment with techniques learned.)


Bench removal
The goal in this project is to clean up the scene by removing the benches from the pier and the boats from the water. Begin by creating a copy of the background layer to work on. Roughly select the pier pavement and add a layer mask, this will ensure that only the pavement pixels are resampled. Create a new selection around one of the benches, being careful to include the shadows and bench edges. Then go to Edit>Fill and select Content-Aware for the use. Repeat the process for the other benches.

A little filter help
Delete the layer mask and evaluate the new bench-less pavement. The Content-Aware algorithm struggles to match the perspective pattern of the bricks on the pier. To help things match up, go to Filter>Vanishing Point. Draw out a plane to match up with the pier, then grab the Clone tool within the vanishing point window. Hold down Opt/Alt to set a source point and watch the cursor overlay to help align the Clone brush. Use this to clone out the pavement areas that are obviously out of perspective.
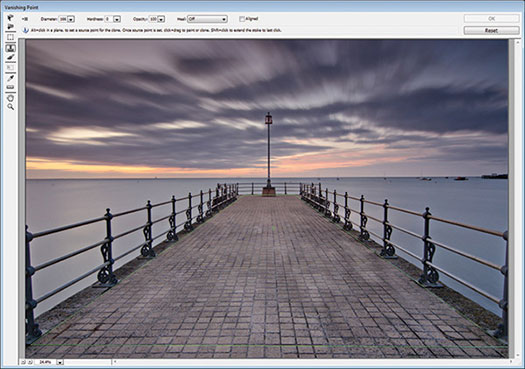
Boats be gone
Zoom in on the background area to get a close look at the boats and buoys. The small buoys are an easy task for the Spot Healing brush when set to Content-Aware. Use a brush radius slightly larger than the dark dots and a single click will remove each of them. The boats can be easily removed using the Patch tool with its Content-Aware option. Select a boat outline and then drag the selection to another area of the horizon to define a sample point. When released, the boat will seamlessly disappear.
![]()
Deke’s Techniques: Creating a Pattern of Unique Inset Circles - Video Illustrator Tutorial
Deke shows you how to create a pattern of morphing, color-changing inset circles inside Adobe Illustrator. We’ll do this by blending multiple groups of circles. Then we’ll blend and re-blend those groups to get a couple of different iterations of the effect. To get started, follow along with Deke in this week’s free video.
![]()
5 Reasons to Use Layer Groups in Photoshop - 10 Minute Video
In this episode of The Complete Picture, Julieanne Kost demonstrates 5 ways to use Layer Groups to create special effects in Photoshop.
![]()
Lightroom 4.4 RC and Camera Raw 7.4 RC Now Available
Here's the latest release news: Lightroom 4.4 and Camera Raw 7.4 Release Candidates are now available on Adobe labs.
![]()
Lightroom to Photoshop Workflow - Video Tutorial
In this episode of The Complete Picture, Julieanne reveals her Lightroom to Photoshop workflow used to create the still life “Cyclical”. Watch video.

![]()
Photoshop Video Tutorial - Organizing Photoshop CS6 Panels
With all the panels in Adobe Photoshop (30-day free trial), it's sometimes difficult to quickly get to where you want to go. Infinite Skills author Andy Anderson shows you how to organize your panels to get the best mix for the job at hand.
![]()
Photoshop CS6 Video Tutorial - Background Save And Autorecover
Photoshop CS6 (free trial) now includes powerful features in backup and autorecovery. From changing the frequency between background saving to working while you save an image, these tools will prove to be invaluable and time efficient for creative artists. Watch video.
![]()
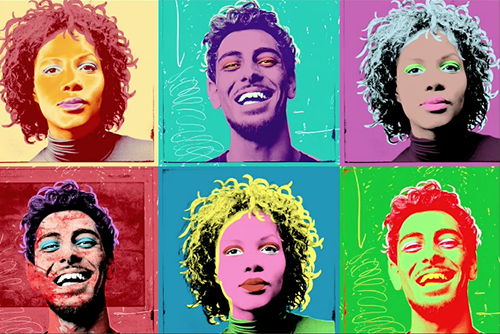
Creating a series of Warhol-style variations - Video Tutorial And Step-by-Step
In this week’s installment of Deke’s Techniques, Deke shows you how to build a Warhol-style serigraph portrait of your valentine, whether it’s your main squeeze, your best bud, or your favorite furry friend. This technique combines last week’s effect with a new high-contrast color palette and luminescent highlights in Adobe Photoshop. Follow along with Deke in this week’s free video and use the companion text below to help with each step.
1. Use the image variation from last week’s technique or start fresh with Deke’s exercise file, which includes a set of preselected color swatches. And here’s a tip if you’re starting from scratch: keep your palette garish, high contrast, and concise (around five swatches in total) for maximum impact.
2. Isolate and select the eyelids of your subject and fill them with white, the default background color in Photoshop.
3. Use the Eyedropper tool to sample your first color swatch, click on the eyelids again, and press Shift+Alt+Backspace or Shift+Option+Delete to fill them with the selected color.
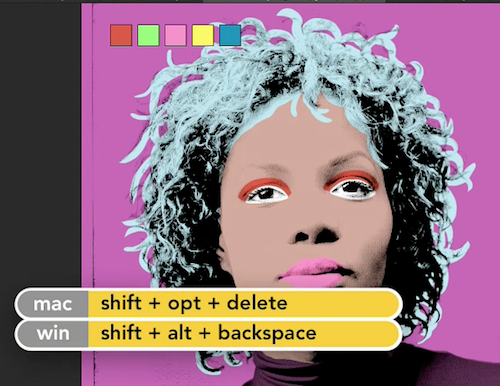
4. Repeat step 3 to fill the lips, hair, and background of your image with the colors of your choice.
5. To offset the fill layers so that they appear out of “registration,” as they would in a real screen print, select the layers, press and hold the Ctrl (Windows) or Command (Mac) key, and press the right and up arrow keys a few times.
6. Save a copy of your new variation by choosing File > Save As.
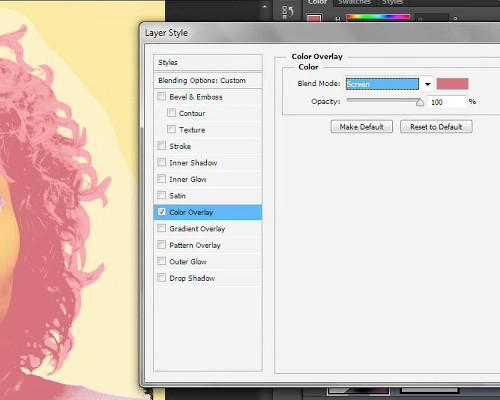
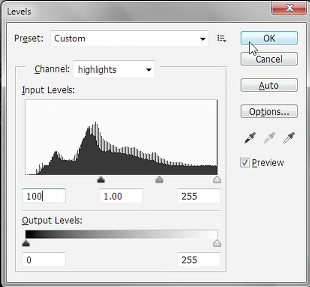
7. To add more dimension to the image, create a rough mask of your subject (free of most of the background) and add a Color Overlay effect. Change the effect’s blend mode to Screen to brighten all of the clipped layers in the image. Experiment by adjusting the Brightness and Saturation values.
8. To create the luminescent highlights, Shift-click the base black and white image and then choose Image > Calculations. Set both Layer options to Merged and select the Red channel for Source 1 and Blue for Source 2. Change the Blending setting to Difference and check Invert.
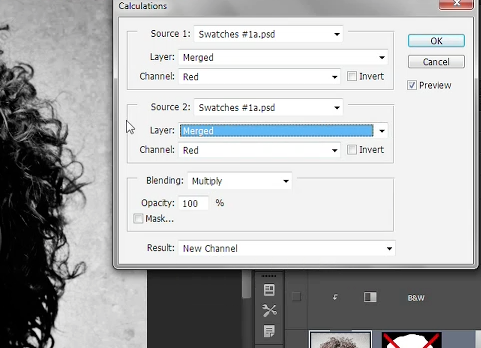
9. Back in the main image, press Ctrl+I (Windows) or Command+I (Mac) to invert the highlights effect.
10. Apply a Levels adjustment and increase the black point value to 100.
11. Turn the visibility of your other layers back on.
12. Finally, fill your highlights layer with the final swatch color and move it to the top of the layer stack.

Now you have a true Warhol-style portrait. However, Warhol would have never stopped at two variations. Tune in next week to watch Deke combine six variations in a precisely aligned hexaptych, or six-panel artwork. In the meantime, members of lynda.com can view the entire Deke’s Techniques collection in our library. You can get a free 7-day trial to the lynda.com Online Training Library. The trial membership entitles you to 7 days of access to all 986 courses in the lynda.com Online Training Library for free. Click sign up on the subscription plan of your choice to get started.
![]()
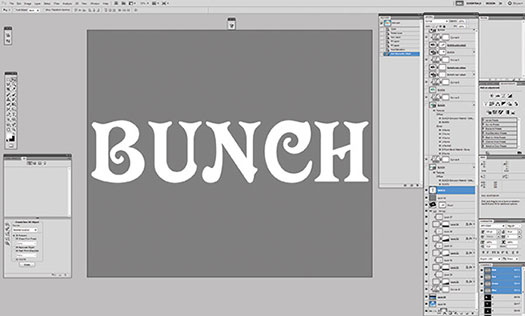
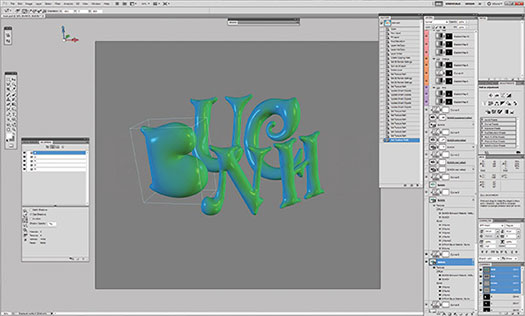
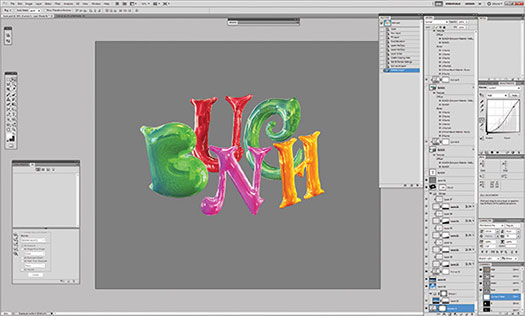
Using The Repousse Tool In Photoshop - Step-by-Step Tutorial
![]() From Photoshop Daily: Create 3D type in Photoshop using Repousse. The Repoussé Tool is super-effective at producing 3D lettering. We’ll show you how to operate options and mimics the look of glossy helium balloons. The bloated effect produced by the Inflate option within Repoussé, combined with the advanced reflections the 3D system enables, work together perfectly to achieve this cool effect.
From Photoshop Daily: Create 3D type in Photoshop using Repousse. The Repoussé Tool is super-effective at producing 3D lettering. We’ll show you how to operate options and mimics the look of glossy helium balloons. The bloated effect produced by the Inflate option within Repoussé, combined with the advanced reflections the 3D system enables, work together perfectly to achieve this cool effect.
The end result is something that couldn’t be achieved at the same level of refinement without using this Photoshop 3D option set. A decent level of understanding of Photoshop’s basic functions, such as layers and selections will also be needed to complete this tutorial.
Make our type
The first step is very important and involves getting the basic letters right. You need to choose a font that suits being made into 3D balloon shapes. The letters should have a decent amount of curvature – you don’t want them looking overly angular. You’ll actually only be dealing with the front of the letters, no extruded sides, so the letters need to be substantial. Here we have used a font called EFF Albert (www.buyfonts.com) and have made the word pretty big.
Repoussé option
Turn flat lettering into 3D shapes by using the 3D menu, choosing Repoussé, then Text Layer. Set the Depth of Extrude to 0, Inflate Strength and Angle to 0.4, at 90 degrees respectively. Also set the Mesh Quality to Best since you’re dealing with curved shapes. For the material set the colour to grey and use the lighting to add colour. Change the colours of the lights in the 3D panel to what looks good, here a mixture of greens and blues. Also put up the gloss and shine values to get a plastic look.

Arrange the letters
You’ll need to move the letters around while keeping them in the same 3D layer so that they interact via reflections and shadows. To do this choose 3D>Repoussé>Split Repoussé Meshes. In the 3D panel you can then select Filter by: Meshes to see the letters have been separated. Selecting each letter individually, move them into place using the Mesh Transform tools (not the Object Transform tools). Spend some time getting the positioning right as once you progress it will become difficult to remove them.
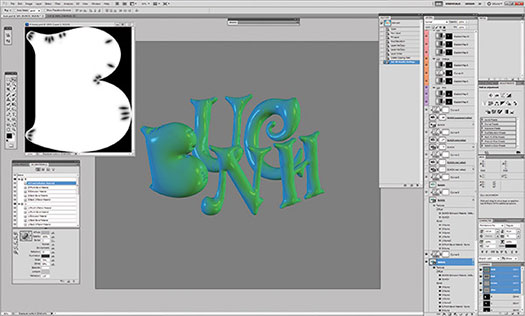
Create creases
To add the little dimples with helium balloon surfaces use bumps maps. Here, black represents low areas and white represents high. Since you’ve split the meshes you have to treat letters individually. For each letter create an image that is basically just the flat letter in white and draw in small shapes in black that will become the dimples. Load these with the Edit the bump texture option in the 3D Material panel, adjusting the value to whatever looks best. The U Scale in the Edit Properties of the map might need to be adjusted so that the map aligns with the letters properly. This value depends on the size of the word – we’ve set it at 5.
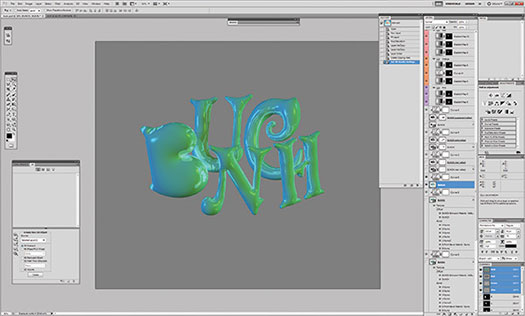
Render your 3D
Up until now you’ll have been working with the 3D render settings quality set to Interactive. This is fast but not suitable for the final image. You need to set the quality to Ray Traced Final. This will produce the correct reflections, anti-aliasing the letters. The process of rendering can take quite a while depending on how big your scene and how fast your computer is, up to hours at a time. You’ll see blue squares appear over your image while rendering, which will disappear when the process has finished.
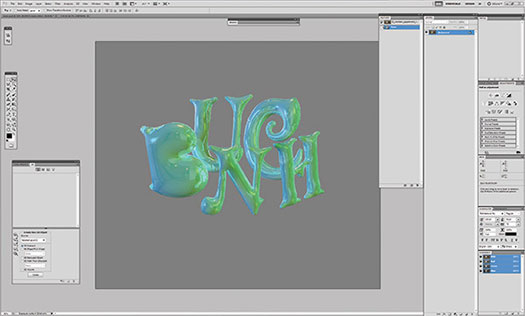
Reflections
What you achieve is letters that reflect each other, but nothing else, making it look like they’re sitting in a vacuum. You need to add an texture to the material, and environmental HDR image types are best as these give a full 360-degree image to reflect. To have better control of the reflections you’ll add them on their own layers. Duplicate the letters layer, setting their material’s Diffuse colour to black, adding environment texture. Reduce Gloss and Shine to 0 and set Reflection up to 85%. Change the blending mode of the layer to Screen.
Reflection falloff
To affect the relative strengths of the reflection in different parts of the letters you can use texture, just like the bump map. Here white represents reflection and black vice-versa. A map like this that creates stronger reflections at the edge looks more like shiny plastic in the real world. You can produce a map like this by simply using a copy of the original flat text layer, adding an Inner Glow Layer Style (fx). For better results, using Gaussian Blur to repeatedly blur two tones together produces a smoother result.
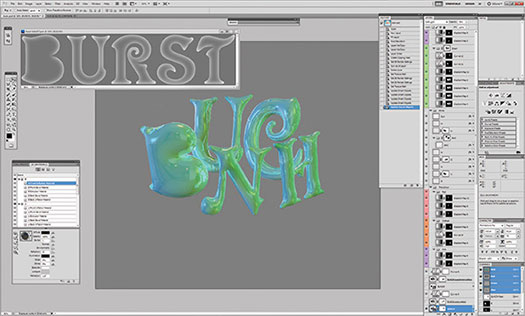
Layer the reflections
Adding further reflections can create a richer effect, simply duplicate the reflection layer you just created and change the environmental texture. Choose one that complements the existing reflections, setting the blending mode to Soft Light. Keeping the blending mode as Screen would simply increase the brightness too much and you’d lose all your detail. You can further control the blending of reflection layers by using the Blend If controls from the Layer Style panel (fx). By blending away the darker tones you can prevent the reflections becoming too heavy.

Change colours
Having the balloons all the same colour is a bit boring so you should use adjustment layers to fix this. Gradient map layers set to a Soft Light blending mode are a good way to achieve effects. For more radical recolouring, away from the green we’ve used, start off with a Gradient map with a Normal blending mode. Layering more adjustment layers on top, you can control the exact balance of colours and light on each letter. Using contrasting tones for neighbouring letters helps increase legibility.
TIP
To produce selections of individual letters, you can turn off the visibilities of the meshes you don’t want selected. This can be done in the Filter: By Meshes section in the 3D panel. Once this is done you can Cmd/Ctrl-click on the layer’s thumbnail. You now have a selection based on the letter or letters that are still visible.
![]()
Download A 30-day Free Trial Of Any Adobe Creative Suite
Photoshop Extended integrates the state-of-the-art editing, compositing, and graphic design capabilities of Adobe Photoshop, and features advanced tools for 3D design, image and video editing.
Photoshop and Photoshop Extended can be purchased as stand-alone applications, as components of the Adobe Creative Suite family, or as part of Adobe's new Creative Cloud offering. Upgrade pricing is also available to eligible customers.
Download
the 30-day Photoshop free trial, or a trial of any Adobe product, including the Master Collection. See our Photoshop CS6 Tutorials Page for a collection of free tutorials and videos. Visit the Adobe Coupons & Special Offers Page to see the latest deals from Adobe. Get up to 80% off at the Adobe Education Store.
![]()
Special Deals On Nik Software Photoshop Plugins - Viveza, Complete Collection - 15% DISCOUNT COUPONS
 Follow the links below and a 15% discount will be AUTOMATICALLY APPLIED to any purchase you make, or use our exclusive discount coupon code - NIKPSS - during the checkout process at Nik Software for the instant 15% discount. This exclusive discount coupon code can be applied to all the latest Nik Software Photoshop plugins, including Silver Efex Pro, Color Efex Pro, Viveza, HDR Efex Pro, and The Complete Collection (big savings).
The Complete Collection features products with Nik Software's patented U Point® technology, giving photographers the most powerful tools for precise and natural photographic enhancements and corrections without the need for complicated selections or layer masks.
The Complete Collection is offered in two editions: (1) the Complete Collection Ultimate Edition includes support for every plug-in to work in Photoshop, Lightroom, and Aperture, and offers Color Efex Pro 3.0 to work in Capture NX 2 as well. (2) the Complete Collection for Lightroom and Aperture includes support for each plug-in to only work in Lightroom and Aperture. Click here to compare both editions
Color Efex Pro
 52 photographic filters with over 250 effects for professional quality images.
Completely Original. Completely Indispensable.
52 photographic filters with over 250 effects for professional quality images.
Completely Original. Completely Indispensable.
Nik Software Color Efex Pro 3.0 filters are the leading photographic filters for digital photography. The award-winning Color Efex Pro 3.0 filters are widely used by many of today's professional photographers around the world to save time and get professional level results. Whether you choose the Complete Edition, Select Edition, or Standard Edition, you’ll get traditional and stylizing filters that offer virtually endless possibilities to enhance and transform images quickly and easily.
Patented U Point technology provides the ultimate control to selectively apply enhancements without the need for any complicated masks, layers or selections. Control color, light and tonality in your images and create unique enhancements with professional results. With 52 filters and over 250 effects found in Color Efex Pro 3.0, you can perform high quality retouching, color correction, and endless creative enhancements to your photographs. Download a free Trial version.
Viveza
 The most powerful tool to selectively control color and light in photographic images without the need for complicated selections or layer masks.
Two of the most important factors in creating great photography are color and light. Mastering the art of selectively correcting or enhancing each of these is now possible for every photographer without the need for complicated masks or selections, or expert-level knowledge of Photoshop. Integrating award-winning U Point technology, Viveza is the most powerful and precise tool available to control light and color in photographic images.
U Point powered Color Control Points, placed directly on colors or objects in an image (such as sky, skin, grass, etc.), reveal easy-to-use controls that photographers can use to quickly adjust brightness, contrast or color in a fraction of the time needed by other tools. With Viveza you’ll spend more time shooting photographs and save hours of image editing. Download a free Trial version.
Silver Efex Pro
 Complete power and control to create professional quality black and white images in one convenient tool.
Silver Efex Pro from Nik Software is the most powerful tool for creating professional quality black and white images from your photographs. For the first time, all the advanced power and control required for professional results have been brought together in one convenient tool.
Featuring Nik Software’s patented U Point technology to selectively control the tonality and contrast of the image, Silver Efex Pro includes advanced imaging algorithms to protect against unwanted artifacts, a comprehensive collection of emulated black and white film types, a variable toning selector for adding traditional toning techniques, over 20 one-click preset styles, and a state-of-the-art grain reproduction engine that help produce the highest quality black and white images possible from your color images while providing more freedom to experiment. Download a free Trial version to use Silver Efex Pro.
HDR Efex Pro
 Experience the power, control, and creative expression of HDR. This all in one toolkit lets you achieve your best HDR images ever, ranging from the realistic to artistic.
HDR Efex Pro is the essential new standard for creating amazingly high quality realistic to artistic HDR images with a revolutionary new all-in-one workflow. HDR Efex Pro includes a vast selection of one-click visual presets for incredibly fast results, advanced tone mapping algorithms, powerful and detailed HDR controls, and patented U Point® technology
Follow our discount coupon links, or enter our exclusive discount coupon code - NIKPSS - during the checkout process at Nik Software for the instant 15% discount. This exclusive discount coupon code can be applied to all the latest Nik Software Photoshop plugins, including Silver Efex Pro, Color Efex Pro, Viveza, HDR Efex Pro, and The Complete Collection (big savings).
![]()
onOne Ships Perfect Photo Suite 7
 onOne today announced the availability of Perfect Photo Suite 7. Improved to give photographers even more ways to maximize their creativity and solve common problems in digital photography.
Perfect Photo Suite 7 provides easy-to-use and powerful tools to develop stunning black and white photographs, enhance the look and feel of images with professionally-designed effects, beautifully retouch portraits, replace unwanted backgrounds, control depth-of-field after the shot has been taken, as well as resize and prepare images for print, in robust layered file workflow—in one affordable package.
For those who have purchased Perfect Photo Suite 6 on or after August 1, 2012, onOne Software will issue a complimentary upgrade to Perfect Photo Suite 7 via download
Perfect Photo Suite 7 introduces five new products—Perfect B&W, Perfect Portrait 2, Perfect Layers 3, Perfect Effects 4 and Perfect Resize 7.5 Pro, integrated with existing favorites Perfect Mask 5.2 and FocalPoint 2.
Photographers can effortlessly move between all of the modules while editing their photos using Perfect Photo Suite 7 as a standalone application. Photographers can also use Perfect Photo Suite to extend the image editing power of Adobe Photoshop Lightroom and Apple Aperture, and as a plug-in to Adobe Photoshop and Adobe Photoshop Elements.
Perfect Photo Suite 7 features a redesigned user interface with a new browser, search functionality, and the ability to flag and access favorite effects and presets. It also includes the powerful new edge-detecting Perfect Brush, presets that give users instant results alongside manual controls that offer photographers the option to fine-tune adjustments and create the images they envision.
![]()
Exclusive 15% Discount On Topaz Plugins, Bundles And Upgrades
 Enter our exclusive discount coupon code PHOTOSHOPSUPPORT during the checkout process at Topaz Labs for an instant 15% discount on any Topaz product, including bundles and upgrades.
Topaz Labs Photoshop plug-ins are specifically designed to expand a photographer's creative toolbox by harnessing powerful image technology developments. Photographers everywhere are now taking advantage of the creative exposure effects, artistic simplification, unique edge manipulation, and top-of-the-line noise reduction offered in Topaz products. The Topaz Photoshop Plugins Bundle is a super powerful Photoshop plugins package that includes the following Topaz products:
Topaz Adjust
Deliver stunning and dynamic images with this uniquely powerful plug-in that features HDR-like abilities and enhances exposure, color and detail.
Topaz InFocus
 Topaz InFocus uses the latest advancements in image deconvolution technology to restore, refine and sharpen image detail.
Topaz Detail
A three-level detail adjustment plug-in that specializes in micro-contrast enhancements and sharpening with no artifacts.
Topaz ReMask
The fastest and most effective masking and extraction program with one-click mask refining.
Topaz DeNoise
Highest-quality noise reduction plug-in that removes the most noise and color noise while preserving the most image detail.
Topaz Simplify
Provides creative simplification, art effects, and line accentuation for easy one-of-a-kind art.
Topaz Clean
Take control of the detail depth of your images with extensive smoothing, texture control and edge enhancement tools.
Topaz DeJPEG
Drastically improves the quality of web images and other compressed photos.
Learn more about the Topaz Photoshop Plugins Bundle. Download a free trial version.
![]()
Site Grinder Web Design Tool
 There often seems to be a strict division of labor within the world of web design and development. Creative professionals tend to stick to the Photoshop domain, while those well-versed in scripting are left to the task of implementing their work. Indeed, the two realms are quite different from each other, to which any of us even vaguely familiar with either can easily attest.
Essentially, Photoshop is a no-holds-barred design studio, offering the artist a seemingly endless array of creative options. On the other hand, HTML, CSS, Java and the like follow strict rules of engagement, requiring the developer to take any number of esoteric concerns into consideration in order to ensure that designs are properly displayed on the web.
Turn Photoshop Into A Complete Web Design Tool
SiteGrinder seeks to bridge this gap between design and development. Basically, SiteGrinder turns Photoshop into an easy-to-use and fully functional web design tool. With SiteGrinder, designers will now have the freedom to totally let their creativity loose and then, without skipping a beat, transfer their designs to the web. Bringing esthetic concerns together with more practical considerations, SiteGrinder is an amazingly powerful tool that would make a fantastic addition to any web designer's bag of tricks. Mac OS X and Windows versions of the SiteGrinder unlockable demo are available now via download.
 WordPress Photoshop Plug-in Creates Wordpress Blogs & Sites
Designers can now create PSD to WordPress Themes in Photoshop with Media Lab's NEW SG3xpress for Wordpress Photoshop plug-in. In addition, Media Lab has released the SG3xpress Add-on for its SiteGrinder 3 for users who wish to add advanced blog and WordPress Theme-building to the already powerful SiteGrinder 3 website creation software.
If you know Photoshop then you already know enough to start creating WordPress themes and blogs for yourself and your clients. Creating a blog or a WordPress site in Photoshop is easy with SG3xpress. Now you can go directly to WordPress with your design saving even more time and money for yourself and your clients.
![]()
Photoshop Masking Plugin Fluid Mask - Exclusive Instant Discount
 The 4 1/2 out of 5 star review of Fluid Mask at MacWorld begins by saying that this "Photoshop plug-in takes the pain out of extracting backgrounds," and goes on to recommend the latest version, stating that "Fluid Mask is a very effective tool for separating objects from their backgrounds. It offers a variety of useful features for tackling almost any difficult image, from wispy hair to complex foliage. Online video tutorials and live training sessions help ease the learning curve."
Our friends at Vertus, the makers of Fluid Mask Photoshop Plugin, have set up a special exclusive discount for PhotoshopSupport.com. Go to our Fluid Mask page for a special, exclusive discount link.
Fluid Mask is designed for photographers, image editors, graphic designers and all those who take digital image editing seriously. In a streamlined interface and workflow, Fluid Mask instantly shows key edges in the image and provides comprehensive easy to use tools that work with difficult-to-see edges and tricky areas like trees & lattices. Fluid Mask will also preserve all-important edge information for a professional quality cut out. Go to our Fluid Mask page for more info.![]()
lynda.com Online Training Library - View Free Video Clips
 Subscriptions to the lynda.com Online Training Library provide anytime access to tens of thousands of video tutorials covering Photoshop, Illustrator, Dreamweaver, web design, digital imaging, 3D, digital video, animation, and many other topics. View free video clips.
For less than a dollar a day, members have the opportunity to stay current and keep skills sharp, learn innovative and productive techniques, and gain confidence and marketability - all at their own pace. Premium subscriptions include instructors’ exercise files so that members can follow along with the exact examples onscreen. Customers learn at their own pace and may stop, rewind, and replay segments as often as necessary. View some free video clips (high resolution).
![]()
A Thank You To Our Friends, Partners & Sponsors!
![]() We'd like to thank our friends, partners and sponsors: Adobe, Google, Hostway, Apple, O'Reilly Media, Brusheezy, Janita, Heathrowe, The Photoshop Roadmap, Power Retouche Plugins, Wacom, onOne Software, Obsidian Dawn, BittBox.
We'd like to thank our friends, partners and sponsors: Adobe, Google, Hostway, Apple, O'Reilly Media, Brusheezy, Janita, Heathrowe, The Photoshop Roadmap, Power Retouche Plugins, Wacom, onOne Software, Obsidian Dawn, BittBox.
![]()
![]()