![]()
![]() Try before you buy. Download any Adobe product for a free 30 day trial.
Try before you buy. Download any Adobe product for a free 30 day trial.
![]()
Welcome To The November 2012 Photoshop Newsletter
![]()
onOne Ships Perfect Photo Suite 7 - 15% Exclusive Discount Code
 onOne today announced the availability of Perfect Photo Suite 7. Improved to give photographers even more ways to maximize their creativity and solve common problems in digital photography.
Exclusive Discount Code - 15% Off
Use our exclusive discount code PSSPPT06 to get 15% off any onOne product, including the new Perfect Photo Suite 7.
Perfect Photo Suite 7 provides easy-to-use and powerful tools to develop stunning black and white photographs, enhance the look and feel of images with professionally-designed effects, beautifully retouch portraits, replace unwanted backgrounds, control depth-of-field after the shot has been taken, as well as resize and prepare images for print, in robust layered file workflow—in one affordable package.
For those who have purchased Perfect Photo Suite 6 on or after August 1, 2012, onOne Software will issue a complimentary upgrade to Perfect Photo Suite 7 via download
Perfect Photo Suite 7 introduces five new products—Perfect B&W, Perfect Portrait 2, Perfect Layers 3, Perfect Effects 4 and Perfect Resize 7.5 Pro, integrated with existing favorites Perfect Mask 5.2 and FocalPoint 2.
Photographers can effortlessly move between all of the modules while editing their photos using Perfect Photo Suite 7 as a standalone application. Photographers can also use Perfect Photo Suite to extend the image editing power of Adobe Photoshop Lightroom and Apple Aperture, and as a plug-in to Adobe Photoshop and Adobe Photoshop Elements.
Perfect Photo Suite 7 features a redesigned user interface with a new browser, search functionality, and the ability to flag and access favorite effects and presets. It also includes the powerful new edge-detecting Perfect Brush, presets that give users instant results alongside manual controls that offer photographers the option to fine-tune adjustments and create the images they envision.
![]()
10 Things Beginners Want to Know How To Do In Photoshop CS6 - 40 Minute Video Tutorial
In this episode of the Adobe Creative Suite Podcast, Terry White shows you How to Get Started With Adobe Photoshop CS6. See how to do the 10 things that beginners ask how to do the most, including how to remove the background from an image and put it on a different background. (watch in Super HD 1280 x 720)
Download A 30-day Free Trial Of Any Adobe Creative Suite
 Photoshop Extended integrates the state-of-the-art editing, compositing, and graphic design capabilities of Adobe Photoshop, and features advanced tools for 3D design, image and video editing.
Photoshop and Photoshop Extended can be purchased as stand-alone applications, as components of the Adobe Creative Suite family, or as part of Adobe's new Creative Cloud offering. Upgrade pricing is also available to eligible customers.
Download
the 30-day Photoshop free trial, or a trial of any Adobe product, including the Master Collection. See our Photoshop CS6 Tutorials Page for a collection of free tutorials and videos. Visit the Adobe Coupons & Special Offers Page to see the latest deals from Adobe. Get up to 80% off at the Adobe Education Store.
![]()
Mastering Color Correction in Photoshop - 5 Free Videos
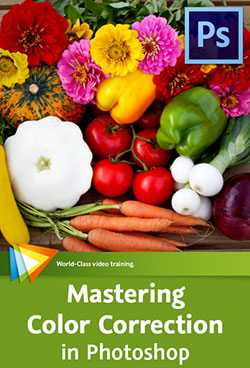 Here are 5 free videos from Mastering Color Correction in Photoshop - Take Control of the Colors in Your Images. There’s more to color than meets the eye. Getting it right is both an art and a science, and in this course Tim Grey shares his knowledge of color correction in Photoshop (CS6 30-day free trial). If you decide to purchase the complete training, use our discount code PSSEP30 for an instant 30% savings, good through October 2012.
Reading a Histogram
The Histogram display is generally thought of as a tool for evaluating tonal information in your photos, but as you'll see in this lesson, it can also be helpful when it comes to color.
Vibrance vs. Saturation
This lesson will show you the important differences between vibrance and saturation when it comes to adjusting the intensity of colors in your photos.
Balancing a Specific Color
When a specific color in a photo isn't looking quite right, you can apply an adjustment that only affects a particular range of colors, as you'll see in this lesson.
Painting a Color Fix
This lesson will guide you through the process of painting a color fix into specific areas of a photo.
Matching Color Between Images
If you have two images that need to have matching colors, the technique you'll learn in this lesson provides a solution.
![]()
How To Turn A Pencil Drawing Into Ink-style Art - Photoshop Video And Step-by-Step Tutorial
Deke McClelland shows you step-by-step how to use Adobe Photoshop to turn a scanned pencil sketch into a digital ink-style drawing.
For his sample file, Deke uses a scanned pencil-sketched comic strip reminiscent of art he drew in his youth:

The first step is to get rid of some color effects that were created during the scanning process. Because this unwanted color is living in the Blue channel, Deke uses the Photoshop Channel Mixer to reduce the effects by mixing in greater values of the Red and Green channels. This process also creates an opportunity for Deke to darken the outlines of his characters.

Next, he strengthens the black outlines with a Levels adjustment:

Then Deke applies the Despeckle filter to help reduce the noisy edges around the drawing caused by the JPEG compression, and creates a white rectangle to cover the edge of the drawing paper that reveals where the scanned paper ends and the scanner itself starts.

One advantage of drawing digitally is the ability to reconsider details. Before taking the time to redraw the cartoon with pencil, Deke brushes white around the eyes of his square character, who he’s affectionately named Jello, so he can redraw the eyes digitally.

After switching his brush color to black, Deke redraws a more refined expression of gelatinous rage and reconstructs the side of Jello’s face that got cut off by the scan:

In the end, you get all the benefits of drawing in the real world, and refining in the digital one. To see every nuance and detail of the process, check out the movie Turning a pencil sketch into digital ink at the top of this post, or on lynda.com. For members of lynda.com, Deke also has a member-exclusive movie this week called Adding a graph-paper background, where he shows you how to give your digitally inked characters a unique background.
You can get a free 7-day trial to the lynda.com Online Training Library. The trial membership entitles you to 7 days of access to all 986 courses in the lynda.com Online Training Library for free. Click sign up on the subscription plan of your choice to get started.
![]()
2 New Lightroom 4 Plugins On Adobe Labs
 From Julieanne Kost's Blog: Adobe has released 2 pre-production plug-ins that extend existing functionality inside the Develop Module in Lightroom: Adobe DNG Flat Field and Adobe DNG Recover Edge. These plug-ins are provided free of charge, but without an official support program.
Like other technologies on Adobe Labs, these tools are not finished products, but rather beta or prototype utilities that may work in your particular environment. To download the plug-ins and for more information, please visit Adobe Labs.
Adobe DNG Flat Field plug-in is a tool used to correct an optical phenomenon called shading, also known as “lens cast”.
Adobe DNG Recover Edge plug-in is a tool used to recover image data typically lost when using the in-camera crop mode.
![]()
Photoshop Creative Effects and Filters - 5 Free Video Tutorials
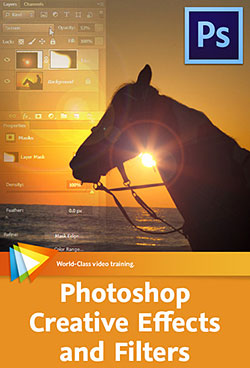 Here are 5 free videos from Photoshop Creative Effects and Filters - Take Your Images in New Directions. "If you can imagine something," says Tim Grey, "you can probably create it in Photoshop." (PS CS6 30-day free trial)
In this one of-a-kind workshop Tim puts his money where his mouth is by sharing his favorite techniques for using Photoshop’s effects and filters to create imaginative, out-of-the-ordinary images. If you decide to purchase the complete training, use our discount code PSSEP30 for an instant 30% savings, good through October 2012.
Using Smart Filters
Smart Filters provide you with the ability to apply creative filters with tremendous flexibility, and this lesson will show you how to put Smart Filters to use.
Creating a Gradient Map Preset
This lesson will guide you through the process of creating your own custom gradient to add a color effect to an image.
Creating an Oil Paint Effect
When you want to apply a painterly effect to a photo, the Oil Paint filter provides an excellent solution. This lesson will show you how to put this filter to use.
Playing with Blend Modes
Some of the blend modes available in Photoshop enable you to create unique effects in your images, as you'll see in this lesson.
Creating Blocks with Extrude
The Extrude filter has some very interesting creative possibilities, as you'll see in this lesson.
![]()
Adobe Photoshop Elements 11 Learn by Video - 7 Free Clips
 Here are 7 free videos for Photoshop Elements 11 (30-day free trial) taken from the video tutorial series Adobe Photoshop Elements 11 Learn by Video - Manage, Optimize, and Share Your Photographic Memories. If you decide to purchase the complete training, use our discount code PSSEP30 for an instant 30% savings, good through end of October 2012.
Updating an Existing Catalog
If you've been using Photoshop Elements prior to version 11, you'll want to watch this lesson so you'll know exactly how to update your existing Elements catalog.
Identifying the People in Photos
The Elements Organizer includes a powerful "people recognition" feature that enables you to automatically identify the people in your photos. This lesson will show you how to put this feature to use.
Performing a Visual Search
The Elements Organizer lets you find images that are visually similar to a particular photo that you've identified. This lesson will show you how to use this impressive capability.
Creating a Perfect Portrait
In this lesson you'll learn how to apply a variety of adjustments to improve any photo that features a person, making it look like a great portrait.
Creating an Out of Bounds Effect
With the Out of Bounds guided edit you can make a subject pop out of the photo, as you'll see in this lesson.
Creating Reflections
This lesson will show you how to create a reflection effect that can add some elegance to a photo.
Creating Greeting Cards
This lesson will show you how to create custom greeting cards that feature your photos.
![]()
CS6 Tutorial - Formating Text In Photoshop CS6
 Here's a new tutorial from Photoshop Daily — Format text in Photoshop CS6. Explore the latest Paragraph and Character style options in Photoshop CS6.
Photoshop CS6’s new Type tool options are geared towards flexible design, with styling and editing faster than ever before (30-day free trial). This makes tweaking type in pages for print or web UI far more productive. This is achieved through the latest Paragraph Styles and Character Styles options. We suggest selecting Typography from the workspace drop option (top-right in the interface) to have all associate tools instantly available in one location. Here’s how they work...
Lorem Ipsum
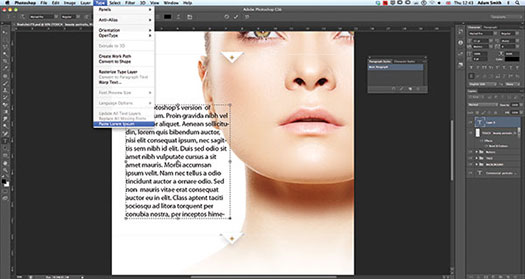
In previous editions of Photoshop, throwing down some blurb to work with in your template meant you had to draw out your text box. Then you’d type and repeatedly copy and paste text to fill the space. However, as Photoshop has borrowed much from InDesign, now you needn’t toil manually. Instead draw out a text box and select Type>Paste Lorem Ipsum.
Paragraph styles
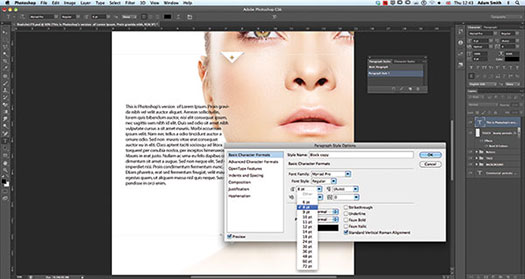
Once your Lorem Ipsum is set, you can start to fashion your paragraphs. Before you do, hit the Create a new Paragraph Style option. Double-click your Paragraph Style 1 preset to alter name, colour, font type, alignment and many other advanced features. Changes update live. Simply click between presets to change style factors.
Character styles
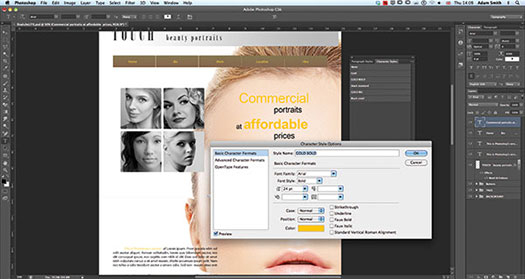
This functionality is interesting, letting you redefine the style of individual words and sentences. Simple select the word(s) you want to change and hit the Create a new Character Style. Double-click the preset to make changes, the same as a Paragraph Style. If you decide to update the effects in this preset each word with the existing effect attached will update automatically.
![]()
How To Use The Graduated Filter And Adjustment Brush In Lightroom And Camera Raw
In this episode of The Complete Picture (The Graduated Filter and Adjustment Brush), discover the power of making selective adjustments like dodging and burning, color corrections and noise removal using the Graduated Filter and Adjustment Brush. Note: although this video was recorded in Lightroom, the same techniques are available in Adobe Camera Raw in Photoshop CS6 (30-day free trial).
![]()
Master Scripted Patterns - A Creative Photoshop CS6 Option
O
 In this new Photoshop CS6 tutorial from Photoshop Daily, Adam Smith explores the creative potential of this new Photoshop CS6 option (free trial). At first, native Pattern presets in Photoshop had limited use for rudimentary texture application. But soon Photoshop artists started personalising patterns and enhancing projects for both on-screen and print.
The new CS6 Scripted Pattern options are in harmony with this creative philosophy. These now offer variable styles, which liberate designs from the single-tiled look that was set in earlier versions. Each defines its own method of displaying your pattern.
Brick Fill fixes textures into rows much like brickwork, with Cross Weave also adopting real-world properties, interlinking multiple textures at alternating 90-degree angles. Both these styles introduce alternate tones to your original pattern, however Spiral retains the original colour of your pattern. Random Fill is less organised, offering entirely random effects each time you apply.
Patterns can now be applied to empty layers, maintaining transparency. This means you don’t have to bother with solid backgrounds when layering effects. Unfortunately these presets don’t extend to the Layer Style options. Parameter control would help adjust looks, applying effects non-destructively in projects. Hopefully we can expect these updates in the near future, but for now we’ll show you how to approach existing scripted styles.
Step 01: Random foreground elements
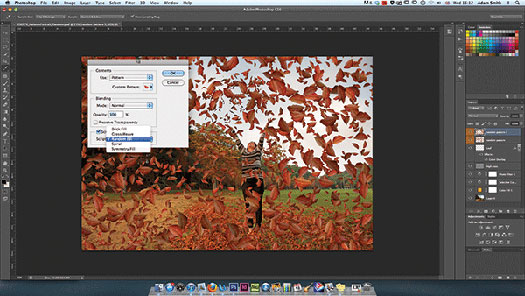
The Random Fill throws out some cool experimental effects. We’ve created a new pattern using leaf stock, applying this scripted pattern to create a foreground. The selection size you make around your leaf will establish spacing applied in your Random Fill effect.
Step 02: Chequered styles
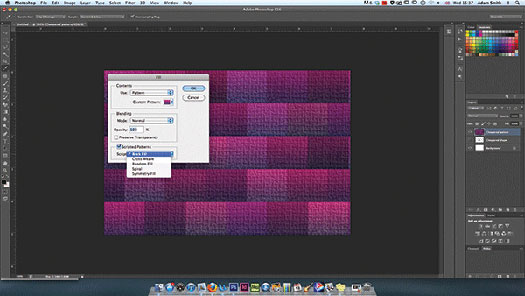
The Brick Fill option works best when applied with shapes with a hard edge, namely squares and rectangles, saved as a new pattern. This eradicates the annoyance of negative space that appears with other shapes. Stick to four sides and these should interlink nicely.
Step 03: Master the cross weave
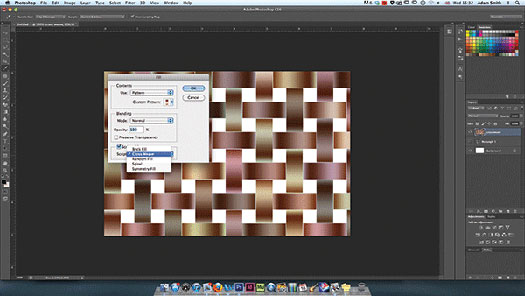
Cross Weave styles are very specific, so stick to the fundamental shapes. We’ve created a small gradient shape in CS6, making a selection and saving this as a pattern preset. Once applied using Scripted Patterns>Cross Weave, the effects are quite attractive.
Final image:

![]()
The Plugin Site Release FilterHub For Photoshop
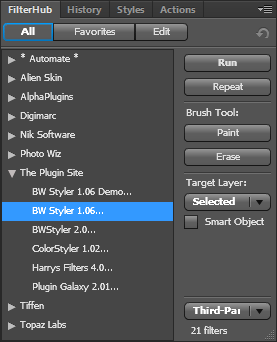 The Plugin Site has announced FilterHub, a panel extension for Photoshop CS4, CS5, CS5.5 and CS6, which runs under Windows and MacOS X. FilterHub is a powerful replacement for Photoshop's Filter menu and offers many advantages over it. It supports built-in Photoshop filters (from the Filter and Adjustments menus), filter plugins and third-party automation plugins. (Download a 14-day-trial version.)
Running filters from the Filter menu in Photoshop is a tedious task. You need to click the Filter item in the menu bar, move down the Filter menu list, find to the right sub menu, move the mouse to the right to enter the sub menu, move down the sub menu and finally click on the appropriate filter item. If you use multiple filters per image, this means performing a lot of unnecessary mouse movements. The wasted seconds for each filter execution add up to minutes and hours as time goes by.
Of course, you can record actions for a certain filter sequence, but you do not need the same filters in the same sequence for all images. You can also assign key shortcuts to filters, but then you have to remember them. Moreover, assigning key shortcuts to dozens of filters is impracticable or even impossible. So you will always need to resort to the inconvenient Filter menu.
With FilterHub your filters are only one click (or a double click) away. The FilterHub panel stays open as long as you wish and displays a configurable list of filters and plugins. You can make it display all filters, show only third-party plugins, enter key words to display only certain filters or add your preferred filters to a favorites list. So even if you do not have FilterHub enlarged to full screen height, you can always have your favorite filters accessible without scrolling.
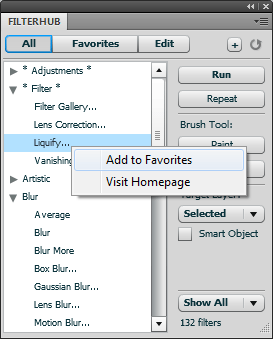 FilterHub additionally allows you to do many things that the Filter menu is not capable of. You can apply the last effect of any filter (not just the last used one) without displaying its dialog and you can paint or erase filter effects with the brush tool. Even more, it runs multiple filters (from the favorites list) with one click, renders the same filter effect on multiple layers in one pass or both: It applies multiple filters on multiple layers with one click.
But this is not all. FilterHub saves you more time and hassle. Before running a filter it can automatically create a duplicated layer, a merged copy of all layers (stamped layer), a smart object or flatten the image.
The Filter menu disables filters that do not officially support smart filtering or a certain image mode. FilterHub does not have these limitations. It applies all filters to smart objects, even those that are disabled on the Filter menu. Furthermore, if a filter does not support the current image mode, FilterHub automatically displays a list of supported modes, preselects the best suited one and converts the image accordingly. So you do not need to try out different modes until you find the right one. FilterHub's context menu offers an option for visiting the homepage of a selected filter, so you can find information about it or check out if there is a new version available.
FilterHub is unique as it is the only available tool that offers a replacement for the old-fashioned Filter menu. It is also the only available third-party tool that lets you run all filters of Photoshop and the only tool that lets you apply multiple filters to multiple layers with one click. The ability to execute filters and plugins faster and more conveniently together with its powerful features make it an indispensable tool for Photoshop users.
FilterHub requires Adobe Photoshop CS4, CS5, CS5.5 and CS6 either under Windows or MacOS X. FilterHub supports all localized versions of Photoshop, but its UI is only available in English and German. FilterHub costs USD 39.95 (Academic/educational license: USD 24.95). A 14-day-trial version can be downloaded.
![]()
Adobe Unveils Next Generation Acrobat XI - New Cloud Services
 Adobe today unveiled Adobe Acrobat XI software with cloud services, a powerful new solution that rises to today's complex document challenges. Acrobat XI Standard has an MSRP of $299/$139 for the upgrade package. Acrobat XI Pro will cost $449/$199. A download of Reader XI will be free when Acrobat ships. The lowest tier of Adobe EchoSign still costs $14.95/month, and Adobe FormsCentral subscriptions start at $14.99/month.
The industry standard for PDF software will now feature complete PDF editing and export to Microsoft PowerPoint; touch-friendly capabilities on tablets; and newly integrated cloud services, including sophisticated Web contracting with Adobe EchoSign® and forms creation, data collection and analysis with Adobe FormsCentral. Acrobat XI additionally supports IT departments with seamless Microsoft Office and SharePoint integration, easy deployment, applications virtualization and robust application security to help provide a low cost of ownership and sound return on investment.
Products included in this release are: Acrobat XI Pro, Acrobat XI Standard, Adobe Reader® XI and newly integrated document services, Adobe FormsCentral and Adobe EchoSign.
The mounting productivity inefficiencies and cost of document-based challenges are highlighted in a recent global IDC white paper. A typical company with 1,000 employees has a productivity cost of US$15.9 million annually, the white paper calls out, and addressing these inefficiencies would be tantamount to hiring an additional 213 people.
![]()
Learning Adobe Illustrator CS6 Tutorial DVD - Video Training - 14 Free Videos
 In this Adobe Illustrator CS6 training course, expert author and trainer Andy Anderson guides you through the tools and techniques that are available to you in this vector graphics editor from Adobe Systems.
Used by professionals around the world, Illustrator can be a mystifying program, but Andy breaks it down into easy-to-understand sections that even an absolute beginner with Illustrator can understand.
Here are the free videos you can watch now from this course:
Introduction To Adobe Illustrator
Working Smart With Illustrator Preferences
Group & Direct Selection Techniques
It's All In The Math
The World Of Illustrator Gradients
The Pathfinder Panel - Part 1
Going Beyond The Pathfinder Panel
Creating Custom Symbols
Pen Tool 101
Generating Paths With The Pen Tool
Working With Smart Guides & The Pen Tool
Generating An Opacity Mask
Working With Live Paint
Creating Custom Illustrator Brushes
This Adobe Illustrator CS6 training course tutorial series starts out with a tour of the Illustrator interface, and an explanation of vector art. Once you have a grounding in the basic navigation, Andy quickly takes you into applying Illustrator tools for selections, color management, shapes, fills, strokes, as well as anchors and paths.
You will learn about creating and managing vector based shapes, using the pen tool, working with effects and layers, working with masks and images, and much, much more. By the completion of this video based tutorial for Adobe Illustrator CS6, you will fully understand the difference between vector and raster art, and how to create high-quality vector images using the variety of tools provided to you in Illustrator CS6. Working files are included to allow you to work with the same files that the author uses throughout this video training course.
![]()
Building A Photo Gallery Website With Adobe Dreamweaver CS6 - Tutorial
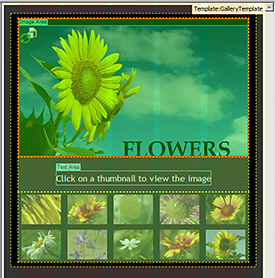 From the latest edition of Inspire magazine from Adobe comes a good tutorial - building a photo gallery website with Adobe Dreamweaver CS6. From the intro:
Dreamweaver CS6 (30-day free trial) includes full support for HTML5 and CSS3, enabling you to create fluid page designs, smooth transitions between content, and content that translates to web and mobile applications.
Whether you're new to building websites or you're a seasoned developer, Dreamweaver is one of those tools that's hard to live without. Rather than using a suite of tools and utilities, you can use the visual preview features, coding tools, and server-related tools in Dreamweaver to speed development.
In this article, I guide you through some of the new features in Dreamweaver CS6 and introduce you to a basic workflow for creating a simple website. You'll build a template for a photo gallery website, including a home page, detail pages, and a navigation bar. Along the way, you'll learn how to use the new Fluid Grid Layout feature, CSS3 transitions, and Dreamweaver templates.
![]()
Adobe Photoshop Lightroom Updated To 4.2 - Now Available
 Lightroom 4.2 is now available as a final release on Adobe.com (update link is on right side bar) and through the update mechanism in Lightroom 4. The goal of this release is to provide additional camera raw support, lens profile support and address bugs that were introduced in previous releases of Lightroom.
Bugs Corrected in Lightroom 4.2:
The following bugs that were part the Lightroom 4 releases have been corrected:
- Stacked photos were hidden in both the Grid view and Filmstrip. This occurred when photos get unstacked as a result of enabling auto-stacking.
- Folder stacks with virtual copies were unstacked when moving to another folder.
- When scrolling through the filmstrip (at somewhat fast rate), occasionally a “gray” image was displayed for an instant and then replaced by the correct image preview.
- The Navigator Panel in Map did not pan correctly.
- Parents and synonyms of “do not export” keywords also did not export.
- Occasionally were unable to publish videos to Facebook
- Audio did not play in video files after creating a slideshow that contains music (Win 7 only)
Image select arrow on keyword list didn’t display when keyword list contained a large number of keywords
- Unable to edit Lightroom photos as jpegs in Photoshop Elements
- Carriage Return in either the Title or Caption field invalidated a Flickr upload.
- Tether capture bar disappeared after deleting photo (Win only).
- Back Cover of Book layout had Horizontal text on spine rather than Vertical
- Sharpening was not applied to books that were exported as JPEG files
- Double-byte characters were not exported to Books saved as PDF files
- Unable to type accented character in book module in LR4
- Luminance Noise slider was unresponsive when Clarity is greater than 0.
- Develop keyboard shortcuts (+ and – keys) no longer worked in older process versions such as PV2010
![]()
5 Free Vectorized Tree Branch Brushes For Photoshop
From Bittbox: 5 free Vectorized Tree Branch Brushes for use in Photoshop.

![]()
Windows 8 And Adobe Photoshop Operating System Compatibility Chart
You can find an Adobe product operating system compatibility chart that will show you exactly which Adobe products work with Windows 8 and which don't. The information details the compatibility of the most recently released version of each Adobe product with Microsoft Windows 8. The chart will be updated as new information becomes available.
![]()
Dreamweaver CS6 Bible - Free Chapter PDF - Adding Advanced Design Features - Working With Layouts
 You can download chapter 10 from Dreamweaver CS6 Bible (PDF). Excerpted with permission from the publisher, Wiley, from Dreamweaver CS6 Bible by Joseph W. Lowery. Copyright © 2012. Here's what's covered in this chapter:
• Understanding how divs and AP elements work in Dreamweaver
• Inserting <div> tags
• Dreamweaver Technique: applying a CSS Layout
• Working with fluid grids for multiple screens
• Modifying AP elements: resizing, moving, and altering properties
• Dreamweaver Technique: Inserting an AP element
• Creating interactive AP elements with Dreamweaver behaviors
Dreamweaver CS6 Bible covers the latest version of the leading website development software. Web designers rely on Dreamweaver to create functional, attractive websites quickly and efficiently. The newest version adds some important functionality for tablet and smart phone screens, HTML5 enhancements, CSS3 updates, and native mobile application development for iOS, Android, and other platforms.
This comprehensive guide covers them all and much more, making it the complete course in Dreamweaver for new users as well as a vital guide to help experienced designers delve deeper into more advanced topics.
![]()
How To Embed Images In InDesign So They Don't Go Missing - Video Tutorial
In this week’s InDesign Secrets episode, Anne-Marie Concepción addresses the dreaded lost image phenomenon, which occurs when Adobe InDesign can’t find your linked images and lets you know with glaring red question marks. The presence of glaring red question marks in your actual layout (and not just your Links panel) is courtesy of InDesign CS6, but the lost images phenomenon is familiar to users of earlier versions of InDesign as well.
Anne-Marie’s solution is simple: embed your images. That way they can’t get lost if you move the image folder or send the document off to a client without a separate file full of graphics. An embedded Photoshop file even retains its layers. The first step is to find the original image and relink it (you’ll have to solve that challenge on your own). Then right-click on the image in the Links panel and choose Embed Link. Your image is now permanently part of your file.
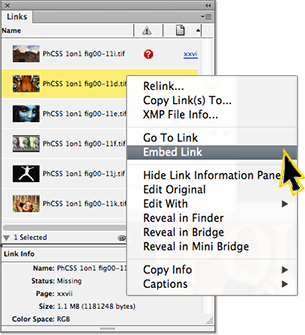
As easy as this is, you should be aware of two potential disadvantages to embedding your file. First, when you embed your images you no longer have the benefit of automatically updating links, but if your graphic is stable and not going to change (like a logo), then it’s really not a an issue. Second, embedding images makes your InDesign file significantly larger. But as Anne-Marie notes, it’s not 1993, and while you may not want to embed hundreds of images, the increased file size you’ll see from embedding a handful of images for an in-house document is not the obstacle it used to be.
One other note: you can’t embed a video file or another InDesign file. What I find particularly fascinating is if you embed a graphic file within your InDesign document, the encompassing InDesign file behaves in some ways like a zipped archive. If you wish to unembed the graphic later, you can create a new “original” right from InDesign. For certain scenarios, this is an elegantly simple solution to the lost image syndrome. Anne-Marie’s partner in InDesign secrecy, David Blatner, has a member-exclusive video in our library this week called Adjusting leading inside a paragraph, in which he explores customizing InDesign stroke styles.
You can get a free 7-day trial to the lynda.com Online Training Library. The trial membership entitles you to 7 days of access to all 986 courses in the lynda.com Online Training Library for free. Click sign up on the subscription plan of your choice to get started.
![]()
Exclusive 15% Discount On Topaz Plugins, Bundles And Upgrades
 Enter our exclusive discount coupon code PHOTOSHOPSUPPORT during the checkout process at Topaz Labs for an instant 15% discount on any Topaz product, including bundles and upgrades.
Topaz Labs Photoshop plug-ins are specifically designed to expand a photographer's creative toolbox by harnessing powerful image technology developments. Photographers everywhere are now taking advantage of the creative exposure effects, artistic simplification, unique edge manipulation, and top-of-the-line noise reduction offered in Topaz products. The Topaz Photoshop Plugins Bundle is a super powerful Photoshop plugins package that includes the following Topaz products:
Topaz Adjust
Deliver stunning and dynamic images with this uniquely powerful plug-in that features HDR-like abilities and enhances exposure, color and detail.
Topaz InFocus
 Topaz InFocus uses the latest advancements in image deconvolution technology to restore, refine and sharpen image detail.
Topaz Detail
A three-level detail adjustment plug-in that specializes in micro-contrast enhancements and sharpening with no artifacts.
Topaz ReMask
The fastest and most effective masking and extraction program with one-click mask refining.
Topaz DeNoise
Highest-quality noise reduction plug-in that removes the most noise and color noise while preserving the most image detail.
Topaz Simplify
Provides creative simplification, art effects, and line accentuation for easy one-of-a-kind art.
Topaz Clean
Take control of the detail depth of your images with extensive smoothing, texture control and edge enhancement tools.
Topaz DeJPEG
Drastically improves the quality of web images and other compressed photos.
Learn more about the Topaz Photoshop Plugins Bundle. Download a free trial version.
![]()
Site Grinder Web Design Tool
 There often seems to be a strict division of labor within the world of web design and development. Creative professionals tend to stick to the Photoshop domain, while those well-versed in scripting are left to the task of implementing their work. Indeed, the two realms are quite different from each other, to which any of us even vaguely familiar with either can easily attest.
Essentially, Photoshop is a no-holds-barred design studio, offering the artist a seemingly endless array of creative options. On the other hand, HTML, CSS, Java and the like follow strict rules of engagement, requiring the developer to take any number of esoteric concerns into consideration in order to ensure that designs are properly displayed on the web.
Turn Photoshop Into A Complete Web Design Tool
SiteGrinder seeks to bridge this gap between design and development. Basically, SiteGrinder turns Photoshop into an easy-to-use and fully functional web design tool. With SiteGrinder, designers will now have the freedom to totally let their creativity loose and then, without skipping a beat, transfer their designs to the web. Bringing esthetic concerns together with more practical considerations, SiteGrinder is an amazingly powerful tool that would make a fantastic addition to any web designer's bag of tricks. Mac OS X and Windows versions of the SiteGrinder unlockable demo are available now via download.
 WordPress Photoshop Plug-in Creates Wordpress Blogs & Sites
Designers can now create PSD to WordPress Themes in Photoshop with Media Lab's NEW SG3xpress for Wordpress Photoshop plug-in. In addition, Media Lab has released the SG3xpress Add-on for its SiteGrinder 3 for users who wish to add advanced blog and WordPress Theme-building to the already powerful SiteGrinder 3 website creation software.
If you know Photoshop then you already know enough to start creating WordPress themes and blogs for yourself and your clients. Creating a blog or a WordPress site in Photoshop is easy with SG3xpress. Now you can go directly to WordPress with your design saving even more time and money for yourself and your clients.
![]()
Photoshop Masking Plugin Fluid Mask - Exclusive Instant Discount
 The 4 1/2 out of 5 star review of Fluid Mask at MacWorld begins by saying that this "Photoshop plug-in takes the pain out of extracting backgrounds," and goes on to recommend the latest version, stating that "Fluid Mask is a very effective tool for separating objects from their backgrounds. It offers a variety of useful features for tackling almost any difficult image, from wispy hair to complex foliage. Online video tutorials and live training sessions help ease the learning curve."
Our friends at Vertus, the makers of Fluid Mask Photoshop Plugin, have set up a special exclusive discount for PhotoshopSupport.com. Go to our Fluid Mask page for a special, exclusive discount link.
Fluid Mask is designed for photographers, image editors, graphic designers and all those who take digital image editing seriously. In a streamlined interface and workflow, Fluid Mask instantly shows key edges in the image and provides comprehensive easy to use tools that work with difficult-to-see edges and tricky areas like trees & lattices. Fluid Mask will also preserve all-important edge information for a professional quality cut out. Go to our Fluid Mask page for more info.![]()
lynda.com Online Training Library - View Free Video Clips
 Subscriptions to the lynda.com Online Training Library provide anytime access to tens of thousands of video tutorials covering Photoshop, Illustrator, Dreamweaver, web design, digital imaging, 3D, digital video, animation, and many other topics. View free video clips.
For less than a dollar a day, members have the opportunity to stay current and keep skills sharp, learn innovative and productive techniques, and gain confidence and marketability - all at their own pace. Premium subscriptions include instructors’ exercise files so that members can follow along with the exact examples onscreen. Customers learn at their own pace and may stop, rewind, and replay segments as often as necessary. View some free video clips (high resolution).
![]()
A Thank You To Our Friends, Partners & Sponsors!
![]() We'd like to thank our friends, partners and sponsors: Adobe, Google, Hostway, Apple, O'Reilly Media, Brusheezy, Janita, Heathrowe, The Photoshop Roadmap, Power Retouche Plugins, Wacom, onOne Software, Obsidian Dawn, BittBox.
We'd like to thank our friends, partners and sponsors: Adobe, Google, Hostway, Apple, O'Reilly Media, Brusheezy, Janita, Heathrowe, The Photoshop Roadmap, Power Retouche Plugins, Wacom, onOne Software, Obsidian Dawn, BittBox.
![]()
![]()
