![]()
![]()
![]()
![]() Try before you buy. Download any Adobe product for a free 30 day trial.
Try before you buy. Download any Adobe product for a free 30 day trial.
![]()

![]()
High Dynamic Range - HDR - In Photoshop Elements 8 Tutorial
Adapted from "Adobe Photoshop Elements 8.0 Maximum Performance" by Mark Galer
 Contrary to popular opinion, what you see is not always what you get. You may be able to see the detail in those dark shadows and bright highlights when the sun is shining – but can your image sensor? Contrast in a scene is often a photographer’s worst enemy.
Contrast is a sneak thief that steals away the detail in the highlights or shadows (sometimes both). Wedding photographers will deal with the problem of contrast by using fill flash to lower the subject contrast; commercial photographers diffuse their own light source or use additional fill lighting and check for missing detail using the Histogram.
Landscape photographers, however, have drawn the short straw when it comes to solving the contrast problem. For the landscape photographer there is no ‘quick fix’. A reflector that can fill the shadows of the Grand Canyon has yet to be made and diffusing the sun’s light is only going to happen if the clouds are prepared to play ball.
Bracketing Exposures
Step 1
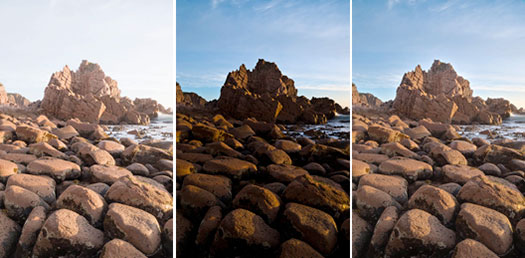
If we can’t fit all the goodies in one exposure, then we’ll just have to take two or more. The idea is to montage, or blend, the best of both worlds (the light and dark sides of the camera’s not-quite all-seeing eye). To make the post-production easier we need to take a little care in the pre-production, i.e. mount the camera securely on a sturdy tripod. Take two exposures – one overexposing from the auto reading and the other underexposing from the auto reading. One or two stops either side of the meter-indicated exposure should cover most high-contrast situations.
Performance Tip
Setting your camera to ‘auto bracket exposure mode’ and using a remote release means that you don’t have to touch the camera between the two exposures, thereby ensuring the first and second exposures can be exactly aligned with the minimum of fuss. The camera will bracket using the shutter speed rather than the aperture to avoid capturing images that have a different ‘depth-of-field’ of focus. The only other movement to be aware of is something beyond your control. If there is a gale blowing (or even a moderate gust) you are not going to get the leaves on the trees to align perfectly in post-production. This also goes for fast-moving clouds and anything else that is likely to be zooming around in the fraction of a second between the first and second exposures.
Step 2
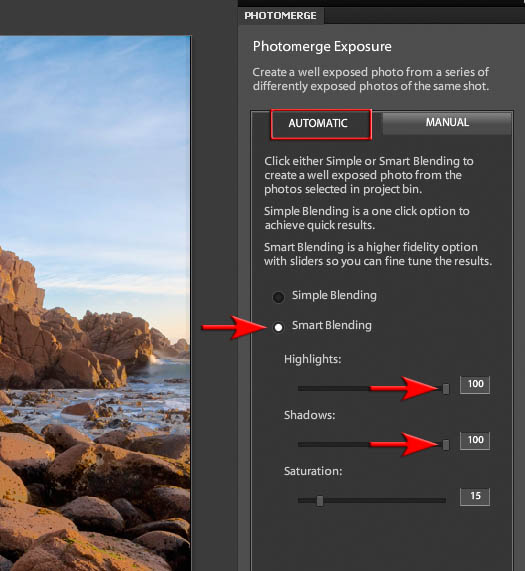
The files used in this tutorial have been optimized from the original Raw files to enhance the shadow and highlight detail. Many HDR workflows use more than two exposures but the two captured for this project provide good shadow and highlight detail without the need for additional files (the advantage of shooting Raw). Go to File > New > Photomerge Exposure (new for Photoshop Elements 8*). In the Photomerge Exposure dialog go to the Automatic tab and then select the Smart Blending option. For this project I have dragged both the Highlights and Shadows slider to 100 to achieve maximum detail from both exposures. I have then selected Done at the base of the Photomerge Exposure dialog to merge the exposures.
*Note > An alternative to Photomerge Exposure for Elements 7 users is EnfuseGUI which is currently available as a free download (show your appreciation with a donation) or the budget ‘Bracketeer’ for Mac users which uses the Enfuse engine. Enfuse is every bit as good as Photomerge Exposure.
Step 3
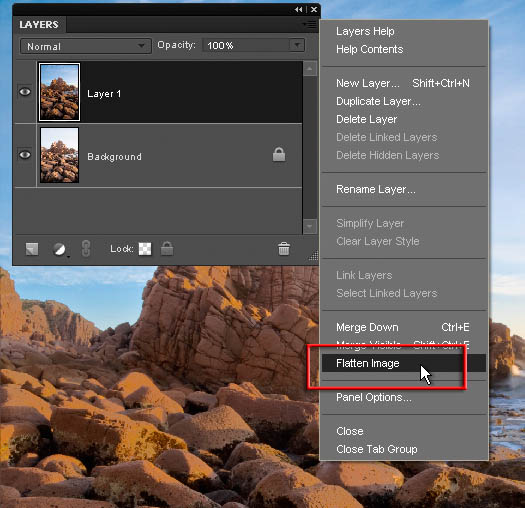
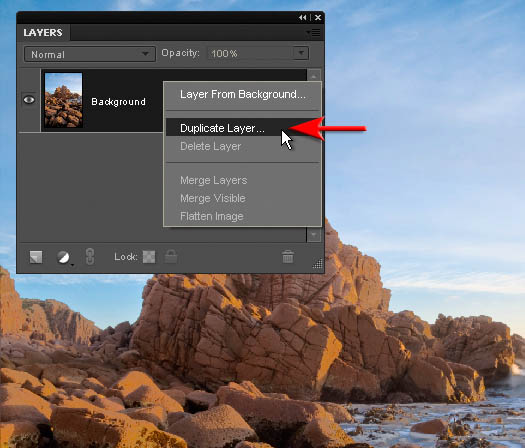
In the Layers panel choose Flatten Image from the fly out menu (we no longer have any need for the original exposure on the background layer). Right-click on the new background layer after the file has been flattened and choose Duplicate Layer.
Step 4
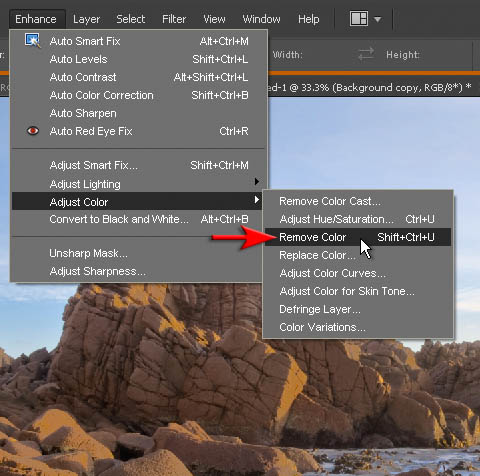
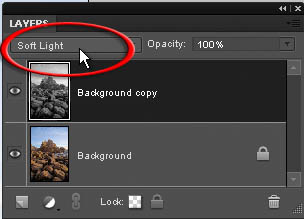
Go to Enhance > Adjust Color > Remove Color. This will ensure the color saturation does not increase when we take the next action. In the Layers panel set the mode of the copy layer to Soft Light. This is one of the contrast blend modes so the visual outcome will be to raise the contrast of the image.
Step 5
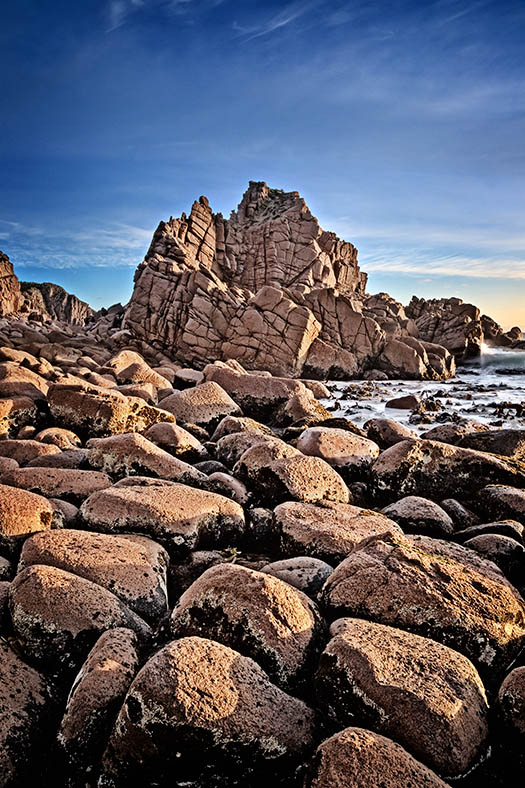
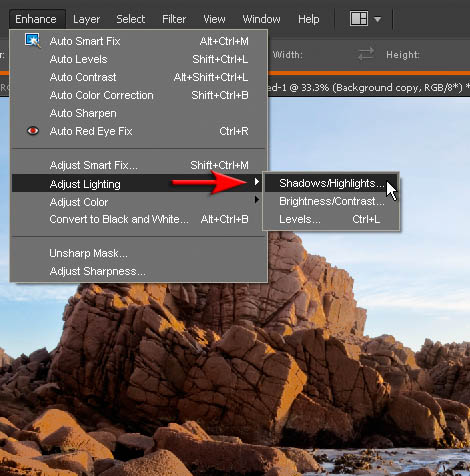
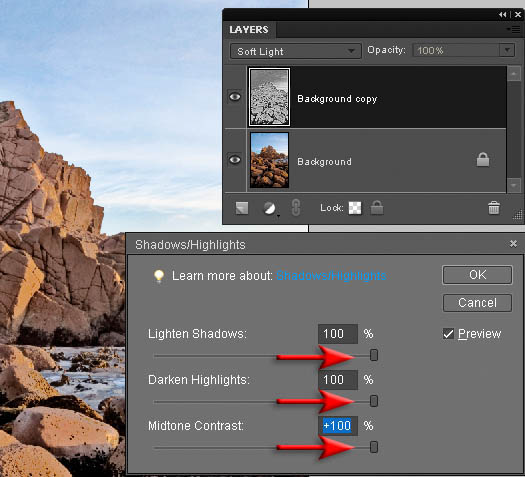
Go to Enhance > Adjust Lighting > Shadows/Highlights. In the Shadows/Highlights dialog raise all three sliders to 100%. These very aggressive adjustments will give your image a HDR post-produced appearance that is often referred to as ‘Tonal Mapping’.
Note > If bright halos appear around the edges of your subject you may like to back off the ‘Darken Highlights’ slider slightly.
Step 6
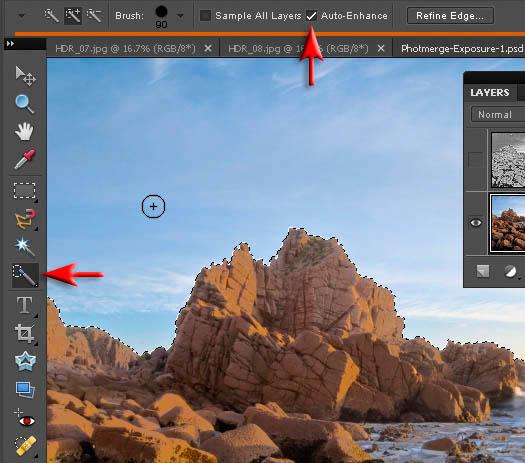
The next few steps will help resolve any remaining halos that may be apparent in the sky of your HDR image. Switch off the visibility of the Background copy layer and click on the background layer to select it. Select the Quick Selection Tool in the Tools panel and check the Auto Enhance option in the Options bar (this will help to refine the edge of the selection). Click and drag the Quick Selection Tool over your sky to select it.
Step 7
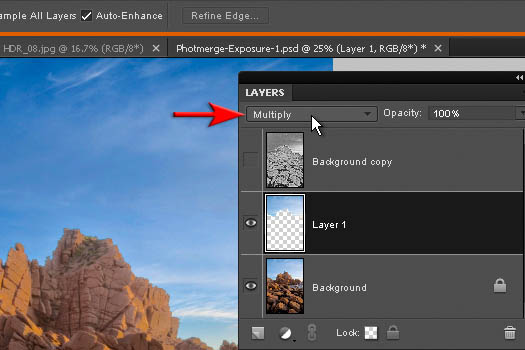
From the Edit menu choose Copy and again from the Edit menu choose Paste. The sky will be copied to a new layer. In the Layers panel set the mode of this layer to Multiply. This action will darken the sky. A small halo will appear above the dark rocks. We will reduce this halo in the following couple of steps.
Step 8
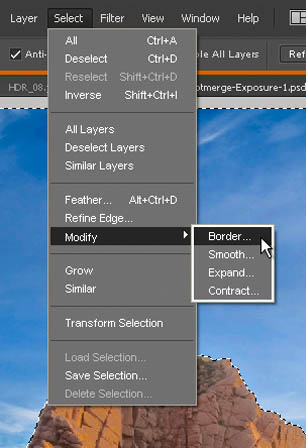
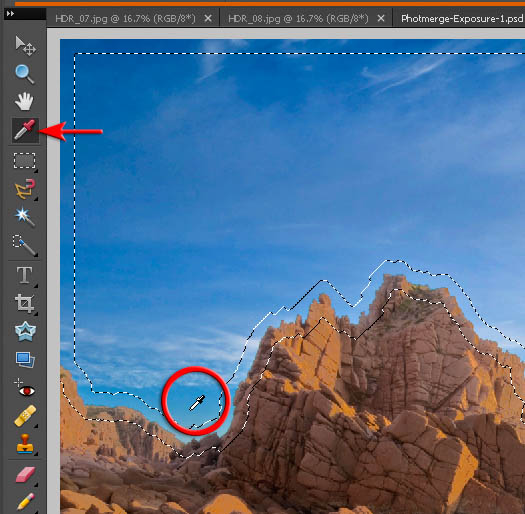
Hold down the Ctrl key (PC) or Command key (Mac) and click on the sky layer to load the pixels as a selection once again (alternatively you can go to Select > Reselect). Then go to Select > Modify > Border. This will allow you to turn the edges of the current selection into a new selection. Enter in a value of 200 pixels in the width field (the maximum possible) and then select OK. If you are working with lower resolution images you may need to lower this amount. If you need to increase the width of the border selection go to Select > Modify > Expand. We are trying to cover the width of the halo with this selection so be generous with the width rather than conservative.
Step 9
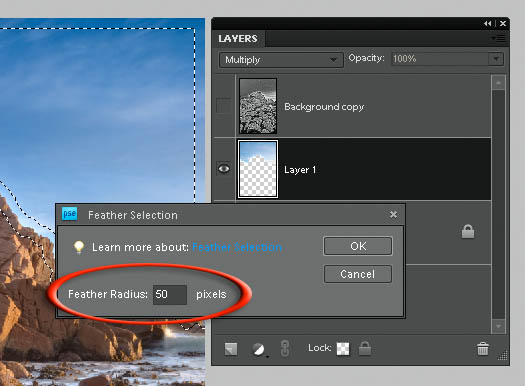
Go to Select > Feather and choose a Feather Radius that is about 25% of the amount you used for the Border Selection. In this project we have used a value of 50 pixels. Select OK. The feathering process will ensure that when we darken this region of the image it will occur gradually.
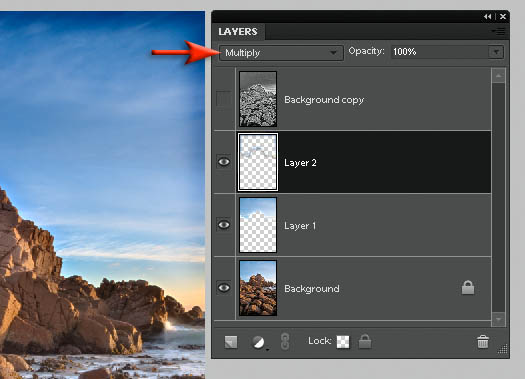
Step 10
From the Edit menu choose Copy and then again from the Edit menu choose Paste. This will place a border of sky pixels on a new layer. Set the mode of this border layer to Multiply to darken the sky and remove the halo in this region.
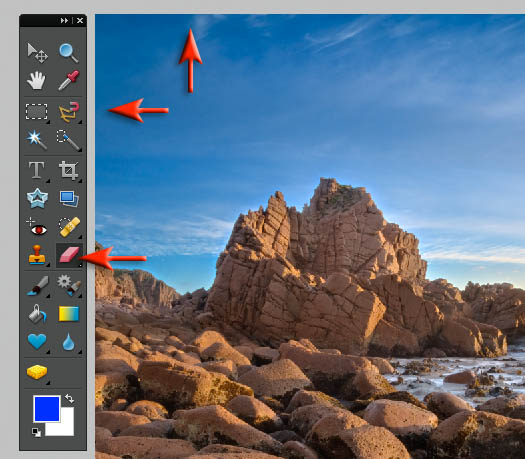
Step 11
Lower the opacity of this layer until the darkening process is subtle (no dark band should be visible). Go to Layer > Create Clipping mask so that the darkening process does not spill over into the rocks. Select the Eraser Tool from the Tools panel and choose a larger soft edged brush in the options bar. Remove any unwanted darkening from the sides and the top of the image and the process of halo reduction is complete.
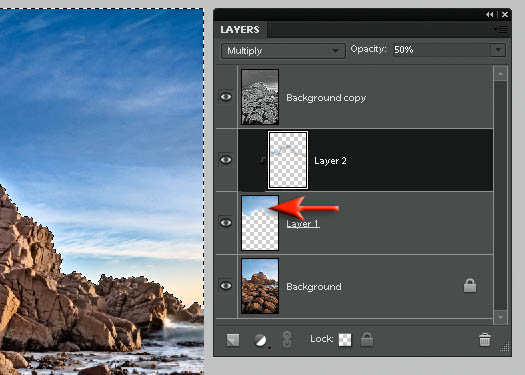
Step 12
Switch on the visibility of the Background copy layer (the Soft Light layer with the Shadows/Highlights adjustment applied). The halo will appear so we need to mask this aspect of this tonal mapping layer. Ctrl/Command+click the Layer 1 sky layer to load this as a selection. Go to Select > Inverse to flip the selection so that it is the foreground rocks that are selected.
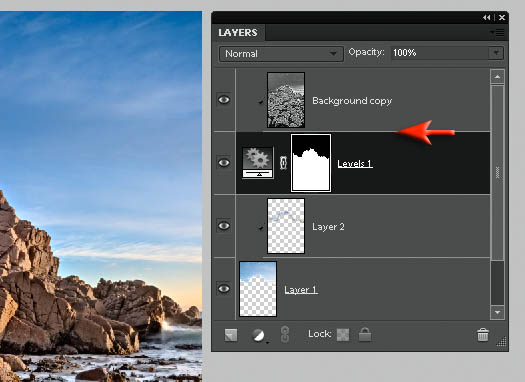
Step 13
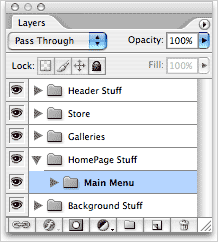
Select Layer 2 in the Layers panel (the border sky layer in Multiply mode). Then add a Levels adjustment layer (go to the Create new fill or adjustment layer icon at the base of the Layers panel and choose Levels from the pull-down menu). The selection will be turned into an adjustment layer mask. Select the Background copy layer above the Levels adjustment layer and then from the Layer menu choose Create Clipping Mask. We will now see the sky below and the halo will again be under control.
Step 14
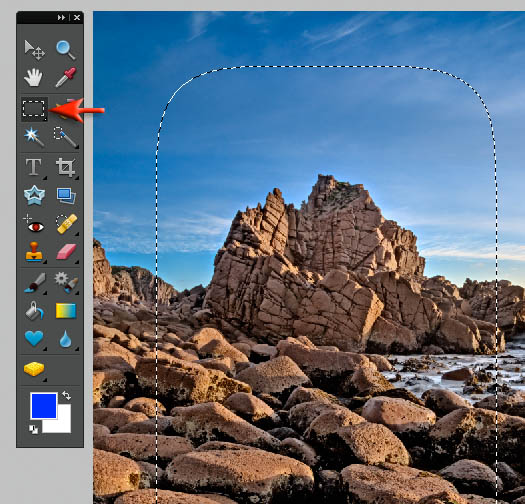
We will now add a vignette to the image. Stamp the Visible layers into a new layer (use the keyboard shortcut Ctrl+Alt+Shift+E on a PC or Command+Option+Shift+E on a Mac). Choose the Rectangular Marquee Tool and choose a 250 pixel feather in the Options bar. Select the central portion of the image. Then hit the delete or Backspace key to remove the selected area.

Step 15
Set the mode of this Stamp Visible layer to Multiply to create the Vignette effect. Lower the opacity until you achieve a subtler vignette effect.
This is an Extract from Adobe Photoshop Elements 8.0 Maximum Performance. Learn more tips and tricks from Photoshop expert Mark Galer.
Topaz Adjust 4 Photoshop Plugin — Creative Exposure, Detail Enhancement, And Color Control Create Stunning HDR Effects - Plus Instant 15% Discount Coupon
 Topaz Labs has announced a major upgrade of the Topaz Adjust Photoshop plug-in, which features new presets, a completely redesigned user interface, and upgraded image processing algorithms. With these improvements, Adjust 4 offers a new way for photographers to improve their photos quickly. Topaz Adjust 4 is a free upgrade for existing customers and retails for $49.99. It is compatible with Windows and Intel-based Macs.
Enter our exclusive discount coupon code PHOTOSHOPSUPPORT during the checkout process at Topaz Labs for an instant 15% discount on any Topaz product, including bundles and upgrades.
“Topaz Adjust 4 uses unique technology that automatically adapts to different image conditions like light, detail, and color," said Albert Yang, president of Topaz Labs and original designer of Topaz Adjust. “This has important implications. Other tools make the same standard adjustments to every single photo they're applied to. In contrast, Topaz Adjust 4 tailors the adjustments specifically to the photo in question. This gives it the flexibility to ditch the cookie cutter enhancements and create some truly fantastic and unique photo effects.”

Digital photographers regularly spend hours post-processing their photos to get the perfect look. Topaz Adjust 4 makes this process easy by merging this extraordinary adaptive technology with many presets and an intuitive workflow. It’s an invaluable tool for photographers who demand quality photo effects, fast. In addition to the effects that Topaz Adjust is already known for — like pseudo-HDR, detail enhancement, and creative exposure — Topaz Adjust 4 includes a wide variety of new customizable presets that range from mild to extreme. This gives photographers a new flexibility to quickly choose and fine-tune the exact look that they are going for in any given photo.
Topaz Adjust 4’s other new features include a completely redesigned and improved user interface, enhanced image processing algorithms, and greater stability. It also works well with a variety of host programs. READ MORE ABOUT TOPAZ ADJUST 4.
Topaz Photoshop Plugins Bundle - 15% Discount - Seven Essential Photoshop Plug-Ins At Super Savings
 Topaz Labs Photoshop plug-ins are specifically designed to expand a photographer's creative toolbox by harnessing powerful image technology developments.
Enter our exclusive discount coupon code PHOTOSHOPSUPPORT during the checkout process at Topaz Labs for an instant 15% discount on any Topaz product, including bundles and upgrades.
Photographers everywhere are now taking advantage of the creative exposure effects, artistic simplification, unique edge manipulation, and top-of-the-line noise reduction offered in Topaz products. The Topaz Photoshop Bundle includes the following Topaz plugins:
Topaz Adjust (new version Adjust 4 just released — read full news on Adjust 4)
Deliver stunning and dynamic images with this uniquely powerful plug-in that features HDR-like abilities and enhances exposure, color and detail.
 Topaz Detail
A three-level detail adjustment plug-in that specializes in micro-contrast enhancements and sharpening with no artifacts.
Topaz ReMask
The fastest and most effective masking and extraction program with one-click mask refining.
Topaz DeNoise
Highest-quality noise reduction plug-in that removes the most noise and color noise while preserving the most image detail.
Topaz Simplify
Provides creative simplification, art effects, and line accentuation for easy one-of-a-kind art.
Topaz Clean
Take control of the detail depth of your images with extensive smoothing, texture control and edge enhancement tools.
Topaz DeJPEG
Drastically improves the quality of web images and other compressed photos.
Learn more about the Topaz Photoshop Plugins Bundle. Download a free trial version.
![]()
Photoshop Elements 10 Upgrade Offer - Upgrade From Any Previous Version For $79.99
 Adobe Photoshop Elements 10 for Windows and Mac is available now at www.adobe.com. Photoshop Elements 10 Windows and Mac is available for a suggested retail price of US$99.99. New upgrade pricing allows past Photoshop Elements users of any version to purchase Photoshop Elements 10 for US$79.99.
Powered by the same engine as Adobe Photoshop, the industry standard for digital imaging, Photoshop Elements 10 utilizes intelligent technology that makes it easy to give everyday photos a boost. Photoshop technology is brought to life through easy to follow steps for achieving stunning photo effects in an approachable way with new Guided Edits, which are very popular and successful.
These include innovations such as creating a shallow depth of field or designing a fun layout of snapshots with Picture Stack, or even adding a dream-like diffused glow with the Orton effect.
New text functionality, which scrapbookers will especially love, allows users to add curving, flowing text to a photo that automatically follows the outline of a subject, custom path or shape. In addition, special crop guides now help users at any level easily achieve interesting, visually appealing compositions. Also, the Smart Brush lets users paint unique effects onto specific areas of photos and now features 30 new effects like Pencil Sketch and Oil Pastel.
With Photoshop Elements 10, users not only have access to fun editing and creation features, but also the ability to organize photos. Object Search automatically finds objects within photos, such as a landmark, flower or pet. The Elements Organizer can even automatically detect duplicate or near-duplicate photos so users can clean up and delete the photos they don’t need and quickly group similar collections of photos. Also, photo enthusiasts who shoot video can now upload their clips directly to Facebook or YouTube®.
 Photoshop Elements 10 users can purchase Adobe’s integrated online service, Photoshop Elements Plus, which includes 20GB of storage for automatic online backup and sharing (up to 15,000 photos or four hours of DVD-quality video), as well as access to an extensive library of how-to's, artwork and Online Album templates for sharing online.
Whether users are social networking or using sharing sites like Facebook, Flickr®, YouTube or Photoshop.com, Photoshop Elements 10 lets customers share their photos directly from within the Elements Organizer and view them from virtually anywhere on the go, offering a comprehensive set of sharing capabilities for today’s increasingly social and mobile worlds. For Facebook lovers, Photoshop Elements integrates users’ Facebook Friend Lists for easily tagging photos that can then be shared directly to Facebook.
On top of all these new features and capabilities, Photoshop Elements 10 enables developers to create tablet and mobile applications that interact with the software via the included API. This opens Photoshop Elements 10 to a new world where the fun and interactivity of touch devices and Photoshop Elements intersect.
Visit our Photoshop Elements 10 Resource Center. You can also signup to download a free 30-day trial of Elements 10. Also see our Photoshop Elements 10 Tutorials page, featuring a special Tilt Shift Tutorial from Photoshop expert Mark Galer.
![]()
Adobe Photoshop Elements 8.0 Maximum Performance Book
 Using a unique combination of step by step projects, movie tutorials and sample images, Adobe Photoshop Elements 8.0 Maximum Performance guides the reader through the most powerful photo editing tools that Elements has to offer. Discussing and demonstrating the skills and know-how to create professional-quality results with this budget-priced software. Whether optimizing photographs for printing, enhancing images for maximum impact, or creating impressive, seamless montages, Adobe Photoshop Elements 8.0 Maximum Performance will enable any aspiring digital professional to get the maximum performance from the credit crunch approved software.
The package is complted with an astonishingly comprehensive DVD packed with over 7 hours of movie tutorials, 100+ sample images, a stock photo gallery as well as automated actions to get even more out of the software.
Mark Galer is a Senior Lecturer in photography at the Royal Melbourne Institute of Technology, Australia. He has written numerous top-selling books, including Elements 8.0 Maximum Performance, and is an Official Adobe Ambassador for Photoshop and Photoshop Elements.
![]()
Adobe Releases Photoshop Elements 8 for Windows and Mac
 Adobe Systems today announced Adobe Photoshop Elements 8 software available for Windows and Mac, providing automated and intelligent photo-editing technology across both platforms. With the newest version of the No. 1 selling consumer photo-editing software, Adobe continues to make cutting-edge innovation accessible to users who want powerful yet easy-to-use tools to tell compelling stories with their photos.
Adobe Photoshop Elements 8 for Windows
With the enhanced Organizer, Windows users of Adobe Photoshop Elements 8 can easily manage media and find photo and video clips even faster than before. The new Auto-Analyzer automatically analyzes and tags media so users can quickly find the most interesting and highest quality content and People Recognition identifies people in photos, becoming more intelligent over time, as it learns to associate names and faces. Also, consumers can now automatically synch all their media across multiple computers. Find out more about Photoshop Elements 8 & Premiere Elements 8 at the Adobe site.
![]()
Did You Know You Could Create An Entire Website In Photoshop?
SiteGrinder Photoshop Plugin - Create Websites Instantly
 There often seems to be a strict division of labor within the world of web design and development. Creative professionals tend to stick to the Photoshop domain, while those well-versed in scripting are left to the task of implementing their work. Indeed, the two realms are quite different from each other, to which any of us even vaguely familiar with either can easily attest.
Essentially, Photoshop is a no-holds-barred design studio, offering the artist a seemingly endless array of creative options. On the other hand, HTML, CSS, Java and the like follow strict rules of engagement, requiring the developer to take any number of esoteric concerns into consideration in order to ensure that designs are properly displayed on the web.
Turn Photoshop Into A Complete Web Design Tool
SiteGrinder seeks to bridge this gap between design and development. Basically, this program turns Photoshop into an easy-to-use and fully functional web design tool. With SiteGrinder, designers will now have the freedom to totally let their creativity loose and then, without skipping a beat, transfer their designs to the web. Bringing esthetic concerns together with more practical considerations, this program is an amazingly powerful tool that would make a fantastic addition to any web designer's bag of tricks.
 Generate Your Web Pages Directly From Photoshop
By generating web pages directly from Photoshop, you'll be able to spend much more time on the creative end of the spectrum, since you'll know right off the bat how well particular designs will translate to the web. No more going back to the Photoshop drawing board after getting a phone call from your development team, telling you that what you had envisioned doesn't have a chance of being displayed on the web. You can immediately visually and interactively test your designs, which permits you to then make changes to either esthetics or functions while it's still relatively early on in the design process.
Pricing and Availability
Mac OS X and Windows versions of the SiteGrinder unlockable demo are available now via download. SiteGrinder can be ordered from Media Lab's online store.
![]()
Photoshop Masking Plugin Fluid Mask 3 - Price Drop And Exclusive $20 Instant Discount - Now Only $129
 The 4 1/2 out of 5 star review of Fluid Mask 3 at MacWorld begins by saying that this "Photoshop plug-in takes the pain out of extracting backgrounds," and goes on to recommend the latest version, stating that "Fluid Mask 3.0.2 is a very effective tool for separating objects from their backgrounds. It offers a variety of useful features for tackling almost any difficult image, from wispy hair to complex foliage. Online video tutorials and live training sessions help ease the learning curve."
Our friends at Vertus, the makers of Fluid Mask 3 Photoshop Plugin, have set up a special exclusive discount for PhotoshopSupport.com. Buy now for only $129. Just follow this discount link and instantly get $20 off your purchase of Fluid Mask 3.
Fluid Mask 3 is designed for photographers, image editors, graphic designers and all those who take digital image editing seriously. In a streamlined interface and workflow, Fluid Mask 3 instantly shows key edges in the image and provides comprehensive easy to use tools that work with difficult-to-see edges and tricky areas like trees & lattices. Fluid Mask will also preserve all-important edge information for a professional quality cut out. Simply follow this discount link and pay only $129 for Fluid Mask 3.
![]()
Exclusive onOne Software 20% Instant Discount Coupon
 Enter our exclusive discount coupon code - PSSPPT06 - during the checkout process at onOne Software for an instant 20% discount on any onOne product. This includes Genuine Fractals and their amazing Photoshop Plug-In Suite.
onOne Software's Plug-In Suite combines full versions of six essential software tools — Genuine Fractals Print Pro, PhotoTools Pro, PhotoFrame Pro, Mask Pro, PhotoTune and FocalPoint — an affordable combination that includes everything a photographer needs to make their images look their best.
Why do you need plugins? Photoshop is an amazing image editing application that has forever changed graphic design and digital photographic editing, but like any tool, if you don't have time to fully learn it, you can't get the most out of it.
Plugins for Photoshop allow you to either do something that you cannot do with the features included in Photoshop or they allow you to do something easier, faster or better than you could do in Photoshop without the plug-in. Whether it is color correction, resizing, masking or creating an effect, you can find a Photoshop plug-in that can help you be more efficient with your time.
![]()
![]()


