![]()
![]()
![]()
![]() Try before you buy. Download any Adobe product for a free 30 day trial.
Try before you buy. Download any Adobe product for a free 30 day trial.
![]()
Selecting & Extracting Hair - Masking Tutorial - Extraction Tips
Adapted from "Adobe Photoshop Elements 5.0 Maximum Performance" by Mark Galer
One of the most challenging montage or masking jobs in the profession of post-production editing is the hair lift. When the model has long flowing hair and the subject needs to change location many post-production artists call in sick. Get it wrong and, just like a bad wig, it shows. Extract filters, Magic Erasers and Tragic Extractors don’t even get us close.

Portrait image by Dan Stainsby
The first secret step must be completed before you even press the shutter on the camera. Your number one essential step for success is to first shoot your model against a white backdrop, sufficiently illuminated so that it is captured as white rather than gray. This important aspect of the initial image capture ensures that the resulting hair transplant is seamless and undetectable.
The post-production is the easy bit - simply apply the correct sequence of editing steps and the magic is all yours. This is not brain surgery but follow these simple steps and you will join the elite ranks of Photoshop gurus around the world. Celebrity status is just a few clicks away.
Step 1
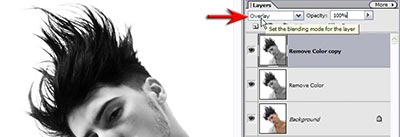
The initial steps of this tutorial are concerned with creating a mask that can be used in the final montage. Start by dragging the background layer to the New Layer icon to duplicate it. Choose ‘Remove Color’ from the Adjust Color submenu found in the Enhance menu (Enhance > Adjust Color > Remove Color).
Drag this desaturated/monochrome layer to the New Layer icon in the Layers palette to duplicate it. Set the blend mode of this new layer (now on top of the layers stack) to ‘Overlay’ mode.
Step 2
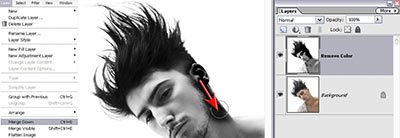
From the Layer menu choose ‘Merge Down’ to create a single high-contrast monochrome layer. Select ‘Black’ as the foreground color and the ‘Brush tool’ from the Tools palette. Choose a large hard edged brush and 100% opacity from the Options bar and set the mode to ‘Overlay’ (also in the Options bar).
Painting in Overlay mode will preserve the white background and darken the rest of the pixels. Accuracy whilst painting in Overlay mode is not a concern when the background is white or is significantly lighter than the subject. Avoid going anywhere near the tips of the hair at this stage.
Step 3
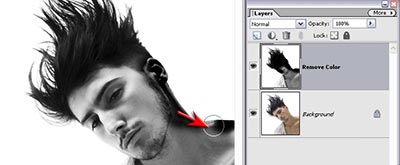
Even the bright tones of the white shirt can be rendered black by repeatedly clicking the mouse whilst using a large brush in Overlay mode. Again it is important to avoid going anywhere near the hair.
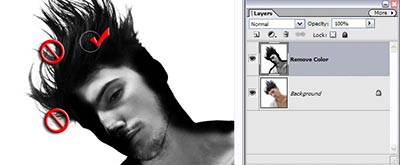
Step 4
Darken the body of the hair near the scalp but avoid the locks of hair that have white background showing through. Painting these individual strands of hair will thicken the hair and may lead to subsequent halos appearing later in the montage process.
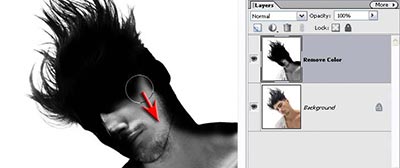
Performance Tip
Switch the blend mode of the brush in the Options bar to ‘Normal’ mode when painting away from the edge of the subject. This will ensure a speedy conclusion to the mask making process. The mask is now ready to use in the montage.
Note > If any of the background has been darkened in the process of creating a black and white mask switch the foreground color to ‘White’ and choose ‘Overlay’ in the Options bar. Paint to render any areas of gray background white. It is again important to avoid painting near the edges containing delicate hair detail.
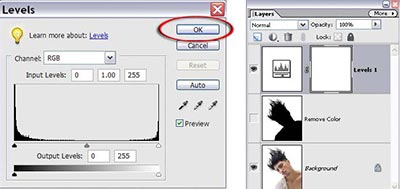
Step 5
With the Remove Color layer selected add a Levels adjustment layer. Without making any adjustment simply select OK. This Levels adjustment layer has a layer mask that we can use to house the mask that we have created in the previous step.
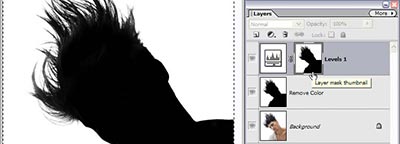
Step 6
The next step relocates the mask you have just created into the layer mask of the adjustment layer. From the Select menu choose ‘All’ and from the Edit menu choose ‘Copy Merged’. Hold down the Alt key and click on the layer mask thumbnail in the Layers palette. The image window will momentarily appear white as you view the empty contents of the layer mask.
From the Edit menu choose ‘Paste’ to transfer the contents of the clipboard to this layer mask. Click on the layer below to select it and then click on the Visibility icon of this layer to switch it off. This mask layer serves no purpose now that it has been successfully transferred to the adjustment layer mask.
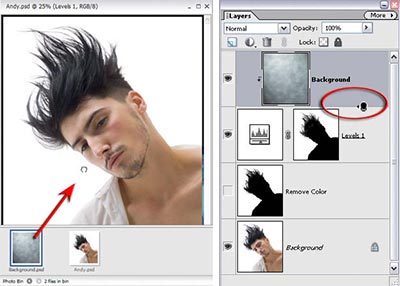
Step 7
The new background is placed on its own layer above the figure and mask layers. Drag the thumbnail of this new file into the image window of your project file from either the Photo Bin or the layer thumbnail in the Layers palette. Group this new background layer with the adjustment layer beneath (Layer > Group with Previous). Alternatively you can hold down the Alt key and click on the dividing line between the two layers to group them.
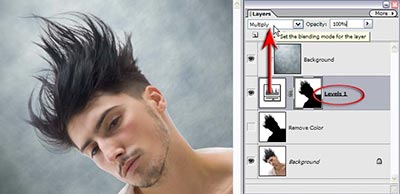
Step 8
Grouping the new background with the adjustment layer will mask the background in the region of the figure but the quality will not yet be acceptable. Setting the blend mode of the adjustment layer to ‘Multiply’ will bring back all of the fine detail in the hair. The background will be not darkened by applying the ‘Multiply’ blend mode as white is a neutral color. The subtle detail in the fine strands of hair will however be preserved in all their glory.
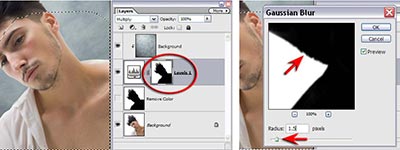
Step 9
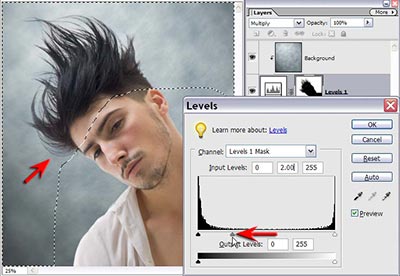
The accuracy and quality of the edge of the mask will usually require some attention in order for the subject to achieve a seamless quality with the new background. Make a selection of all of the edges that do not include any hair detail using the Lasso tool with a small amount of feather set in the Options bar. With the adjustment layer mask selected choose the ‘Gaussian Blur filter’ (Filter > Blur > Gaussian Blur) and apply a 1- to 2-pixel Radius Blur to the mask.
Click OK and then from the Enhance menu choose a Levels adjustment from the Adjust lighting submenu. Move the central Gamma slider underneath the histogram to realign the edge of the mask with the subject edge (no dark or light halo should be visible).
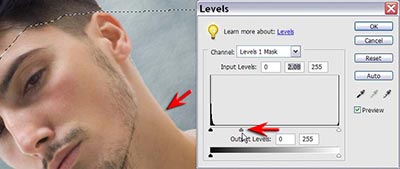
Performance Tip
If the mask is too soft the edges can be sharpened by moving the black and white sliders in towards the central Gamma slider a little. Select OK when perfect alignment has been achieved.
Zoom in to 100% Actual pixels whilst working to accurately assess the quality of your mask.
Step 10
In most instances the hair is already looking pretty fabulous but to modify and perfect the hair even further you will need to inverse the selection (Select > Inverse). Choose ‘Levels’ once again and move the central Gamma slider to the left to increase the density of the hair and eliminate any white halos that may be present. Moving the White slider to the left a little may help the process of achieving a perfect blend between subject and background. Select OK and choose ‘Deselect’ from the Select menu.
Performance Tip
Any localized refinement of the mask can be achieved manually by painting with a small soft edged brush directly into the layer mask. Paint with white at a reduced opacity (10-20%) to remove any fine halos present in localized areas. Several brush strokes will slowly erase the halo from the image.
Step 11
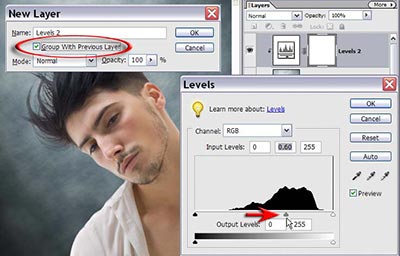
The true test of an accurate mask for a subject that was photographed against a white background is when you place the subject against a very dark background. Grouping a Levels adjustment layer with the new background layer can darken the background image used in this project.
Hold down the Alt key when you select a Levels adjustment layer from the Layers palette. Click on the Group with Previous box in the New Layer dialog box and then select OK to open the Levels dialog box. Move the Gamma slider to the right in order to preview your subject against a darker background in the image window.

This is an Extract from Adobe Photoshop Elements 5.0 Maximum Performance. Learn more tips and tricks from Photoshop expert Mark Galer.
![]()
Topaz ReMask Photoshop Plugin - 15% Discount Code
We found a great Photoshop cutout plugin - Topaz Labs ReMask - and you can get a 15% discount. Enter PHOTOSHOPSUPPORT during checkout and get $10.50 off and pay only $59.49.
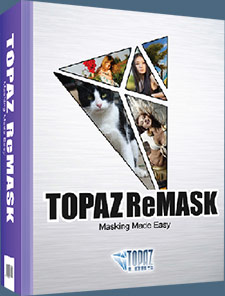 Topaz ReMask is the ultimate masking and extraction tool that accelerates and simplifies the process of removing unwanted backgrounds from your digital images. It also allows users to quickly isolate an image area for a variety of selective adjustments such as: color correction, color change, detail enhancement, Bokeh effect, re-sizing and much more.
Topaz ReMask provides precise control over cutting the most intricate image elements such as hair, fur and transparent objects. ReMask even works to preserve edges and other fine detail elements.
Simply follow this special link and enter PHOTOSHOPSUPPORT during checkout for an instant 15% discount on Topaz ReMask. You'll get an instant $10.50 off and pay only $59.49.
Topaz ReMask is the quickest and easiest solution to masking and cutouts with professional results. It makes merging multiple image elements seamless, giving you ultimate control over refining your image scenes.
![]()
Download A 30-day Free Trial Of Any Adobe Creative Suite
 Photoshop Extended integrates the state-of-the-art editing, compositing, and graphic design capabilities of Adobe Photoshop, and features advanced tools for 3D design, image and video editing.
Photoshop and Photoshop Extended can be purchased as stand-alone applications, as components of the Adobe Creative Suite family, or as part of Adobe's new Creative Cloud offering. Upgrade pricing is also available to eligible customers.
Download
the 30-day Photoshop free trial, or a trial of any Adobe product, including the Master Collection. See our Photoshop CS6 Tutorials Page for a collection of free tutorials and videos. Visit the Adobe Coupons & Special Offers Page to see the latest deals from Adobe. Get up to 80% off at the Adobe Education Store.
![]()
Adobe Photoshop Elements 11 Learn by Video - 7 Free Clips
 Here are 7 free videos for Photoshop Elements 11 (30-day free trial) taken from the video tutorial series Adobe Photoshop Elements 11 Learn by Video - Manage, Optimize, and Share Your Photographic Memories. If you decide to purchase the complete training, use our discount code PSSEP30 for an instant 30% savings, good through end of October 2012.
Updating an Existing Catalog
If you've been using Photoshop Elements prior to version 11, you'll want to watch this lesson so you'll know exactly how to update your existing Elements catalog.
Identifying the People in Photos
The Elements Organizer includes a powerful "people recognition" feature that enables you to automatically identify the people in your photos. This lesson will show you how to put this feature to use.
Performing a Visual Search
The Elements Organizer lets you find images that are visually similar to a particular photo that you've identified. This lesson will show you how to use this impressive capability.
Creating a Perfect Portrait
In this lesson you'll learn how to apply a variety of adjustments to improve any photo that features a person, making it look like a great portrait.
Creating an Out of Bounds Effect
With the Out of Bounds guided edit you can make a subject pop out of the photo, as you'll see in this lesson.
Creating Reflections
This lesson will show you how to create a reflection effect that can add some elegance to a photo.
Creating Greeting Cards
This lesson will show you how to create custom greeting cards that feature your photos.
Visit our Photoshop Elements 10 Resource Center. You can also signup to download a free 30-day trial of Elements 10. Also see our Photoshop Elements 10 Tutorials page, featuring a special Tilt Shift Tutorial from Photoshop expert Mark Galer.
![]()
onOne Software For Digital Photographers – Exclusive 15% Discount
onOne Software is the fastest and easiest way to make your images extraordinary. They work everywhere – with Photoshop, Lightroom, Aperture, and as standalone applications. Use discount code PSSPPT06 to get 15% off any onOne product.

Perfect Photo Suite
- Everything You Need to Realize Your Photographic Vision
- Seven integrated products for your photography workflow
- Perfect Effects: Create images with impact
- Perfect Portrait: Simply powerful retouching
- Perfect Resize (Genuine Fractals): Enlarge images for print
- Perfect Layers: The power of layers without Photoshop
- Perfect Mask: The essential cut-out tool
- FocalPoint: Put the focus where you want
- PhotoFrame: Borders, backgrounds, textures and adornments
Perfect Effects
- Add popular HDR and retro looks
- Recreate the look of film and darkroom techniques
- Finish images with vignettes, textures and borders
Perfect Portrait
- Simply powerful portrait retouching
- Automatic skin smoothing and blemish removal
- Instant enhancement of eyes and teeth
Perfect Mask
- Remove backgrounds with a single click
- Easily cut around the tough stuff like hair, glass, and tree branches
- All of the best masking tools without Photoshop
Perfect Resize
- Get the highest quality image enlargement, powered by Genuine Fractals
- Enlarge mobile phone to DSLR images up to 1000%
- Maintain all the sharpness and detail of your original photo
 FocalPoint
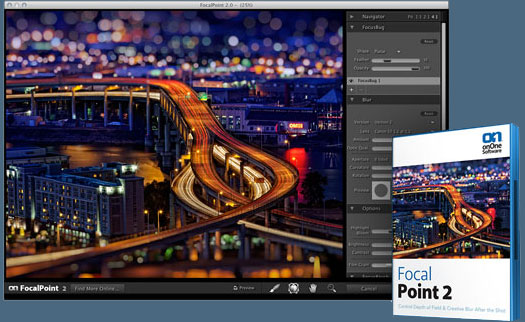
- Create the look of fast, expensive lenses instantly
- Control depth of field after the shot
- Simulate the creative look of tilt-shift lenses
PhotoFrame
- Enhance images with borders, textures and adornments
- Add authentic film and darkroom edge effects
- Complete library of more than 1000 professional design elements
Perfect Layers
- Extend the image editing power of Lightroom & Aperture
- Combine the best parts of multiple photos
- Retouch portraits and landscapes
![]()
Exclusive 15% Discount On All Topaz Plugins - Use Coupon Code PHOTOSHOPSUPPORT - Includes Bundles And Upgrades
 Enter our exclusive discount coupon code PHOTOSHOPSUPPORT during the checkout process at Topaz Labs for an instant 15% discount on any Topaz product, including bundles and upgrades.
Topaz Labs Photoshop plug-ins are specifically designed to expand a photographer's creative toolbox by harnessing powerful image technology developments. Photographers everywhere are now taking advantage of the creative exposure effects, artistic simplification, unique edge manipulation, and top-of-the-line noise reduction offered in Topaz products. The Topaz Photoshop Plugins Bundle is a super powerful Photoshop plugins package that includes the following Topaz products:
Topaz Adjust
Deliver stunning and dynamic images with this uniquely powerful plug-in that features HDR-like abilities and enhances exposure, color and detail.
 Topaz Detail
A three-level detail adjustment plug-in that specializes in micro-contrast enhancements and sharpening with no artifacts.
Topaz ReMask
The fastest and most effective masking and extraction program with one-click mask refining.
Topaz DeNoise
Highest-quality noise reduction plug-in that removes the most noise and color noise while preserving the most image detail.
Topaz Simplify
Provides creative simplification, art effects, and line accentuation for easy one-of-a-kind art.
Topaz Clean
Take control of the detail depth of your images with extensive smoothing, texture control and edge enhancement tools.
Topaz DeJPEG
Drastically improves the quality of web images and other compressed photos.
Learn more about the Topaz Photoshop Plugins Bundle. Download a free trial version.
![]()
lynda.com Online Training Library - View Free Video Clips
 Subscriptions to the lynda.com Online Training Library provide anytime access to tens of thousands of video tutorials covering Photoshop, Illustrator, Dreamweaver, web design, digital imaging, 3D, digital video, animation, and many other topics. View free video clips.
For less than a dollar a day, members have the opportunity to stay current and keep skills sharp, learn innovative and productive techniques, and gain confidence and marketability - all at their own pace. Premium subscriptions include instructors’ exercise files so that members can follow along with the exact examples onscreen. Customers learn at their own pace and may stop, rewind, and replay segments as often as necessary. View some free video clips (high resolution).
![]()
Did You Know You Could Create An Entire Website In Photoshop?
SiteGrinder Photoshop Plugin - Create Websites Instantly
 There often seems to be a strict division of labor within the world of web design and development. Creative professionals tend to stick to the Photoshop domain, while those well-versed in scripting are left to the task of implementing their work. Indeed, the two realms are quite different from each other, to which any of us even vaguely familiar with either can easily attest.
Essentially, Photoshop is a no-holds-barred design studio, offering the artist a seemingly endless array of creative options. On the other hand, HTML, CSS, Java and the like follow strict rules of engagement, requiring the developer to take any number of esoteric concerns into consideration in order to ensure that designs are properly displayed on the web.
Turn Photoshop Into A Complete Web Design Tool
SiteGrinder seeks to bridge this gap between design and development. Basically, SiteGrinder turns Photoshop into an easy-to-use and fully functional web design tool. With SiteGrinder, designers will now have the freedom to totally let their creativity loose and then, without skipping a beat, transfer their designs to the web. Bringing esthetic concerns together with more practical considerations, SiteGrinder is an amazingly powerful tool that would make a fantastic addition to any web designer's bag of tricks. Mac OS X and Windows versions of the SiteGrinder unlockable demo are available now via download.
![]()
Photoshop CS4 Essential Skills - By Mark Galer And Philip Andrews
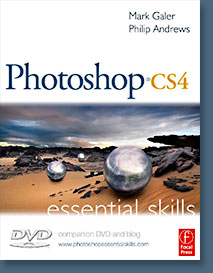 Brimming with beautiful pictures, Photoshop CS4 Essential Skills guides you through a project-based, progressive curriculum so that you can build all the essential skills to enhance photographs creatively and professionally with Photoshop CS4. If you are an aspiring professional or a student learning photography, digital imaging, or design graphics, you'll be amazed at the stunning results you can achieve. A DVD is included free.
The Essential Skills Photography Series from Focal Press uniquely offers a structured learning experience for photographers of all ages, with both the underlying theory and loads of invaluable 'how to' and real-life practice projects - all from the most talented photography practitioners/educators in the world.
Read 2 free sample chapters:
Skin Retouching Tips In Photoshop CS4
Transforming Smart Objects In Photoshop CS4
Find more Photoshop CS4 tutorials on our Photoshop CS4 Tutorials Page.
Read 2 free sample chapters from the Adobe Photoshop CS3 version:
![]() Adjusting Exposure in Adobe Camera Raw CS3
Adjusting Exposure in Adobe Camera Raw CS3
![]() Photoshop CS3 Tutorial High Dynamic Range
Photoshop CS3 Tutorial High Dynamic Range
Find More Adobe Photoshop Books at Amazon.com
Find all the latest bestselling Photoshop books at discount prices at Amazon.com.
![]()
![]()


