![]()
![]()
![]() Find free brush sets for print on our High Resolution Photoshop Brushes page.
Find free brush sets for print on our High Resolution Photoshop Brushes page.
![]() Try before you buy. Download any Adobe product for a free 30 day trial.
Try before you buy. Download any Adobe product for a free 30 day trial.
![]()

![]()
Top 10 Photoshop Brush Tips - From Stephanie Of Obsidian Dawn
![]()
Stephanie has kindly put together her top 10 Photoshop brush tips to help you get the most out of your Photoshop brushes. Read more about her just released Photoshop Brushes CD, download her free Photoshop Frames And Borders Brush Set, and see her free high resolution Photoshop Brushes Page for more sweet goodies. Enjoy!
Top 10 Photoshop Brush Tips
1. Using "Replace Brushes..."
2. Rotating a Brush
3. Brush Fade
4. Brush Preset Picker Display
5. Adding Texture to Brushes
6. Changing Part of Vector Brush Color
7. Smoothing Brush Edges
8. Fluctuating Brush Color
9. Changing Brushes Perspective
10. Scattering Brushes
1. USING "REPLACE BRUSHES..."
If you're ever having trouble loading or downloading a brush set from somewhere, here's a useful tip as an alternative to placing the brush set in your Photoshop Brushes directory. (This is mostly for beginners - I get asked this question a LOT, though!)
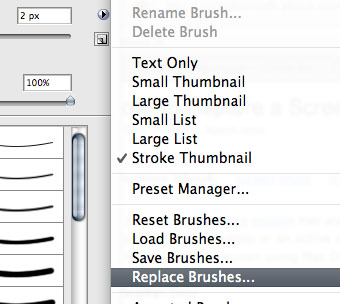
Download the ABR or ZIP file directly to your desktop. If it's a ZIP file, unzip it right there on your desktop, too. Open Photoshop, then click on your brush tool. Just under the top menu, click on the small arrow just to the right of the brush thumbnail. Now click on the arrow on the right side of the window that opens to get to the Brush Preset Picker.
Instead of loading a brush set like you would if you'd placed it into your Photoshop directory, you can also choose "Replace Brushes.." from that menu. Do so now. It will ask you what to replace the brushes with. Find that file on your desktop. Choose it and then click "Load." It should now be loaded in place of your previous set.
If it's not, then there's either something wrong with the set, the download got corrupted (this does happen occasionally), or you didn't unzip the file.
2. ROTATING A BRUSH
If you want to rotate a brush, there are two ways to do it.
1. You can put it on its own layer, and then choose Edit > Transform > Rotate and move it around that way.
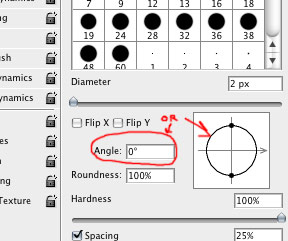
2. Even BETTER... you can change the orientation/rotation of a brush before you even use it! Here's how. Have your brush tool selected, with the brush you're wanting to use loaded. Click on the "Brushes" tab in the upper right area of your Photoshop window (F5 will also open it). Click on "Brush Tip Shape."
Now, you'll see an area where there's a circle with a crosshair through it, with an arrow on one side of the crosshair. Say that you want to rotate your brush about 40 degrees to the right. You can either type in "-40" into the "Angle" area, or you can click on the arrow part of that crosshair and rotate it around to where you want it to be. You can check how your brush looks in the preview area beneath!
There's also the options for Flip X and Y, which... well, basically flip the brush horizontally or vertically. That's handy for adding borders to something, like if you have a corner brush that's made for the upper right corner and you want to also use it in the upper left... just Flip X, and voila!
3. BRUSH FADE
Ever wonder how people make a brush "fade out" as the stroke continues? Almost like real paint would? Here's a quick tip on how to do just that.
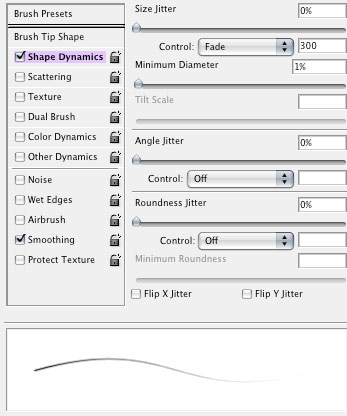
Select a basic, round brush with your brush preset picker. About 15 pixels or so would be a good size. Now, click on the "Brushes" tab on the upper right of your Photoshop working space (or hit F5).
Click on "Shape Dynamics." Make sure that Size Jitter, Minimum Diameter, Angle Jitter, and Roundness Jitter are all at 0%. The controls after Angle Jitter and Roundness Jitter should also say "Off."
Now, next to the Control under "Size Jitter", click the small arrow on the right and select "Fade." In that small box to the right of it, put in a number. Say 50 or 100. Depending on how long your line is. This value is how many pixels out you want the line to go for before it fades out completely.
Now take that brush and paint on your canvas! You'll see it "fade out" as it goes on. What it's technically doing is become smaller and smaller until the brush size is 0px. You can also make it actually fade out. Instead of (or in addition to) clicking on "Shape Dynamics," click on "Other Dynamics" under the Brush tab menu.
Set everything to 0% and "off" as before. Under the Opacity Jitter slider, change the "Control" on that to "Fade." Then in the small box to the right of it, put in a value like you did before. 50 or 100 pixels, something like that. This works the same way, but it will actually fade out instead of just getting smaller.
They each have their different uses, and also work great together!
4. BRUSH PRESET PICKER DISPLAY
Did you know that you can change the way that you view your brushes in the brush preset picker?
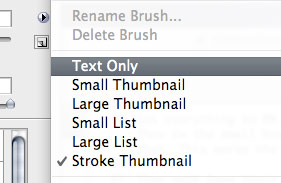
Select the brush tool and click on the arrow just to the right of the thumbnail that displays in that top area just below the menu. This is the brush preset picker.
Now, click on that small arrow on the top right. From here, you can load all your different brushes, of course, but you can also change the way that they're displayed. You have the following options:
- Text: This will only display the name of the brushes.
- Small Thumbnail: This displays small thumbnails of the brushes and the brush size just below it.
- Large Thumbnail: This displays larger thumbnails of the brushes and the brush size.
- Small List: This displays the size of the brush followed by the brush name. There is a VERY small preview, as well, but you may not be able to make out much.
- Large List: This displays a larger preview, followed by the size of the brush and the brush name.
- Stroke Thumbnail: This view displays the thumbnail, with the size of the brush beneath it. To the right, it shows you what the brush will look like when you paint with it (this is particularly handy for viewing some of my brush sets that were made to be "painted" with, like my textures brush set and special effects brush set).
* By the way, you can also change the SIZE of that brush preset picker window by clicking and dragging on the lower right corner.
5. ADDING TEXTURE TO BRUSHES
You can add texture to a brush fairly easily (although, working on high resolutions on slower computers, you may have a bit of trouble... adding texture to brushes this way can definitely slow the brush down).
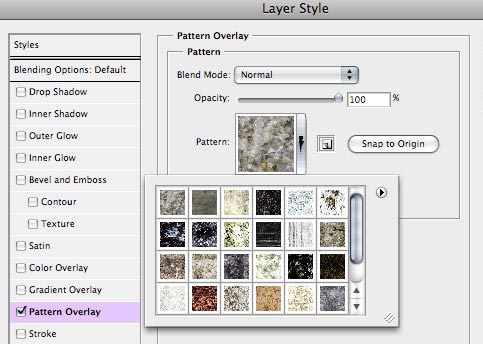
- Select the brush that you want to paint with.
- Then, hit F5 to bring up your brushes tab (unless you already have it open, of course).
- Click on "Texture"
- You can choose the texture that you want just like you would choose a pattern. Click on the small arrow next to the thumbnail, and it will bring up a list of all the available, currently loaded textures. (To load more, you would then choose the arrow on the top right of that window and choose from amongst the available listed pattern sets, at the bottom of that list.)
- You can change the scale of the texture using the "Scale" slider. This makes the texture smaller or larger.
- "Depth" specifies how deeply the paint penetrates into the texture. Type a number, or use the slider to enter a value. At 100%, the low points in the texture do not receive any paint. At 0%, all points in the texture receive the same amount of paint, therefore hiding the pattern.
- "Minimum Depth," therefore, determines the minimum depth to which paint will penetrate.
- "Depth Jitter" will make the depth change randomly as you paint, to give it more of a randomly splotchy look.
- You can also change the "Mode," which defaults to "Subtract." Play around with how each one looks in the preview at the bottom of the window.
6. CHANGING PART OF VECTOR BRUSH COLOR
With vector brushes, it's fairly easy to change the color to different parts of the brush.
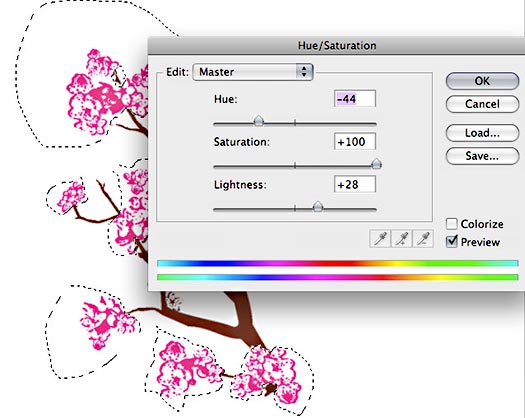
- First, use the brush on its own layer. (SHIFT-CTRL-N for PC or SHIFT-CMD-N for Mac to create a new layer.) Use whatever color you want.
- Next, take the lasso tool (L) and outline the parts of the design that you want to change thecolor of. For example, using the "circles" brush from this pack, you could outline just the big, center circle. This will select it.
- Tip on selecting: Holding SHIFT will allow you to ADD to your current selection, if you missed something. Holding ALT will allow you to SUBTRACT from your current selection, if you got something extra in there.
- Now, on the top menu, choose Image > Adjustments > Hue/Saturation.
- Slide the "Hue" slider back and forth until it reaches the color that you'd like to accompany the first one.
- Hit OK, and that's it! You now have a vector design in two distinct colors, using just one brush.
7. SMOOTHING BRUSH EDGES
Ever tried to paint with a brush and thought that the edges didn't seem as clean and smooth as they could be? The way that the hard-edged brushes in Photoshop's "Basic Brushes" are set, that just may happen when you're working at higher resolutions. So, how do you fix that?
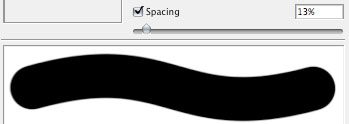
- Click on your brushes tab (or hit F5 to bring it up).
- Click on "Brush Tip Shape" and look at the preview image of the brush at the bottom. You'll be able to see those bumpy edges if you set the diameter at a high size.
- Now change the "Spacing" so that it's set to about 15% or lower. You can set it to 1% to make it perfectly smooth for those ultra-high resolutions, but if you have a slower computer, that may slow the brush down when you go to use it. So just find a nice percentage where you don't see all the bumpy edges.
That's it! I don't expect many of you to need this tip, but I remember back when I was first learning to paint digitally in Photoshop, and I couldn't figure out why the edges were coming out so bumpy sometimes. So I thought I'd share!
8. FLUCTUATING BRUSH COLOR
You know how the grass that comes with Photoshop fluctuates in color, each time that you use it? You can do that with any brush that you want! Here's how.
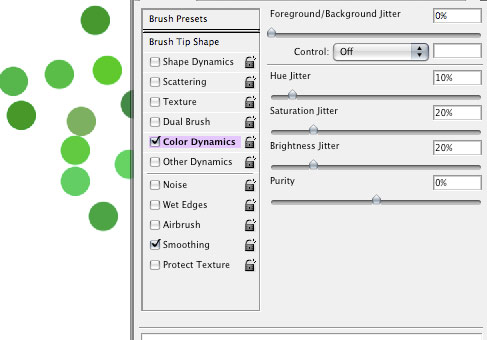
- Hit F5 to bring up your brushes tab
- Choose "Color Dynamics"
- One way to control the color is to choose two colors for your foreground and background colors. In the case of a blade of grass, say... light green and dark green. Then set the "Foreground/Background Jitter" bar somewhere between 25-75%. When you use your brush, it will now vary in color between the foreground and background colors that you chose!
- Another way (or you can do the former and then ALSO do this) is by using the Hue, Saturation, and Brightness Jitter sliders.
- Hue will change the color itself. Set it at about 10%, and your green will become both a blue-green and a yellow-green sometimes.
- Saturation will change the intensity of the color. Set it at 20% or so, and your green will switch between a bright, vivid green to a slightly grayed-out green.
- Brightness will change the darkness of the color. Set it at 20% or so, and your green will range between a light green and a darker green.
Play around with these settings, and you can achieve all kinds of color variations!
9. CHANGING BRUSHES PERSPECTIVE
Sometimes, you'll nee to change the shape of a brush in order to help them fit your model or scene. To do so, you should follow these tips.

- Open up the file with the image where you want to use the brushes.
- On the left side, click on the brush tool. Up on top, just under the main menu, it will show you the shape of the brush that you have selected. Click on the arrow to the right of that.
- Slide the "Master Diameter" slider to the right or left so that the brush is the size that you want it to be
- Hit F7 to make sure that your layers palette is showing. If something disappears, hit F7 again. If it appears, great.
- Down at the bottom of that, you'll see some little buttons. The one just to the left of the trash can is the "Create a New Layer" button. Click that.
- NOW click on the canvas with the brush you selected (making sure the color is what you want!).
- Over in that Layers Palette on the right, the new "Layer 1" layer should still be highlighted. By putting this brush on its own layer, you can now manipulate the brush and not the rest of the painting/image.
- Edit > Transform > Distort
- In that little box that shows up, click on the various corners of the image to distort the brush shape so that it's how you want it.
You can use this method to change the angles of things, the basic shape, as well as the perspective!
Say that you wanted to use one of my Arcane Circles brushes, and have it look like its lying on the floor. You would follow the same steps above, and when it comes time to drag the corners to distort the image, you would move the top two corners toward each other and down a bit. The bottom two corners, you would widen. This should make the circle look like it's sitting on a floor! Fine tune it by moving the corners as you see fit, to make it fit your specific floor angle.
10. SCATTERING BRUSHES
To scatter a brush shape about randomly in different sizes and at different angles, click on your brush tool. Select which brush you want to scatter.
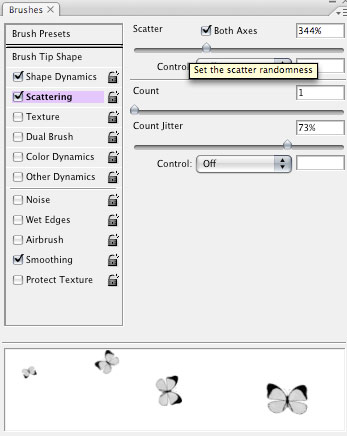
Click on the brushes tab up on the upper right corner of your Photoshop window (or hit F5).
Click on Shape Dynamics. Set your Size Jitter slider at about 50-75%. If you don't want your brush size to get smaller than a certain size, set your Minimum Diameter slider to whatever percentage you think fits.
To change the angle of the brush, set the Angle Jitter slider low or high depending on how much you want the brush to tilt to one side or the other. Make sure everything else is at 0% or Off. Click on Scattering, and then set the Scatter slider as low or high as you'd like. You can see how much it's scattering in the thumbnail. Click on Brush Tip Shape. Move the Spacing slider to the right until the brush is spaced how you'd like. Make sure the rest is at 0% or Off.
That's it! Now paint with your brush.
![]()
Photoshop CS5 & Photoshop CS5 Extended - New Painting Brushes
 Adobe Photoshop CS5 delivers breakthrough capabilities to help you create images with impact. Refine your
images with reengineered photography tools for removing noise, adding grain, and creating high dynamic
range (HDR) images. Get precise results when making complex selections. Remove any image element and
see the space fill in almost magically. Paint with naturally textured brushstrokes and realistic color blends. Learn more about Photoshop CS5.
Adobe Photoshop CS5 Extended software helps you create the ultimate images
for print, the web, and video. Enjoy all the state-of-the-art editing, compositing,
and painting capabilities in industry-standard Photoshop CS5, and experience
fast performance thanks to cross-platform 64-bit support. Also create 3D extrusions
for logos, artwork, and motion graphics; edit 3D objects with advanced tools; and create and enhance motion-based content. Learn more about Photoshop CS5 Extended.
Photoshop CS5 - Extraordinary Painting Effects
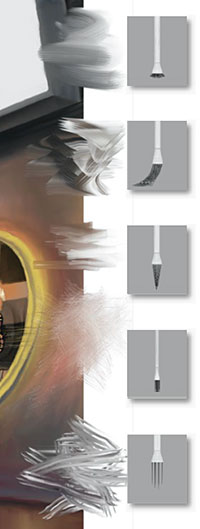 With a new Mixer Brush, a Bristle Tips feature, and a new mechanism for blending colors, Photoshop CS5 redefines the way you paint. You can take advantage of more natural and realistic painting effects, making it easy to take your imagery and designs in new artistic directions.
The Mixer Brush lets you define multiple colors on a single tip, and then mix and blend them with the underlying hues on your canvas, achieving creative results that rival traditional painting media. When starting with a photo original, you can use a dry, empty brush to blend the existing colors while at the same time adding a painterly effect to the image.
Mixer Brush settings provide extensive control over the wetness of the canvas colors, the load rate that determines amount of paint loaded on the brush, the mixing rate between brush and canvas colors, and whether the brush is refilled, cleaned, or both after each painting stroke.
In conjunction with these new mixing features, Photoshop CS5 incorporates unprecedented control over stroke characteristics of its painting tools with Bristle Tips. Bristle Qualities define key bristle properties such as shape, length, stiffness, thickness, angle, and spacing, which affect how the color is laid on the image as you paint.
The Bristle Brush Preview feature provides a visual representation of these changes, and you can save your tip configurations for future use, allowing you to build a customized collection of Bristle Tips to experiment with when using Photoshop brush tools. Read about all the new features in Photoshop CS5.
You can upgrade from any Suite to any Suite, as there are no more restrictions. Customers can upgrade to CS5 suites from up to 3 versions back. Customers can even step down; go from Photoshop Extended to Photoshop or from a Master Collection to another Suite. For full upgrade pricing on individual CS5 products visit the Adobe Store. See CS5 pricing in UK currency at the Adobe UK Store. Visit the Adobe Special Offers page to find deals. Save 80% on Adobe Student Editions. Try before you buy — download a free Photoshop CS5 trial.
![]()
Obsidian Dawn Photoshop Brushes Compilation CD
 The Obsidian Dawn Photoshop Brushes Compilation CD features one of every single Obsidian Dawn brush set. That means that it contains 100+ brush sets and thousands of brushes. It is constantly updated with the latest releases, so that the CD includes all of the most recently released brush sets.
The Obsidian Dawn Photoshop Brushes Compilation CD is only $10, with free shipping to those in the US! To purchase the CD, visit Obsidian Dawn Brushes and click on the "Buy Now" button. International shipping is also available for $5 extra.
Payment
Payments are made with Paypal. Paypal accepts credit cards, personal checks, and bank account transfers. Your order will be processed and shipped within 1 or 2 business days. Note: If you write a personal check, the CD will not be mailed until it clears.
Copyright Usage
The brushes on this CD are available for personal or commercial usage. However, Stephanie does ask that in return for using them, you credit her and/or link back to her website (www.brushes.obsidiandawn.com) wherever possible.
 If you are using them commercially and do not have a way to credit or link back, there are commercial licenses available for you to purchase, as well. Once you have a commercial license on a brush set, you have full rights to be able to use the brushes in your designs, without needing to give credit.
Included
Included on the CD are all of Obsidian Dawn's brush sets. Many of the sets are high resolution. Here's just a small sampling of what you'll receive:
* glitter
* gradient designs
* special effects
* swirls
* paisley elements
* tribal designs
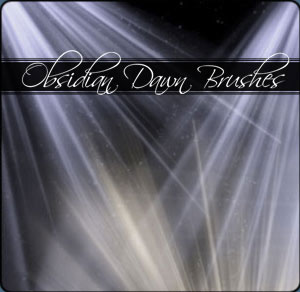
* light rays
* fairy wings
* sparkles
* eyelashes
 * hieroglyphs
* kanji
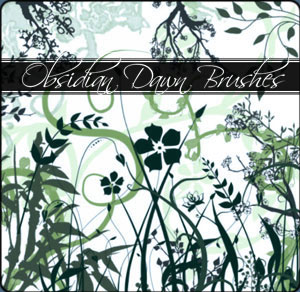
* vector foliage
* lightning
* cracks
* wings
* feathers
* flowers
* clouds
* snow & flakes
* frames & borders
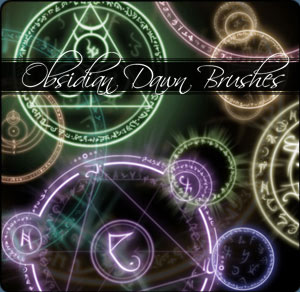
* arcane circles
* hair strands * stitching
* flames
* tech
* dripping
* hearts
* splats & splatters
* lace
* textures
* urban designs
* butterflies
Not familiar with Stephanie's work?
All of her sets are free to download at Obsidian Dawn Brushes. Feel free to download a set or two and try them out while you wait for your CD to arrive!
Why only $10?
Then price of $10 covers the cost of shipping and materials to make the CD, with very little extra left over. Why is it so cheap?
All of Stephanie's brush sets are free and will remain free. The Obsidian Dawn Photoshop Brushes Compilation CD is being offered merely as a convenience for those that do not wish to spend hours and hours downloading Stephanie's 100+ brush sets. So, Stephanie wanted to keep the price as low as possible to remain in the same spirit as offering her brushes for free.
This is her gift to the digital artistic community. She enjoys what she does immensely, and gets great pleasure from allowing everyone the use of her brushes. Most of these sets are professional quality, so you're getting a great deal!
Featured
Stephanie's work has been featured in several magazines.
* Adobe's Proxy Magazine, Vol 1 No 4
* Photoshop Creative Magazine: Issues 6, 25, and 31
 * Kamera och Bild (Swedish) - Issue 3, 2007
* Creative TECHniques - Issue 7, Spring 2008
* Photoshop User - Oct/Nov 2007
She has also been creating exclusive brush sets for several websites, including Photoshop Support, The Photoshop Roadmap, and for the National Association of Photoshop Professionals (NAPP) website.
Additionally, Stephanie's brushes have been featured in a retail product! For all of you scrapbookers out there, several of Stephanie's brush sets are available in IScrapbook.
Order the Obsidian Dawn Photoshop Brushes Compilation CD Now!
![]()
Free Photoshop Frames And Borders Brush Set From Stephanie
 Stephanie from Obsidian Dawn has created a marvelous set of 28 brushes consisting of frames and borders. This is an exclusive set just for PhotoshopSupport.com. Simply go to the Photoshop Frames And Borders Brush Set Page to download the free brushes. The set contains some beautiful Polaroid frames, a stamp border, bamboo, rope and decorative borders, filmstrips, fabric, and grunge.
The page also features a great tutorial by Stephanie that will walk you through installing and using the Frames & Borders Free Photoshop Brush Set. The tutorial includes tips on using specific brushes from the set to insure that they come out their best. You'll find a description of each of the 28 brushes at the end of the tutorial. And if you are already familiar with how to install and use Photoshop brushes, just skip down to the "Using the Brushes" section.
More Free Photoshop Brushes From Stephanie
We've collected the most recent of Stephanie's original brushes on a special Obsidian Dawn Photoshop Brushes Page, with big preview images to give you an idea of each set. You'll also find her great random tips for using Photoshop Brushes.
BONUS- Valentine Hearts & Valentine Photoshop Brush Gifts From Stephanie!
![]()
Free High Resolution Photoshop Brushes
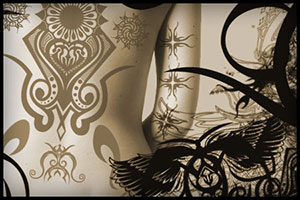 Why would you need Photoshop brushes in high resolution? If you print something at 200 or 300 dpi then you'll need graphics that can be sized accordingly, and that's where high resolution brushes excel. They were meant to be used in documents where the size would be much more substantial than just a web page element or a simple background. So download some of these exquisite free brushes and create something stunning in high res right now!
Visit our new Free High Resolution Photoshop Brushes Directory and you'll find an amazing collection of free Photoshop brush sets from master Photoshop brush designer Jason Gaylor of Designfruit fame, and some very beautiful free high res sets from Bittbox.
![]()
SiteGrinder Photoshop Plugin - Create Websites Instantly
 There often seems to be a strict division of labor within the world of web design and development. Creative professionals tend to stick to the Photoshop domain, while those well-versed in scripting are left to the task of implementing their work. Indeed, the two realms are quite different from each other, to which any of us even vaguely familiar with either can easily attest.
Essentially, Photoshop is a no-holds-barred design studio, offering the artist a seemingly endless array of creative options. On the other hand, HTML, CSS, Java and the like follow strict rules of engagement, requiring the developer to take any number of esoteric concerns into consideration in order to ensure that designs are properly displayed on the web.
Turn Photoshop Into A Complete Web Design Tool
SiteGrinder seeks to bridge this gap between design and development. Basically, this program turns Photoshop into an easy-to-use and fully functional web design tool. With SiteGrinder, designers will now have the freedom to totally let their creativity loose and then, without skipping a beat, transfer their designs to the web. Bringing esthetic concerns together with more practical considerations, this program is an amazingly powerful tool that would make a fantastic addition to any web designer's bag of tricks.
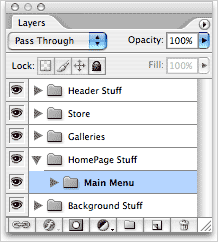 Generate Your Web Pages Directly From Photoshop
By generating web pages directly from Photoshop, you'll be able to spend much more time on the creative end of the spectrum, since you'll know right off the bat how well particular designs will translate to the web. No more going back to the Photoshop drawing board after getting a phone call from your development team, telling you that what you had envisioned doesn't have a chance of being displayed on the web. You can immediately visually and interactively test your designs, which permits you to then make changes to either esthetics or functions while it's still relatively early on in the design process.
Pricing and Availability
Mac OS X and Windows versions of the SiteGrinder unlockable demo are available now via download. SiteGrinder can be ordered from Media Lab's online store.
![]()


