![]()
![]()
![]() Try a 30-day free trial of Photoshop or any Adobe Creative Suite product.
Try a 30-day free trial of Photoshop or any Adobe Creative Suite product.
![]()
![]()
How To Create A Surreal Image - Step-by-Step Photoshop Tutorial
FEBRUARY 22, 2013
 From Photoshop Daily: How to create a surreal Photoshopped image. Recreate this breathtaking surreal image using Photoshop. Before starting this project, try finding an assortment of stocks and resources. The aim here is to create something fantastical while maintaining a level of realism.
But don’t be afraid to deviate or experiment with your own ideas. This tutorial is for intermediate users with excellent knowledge of using the tools provided in Photoshop. We recommend using a graphics tablet to speed up workflow.
Build the basic layout
Our model is from Dreamstime (image no: 13151452). Begin by clipping the model with your preferred extraction method, before pasting her into your background (we are using a pre-composited background from Dreasmtime, image no: 9324588). Cut out the mushroom to use later. Using a graphics tablet, paint over the moon and mushroom by selecting similar tones.

Retouch the model
This step requires some experimentation to achieve the surreal colouring. Create a gradient with three to five colours of your choice and set it to Radial. On a clipping mask (Cmd/Ctrl+Opt/Alt+G) click and drag out a gradient over the model. Set the blending mode to Lighten. Duplicate this layer, change some hues (Cmd/Ctrl+U) and experiment with blending modes like Soft Light.

Finish retouching and add elements
After the colouring portion, take the original image of the model and place it over the other layers. Add a Filter>Other>High Pass around 10-20px and set to Soft Light. We also added adjustment layers and painted on a layer mask to reveal vital details. We also clipped out the mushroom from the original background and placed two more back into the scene.

Begin blending
We need to blend everything more accurately into the surroundings. Select a soft-edged brush (100 to 200px, 20% Opacity) with the colour set to ‘#161c24’. On a clipping mask, begin to paint over the elements so they appear more backlit. Adjust the opacity and blending mode as needed. Create a clipping mask and paint in some brighter tones for rim lighting around the outside of the elements. Using the Color Picker, select various hues in the piece and paint over the woman and mushrooms. Set the blending mode to Soft Light. Be sure to paint in a rough shadow underneath the woman.

Paint the grass
Take a small hard-edged brush (10 to 20px) and use the Color Picker to sample tones from the grass around the model’s feet. Slowly paint around the feet to mimic the surrounding grassy areas. If you don’t have a tablet, try the Dune Grass brush in the Default set to generate an easy workaround. Use this technique for around the mushrooms and any other elements we add later on. Implementing these fine details adds to the overall image. Do it in many areas so the level of detail and blending is evident.

Add mountains
The background looks a bit dull and flat, so we’re going to add some faded mountains to bring a sense of depth and add to the surrealism of the scene. Create a new layer just above the background and add in your mountain stock (we used Dreamstime, image no: 1252648, but there are other options on the disc too). Add a layer mask and use a Soft brush in black at around 20% Opacity to start blending it. We set the blending mode to Vivid Light in this case, but experiment as you see fit.

Liven up the sky
The sky here is also very bland, so let’s bring in some more prominent clouds. The key is to simply find a cloud stock with a good contrast between the sky and clouds (again, there are options on the disc and we used Shutterstock, image no: 63948211). Use Cmd/Ctrl+L for Levels and drag the sliders around to maximise the contrast. Once it looks good, simply set the blending mode to Screen and bring in a layer mask to blend them in more seamlessly. The screenshot here shows the clouds before applying the Screen blend. We will add more details using this technique later.

Surreal sparkle touches
On the original composite background used, we clipped some of the simple sparkles coming from the original mushroom. To create more streaks, simply take the Smudge tool at 5 to 10px, 90% Strength and hold Shift to pull up some more vertical lines. Add in more sparkles by adding a Scatter to a 4px brush in the Brush palette and set the Count to 1 as seen in the screenshot. If brushing on black background, set to Screen or Color Dodge blending mode to achieve the desired effect.

Hairpiece
To build on the surreal look, use the Polygonal Lasso tool to cut out the bun from her hair and copy that layer. Here, we placed it on top on a new layer to give the impression of longer hair being tied up. To blend, use a 3px brush and Opt/Alt-click on a tone in the hair. Slowly brush some strands back in to remove the choppiness from the cutout. We also added a small branch in her hair from a Dreamstime vine (image no: 1238379). There are also some leaves images on the disc.
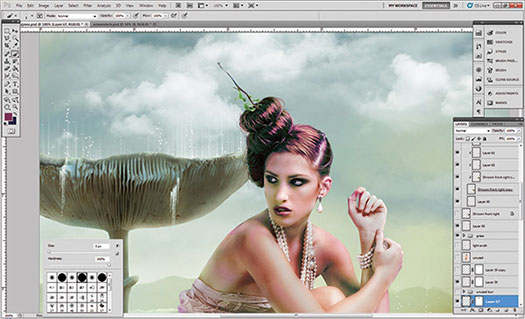
Push the details
We cut out a frog stock (there are some samples of the disc; ours is from sxc.hu, image no: 554538) and employed some of the same blending techniques. Make sure to darken the back of it using Hue/Saturation and adjust the lighting so it hits the edges. Since it’s up front, add a slight Gaussian Blur at 5-7%. Draw in some grass again around the frog and other new elements to improve blending. Also explore some of the colouring techniques on them used early to add to the overall feeling. Also added during this stage is the dragonfly photo of our own and a blurred vine up front (10 to 15%) from Dreamstime (image no: 1313045).

Painting layers and atmosphere
Let’s paint in some mist and more sparkles using the supplied brush set. The key is to add some touches to the atmosphere that seem a bit empty or lacking. The set works well with a tablet due do its variation. No need to use blend modes here, just select white for your Foreground colour and carefully paint more details. They can easily be used with a mouse as well. The screenshot shows the painting layer on a black Background as well.
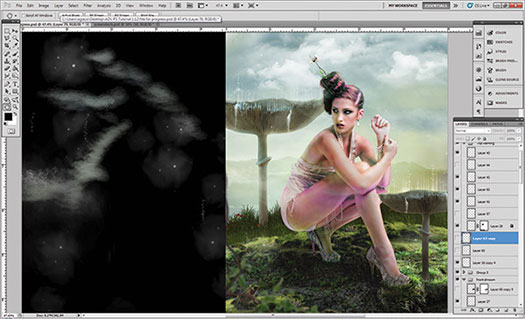
Foliage
In order to blend the model a bit more with the surroundings, gather various vine and foliage stocks to place around her. We also painted some simple thin branches in a couple tones of brown and added leaves to them. Don’t worry about making it perfect since errors in small elements aren’t very discernable. Position them so it flows around her body and looks more elegant rather than messy. Also be sure to create a shadow underneath in the right spots to add some dimension to the foliage.
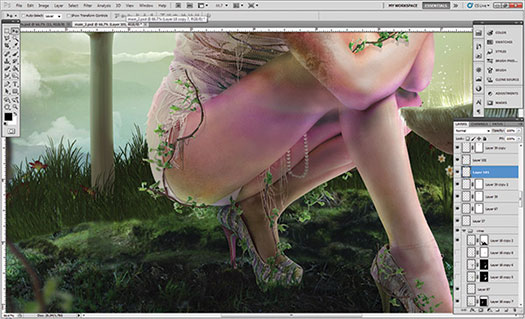
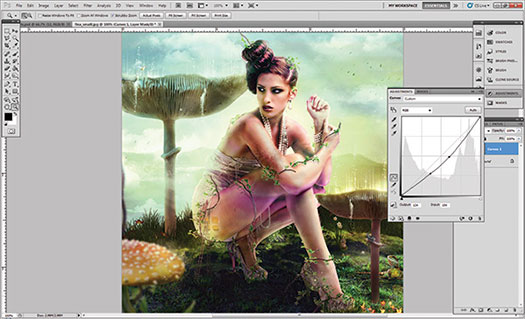
Adjustment layers and finalising
Last, we need to add some drama to the image using adjustment layers. Using your preferred method, first add some contrast. In this case we used a Curves layer. We added some blue tones using Color Balance, brought out some warm highlights with selective colour, and also a black/white Gradient Map set to Luminosity among others. A PSD marked as adjustment layers is included on the disc in order to obtain all the adjustments made on this final image.

Creative Cloud Discount - Adobe Creative Cloud 40% Off Discount
 Current Creative Suite users - Save 40% off the first year on Adobe Creative Cloud.
Offer available to all registered users of individual products and suites, CS3 or later. Not available for education or volume licensing customers.
With Adobe Creative Cloud, a simple monthly membership gives you the entire collection of CS6 tools and more. Love print? Interested in websites and iPad apps? Ready to edit video? You can do it all. Plus, Creative Cloud members automatically get access to new products and exclusive updates as soon as they’re released. And, with cloud storage and the ability to sync to any device, your files are always right where you need them. Creative Cloud is available for individuals or teams.
posted by Jennifer Apple | facebook | RSS feed | bookmark | comment | twitter
![]()
onOne Software For Digital Photographers – Exclusive 15% Discount
 onOne Software is the fastest and easiest way to make your images extraordinary. They work everywhere – with Photoshop, Lightroom, Aperture, and as standalone applications. Use discount code PSSPPT06 to get 15% off any onOne product.
Perfect Photo Suite
- Everything You Need to Realize Your Photographic Vision
- Seven integrated products for your photography workflow
- Perfect Effects: Create images with impact
- Perfect Portrait: Simply powerful retouching
- Perfect Resize (Genuine Fractals): Enlarge images for print
- Perfect Layers: The power of layers without Photoshop
- Perfect Mask: The essential cut-out tool
- FocalPoint: Put the focus where you want
- PhotoFrame: Borders, backgrounds, textures and adornments
Perfect Effects - Add popular HDR and retro looks
Perfect Portrait - Automatic skin smoothing and blemish removal
Perfect Mask - Easily cut around the tough stuff like hair, glass, and tree branches
Perfect Resize - Enlarge mobile phone to DSLR images up to 1000%
FocalPoint - Create the look of fast, expensive lenses instantly
PhotoFrame - Complete library of more than 1000 professional design elements
Perfect Layers - Extend the image editing power of Lightroom & Aperture
![]()
Special Deals On Nik Software Photoshop Plugins - Viveza, Complete Collection - 15% DISCOUNT COUPONS
 Follow the links below and a 15% discount will be AUTOMATICALLY APPLIED to any purchase you make, or use our exclusive discount coupon code - NIKPSS - during the checkout process at Nik Software for the instant 15% discount. This exclusive discount coupon code can be applied to all the latest Nik Software Photoshop plugins, including Silver Efex Pro, Color Efex Pro, Viveza, HDR Efex Pro, and The Complete Collection (big savings).
The Complete Collection features products with Nik Software's patented U Point® technology, giving photographers the most powerful tools for precise and natural photographic enhancements and corrections without the need for complicated selections or layer masks.
The Complete Collection is offered in two editions: (1) the Complete Collection Ultimate Edition includes support for every plug-in to work in Photoshop, Lightroom, and Aperture, and offers Color Efex Pro 3.0 to work in Capture NX 2 as well. (2) the Complete Collection for Lightroom and Aperture includes support for each plug-in to only work in Lightroom and Aperture. Click here to compare both editions
Color Efex Pro
 52 photographic filters with over 250 effects for professional quality images.
Completely Original. Completely Indispensable.
Nik Software Color Efex Pro 3.0 filters are the leading photographic filters for digital photography. The award-winning Color Efex Pro 3.0 filters are widely used by many of today's professional photographers around the world to save time and get professional level results. Whether you choose the Complete Edition, Select Edition, or Standard Edition, you’ll get traditional and stylizing filters that offer virtually endless possibilities to enhance and transform images quickly and easily.
Patented U Point technology provides the ultimate control to selectively apply enhancements without the need for any complicated masks, layers or selections. Control color, light and tonality in your images and create unique enhancements with professional results. With 52 filters and over 250 effects found in Color Efex Pro 3.0, you can perform high quality retouching, color correction, and endless creative enhancements to your photographs. Download a free Trial version.
Viveza
 The most powerful tool to selectively control color and light in photographic images without the need for complicated selections or layer masks.
Two of the most important factors in creating great photography are color and light. Mastering the art of selectively correcting or enhancing each of these is now possible for every photographer without the need for complicated masks or selections, or expert-level knowledge of Photoshop. Integrating award-winning U Point technology, Viveza is the most powerful and precise tool available to control light and color in photographic images.
U Point powered Color Control Points, placed directly on colors or objects in an image (such as sky, skin, grass, etc.), reveal easy-to-use controls that photographers can use to quickly adjust brightness, contrast or color in a fraction of the time needed by other tools. With Viveza you’ll spend more time shooting photographs and save hours of image editing. Download a free Trial version.
Silver Efex Pro
 Complete power and control to create professional quality black and white images in one convenient tool.
Silver Efex Pro from Nik Software is the most powerful tool for creating professional quality black and white images from your photographs. For the first time, all the advanced power and control required for professional results have been brought together in one convenient tool.
Featuring Nik Software’s patented U Point technology to selectively control the tonality and contrast of the image, Silver Efex Pro includes advanced imaging algorithms to protect against unwanted artifacts, a comprehensive collection of emulated black and white film types, a variable toning selector for adding traditional toning techniques, over 20 one-click preset styles, and a state-of-the-art grain reproduction engine that help produce the highest quality black and white images possible from your color images while providing more freedom to experiment. Download a free Trial version to use Silver Efex Pro.
HDR Efex Pro
 Experience the power, control, and creative expression of HDR. This all in one toolkit lets you achieve your best HDR images ever, ranging from the realistic to artistic.
HDR Efex Pro is the essential new standard for creating amazingly high quality realistic to artistic HDR images with a revolutionary new all-in-one workflow. HDR Efex Pro includes a vast selection of one-click visual presets for incredibly fast results, advanced tone mapping algorithms, powerful and detailed HDR controls, and patented U Point® technology
Follow our discount coupon links, or enter our exclusive discount coupon code - NIKPSS - during the checkout process at Nik Software for the instant 15% discount. This exclusive discount coupon code can be applied to all the latest Nik Software Photoshop plugins, including Silver Efex Pro, Color Efex Pro, Viveza, HDR Efex Pro, and The Complete Collection (big savings).
![]()
Exclusive 15% Discount On Topaz Plugins, Bundles And Upgrades
 Enter our exclusive discount coupon code PHOTOSHOPSUPPORT during the checkout process at Topaz Labs for an instant 15% discount on any Topaz product, including bundles and upgrades.
Topaz Labs Photoshop plug-ins are specifically designed to expand a photographer's creative toolbox by harnessing powerful image technology developments. Photographers everywhere are now taking advantage of the creative exposure effects, artistic simplification, unique edge manipulation, and top-of-the-line noise reduction offered in Topaz products. The Topaz Photoshop Plugins Bundle is a super powerful Photoshop plugins package that includes the following Topaz products:
Topaz Adjust
Deliver stunning and dynamic images with this uniquely powerful plug-in that features HDR-like abilities and enhances exposure, color and detail.
Topaz InFocus
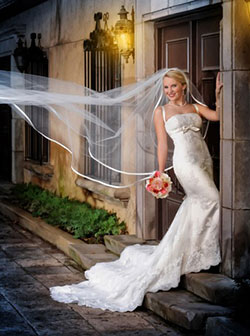 Topaz InFocus uses the latest advancements in image deconvolution technology to restore, refine and sharpen image detail.
Topaz Detail
A three-level detail adjustment plug-in that specializes in micro-contrast enhancements and sharpening with no artifacts.
Topaz ReMask
The fastest and most effective masking and extraction program with one-click mask refining.
Topaz DeNoise
Highest-quality noise reduction plug-in that removes the most noise and color noise while preserving the most image detail.
Topaz Simplify
Provides creative simplification, art effects, and line accentuation for easy one-of-a-kind art.
Topaz Clean
Take control of the detail depth of your images with extensive smoothing, texture control and edge enhancement tools.
Topaz DeJPEG
Drastically improves the quality of web images and other compressed photos.
Learn more about the Topaz Photoshop Plugins Bundle. Download a free trial version.
![]()
Site Grinder Web Design Tool
 There often seems to be a strict division of labor within the world of web design and development. Creative professionals tend to stick to the Photoshop domain, while those well-versed in scripting are left to the task of implementing their work. Indeed, the two realms are quite different from each other, to which any of us even vaguely familiar with either can easily attest.
Essentially, Photoshop is a no-holds-barred design studio, offering the artist a seemingly endless array of creative options. On the other hand, HTML, CSS, Java and the like follow strict rules of engagement, requiring the developer to take any number of esoteric concerns into consideration in order to ensure that designs are properly displayed on the web.
Turn Photoshop Into A Complete Web Design Tool
SiteGrinder seeks to bridge this gap between design and development. Basically, SiteGrinder turns Photoshop into an easy-to-use and fully functional web design tool. With SiteGrinder, designers will now have the freedom to totally let their creativity loose and then, without skipping a beat, transfer their designs to the web. Bringing esthetic concerns together with more practical considerations, SiteGrinder is an amazingly powerful tool that would make a fantastic addition to any web designer's bag of tricks. Mac OS X and Windows versions of the SiteGrinder unlockable demo are available now via download.
![]()
lynda.com Online Training Library - View Free Video Clips
 Subscriptions to the lynda.com Online Training Library provide anytime access to tens of thousands of video tutorials covering Photoshop, Illustrator, Dreamweaver, web design, digital imaging, 3D, digital video, animation, and many other topics. View free video clips.
For less than a dollar a day, members have the opportunity to stay current and keep skills sharp, learn innovative and productive techniques, and gain confidence and marketability - all at their own pace. Premium subscriptions include instructors’ exercise files so that members can follow along with the exact examples onscreen. Customers learn at their own pace and may stop, rewind, and replay segments as often as necessary. View some free video clips (high resolution).
![]()


